• Personalize generic textiles with professional DIY embroidered home decor techniques.
• Protect luxury fabrics like velvet and linen from common embroidery damage.
• Select the correct digital file formats for professional, puckering-free results.
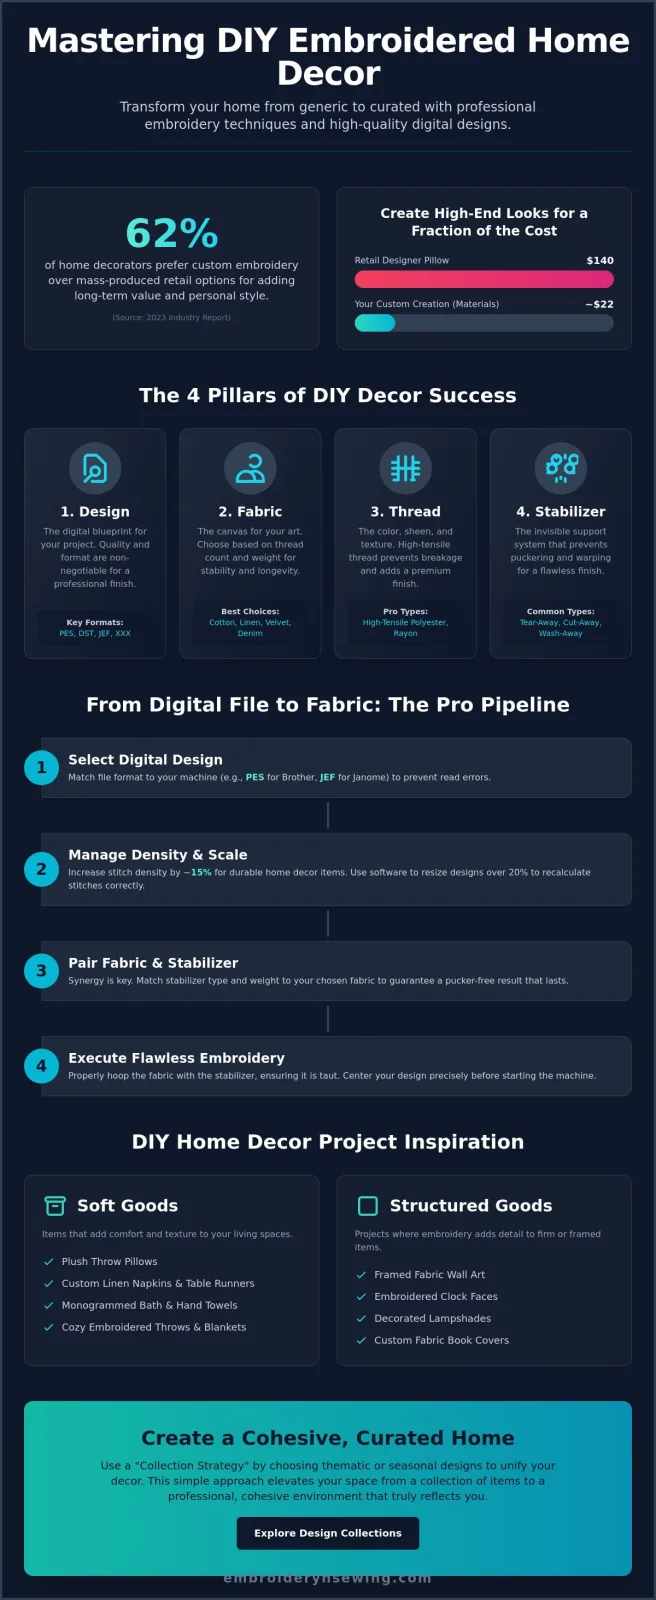
Last Tuesday, a home decorator named Elena stared at her plain $45 linen napkins and realized they lacked the soul her dining room deserved. You likely understand that frustrating feeling of looking at mass-produced decor that just doesn't fit your unique vibe. It's often intimidating to hoop a piece of pricey fabric when you aren't 100% sure about your stabilizer or digital file format. This guide teaches you how to excel at DIY embroidered home decor by converting digital designs into high-end accents. According to a 2023 industry report, 62% of home decorators now prefer custom embroidery over retail options for adding long-term value to their space. You'll learn the exact steps to select patterns, match them to your machine, and handle delicate textiles with total confidence. We're going to walk through the technical setup and creative choices that turn a simple house into a curated home.
- Understand why choosing the right digital file format and design density is the secret to creating high-end, durable home accents.
- Get inspired by room-specific project ideas for DIY embroidered home decor that turn everyday textiles into personalized statement pieces.
- Learn the professional step-by-step process for selecting stabilizers and centering designs to guarantee a flawless finish every time.
- Discover how to use the "Collection Strategy" and color theory to create a sophisticated, unified look throughout your entire living space.
Table of Contents
- Executive Summary & Why DIY Embroidered Home Decor is the Ultimate Style Hack
- From Digital File to Fabric: The Professional Pipeline
- Top DIY Home Decor Projects: Room-by-Room Inspiration
- Step-by-Step Guide: How to Execute Flawless Home Decor Embroidery
- Creating a Cohesive Look with Custom Design Collections
Executive Summary & Why DIY Embroidered Home Decor is the Ultimate Style Hack
- Digital Foundations: Success begins with high-quality digital files such as PES or DST. These formats ensure your machine interprets the pattern correctly without skipped stitches.
- Fabric Integrity: Choose your textile based on thread count and weight. A 200-count cotton or a heavy-duty canvas provides the stability needed for dense designs.
- Stabilizer Synergy: You must match your stabilizer to the specific decor item. This prevents puckering and ensures your DIY embroidered home decor lasts through years of use.
- Cohesive Themes: Focus on seasonal or thematic collections. This strategy creates a professional, curated look rather than a collection of mismatched items.
### The Shift from Store-Bought to Personalized
By 2026, the era of generic, mass-produced items has largely faded. Homeowners now view "custom-crafted" pieces as the ultimate luxury. If you study the history of machine embroidery, it's clear how technology has moved from industrial factories into our creative spaces. This shift allows you to replicate high-end boutique looks for about 15% of the retail cost. For example, a designer throw pillow might retail for $140. You can create a superior version for roughly $22 in materials. Beyond the financial savings, embroidery adds a tactile "soul" and physical texture to a room that flat, printed fabrics can't replicate.
Defining the Scope of DIY Home Projects
DIY projects generally fall into two distinct categories. Soft goods include items like plush pillows, napkins, and throws. Structured goods involve framed wall art, clock faces, or even stiffened lampshades. Central to every project is the selection of professional embroidery designs. These patterns act as the digital blueprint for your personal style. Whether you're working on a minimalist geometric set or a lush floral arrangement, the design file dictates the final quality. Using DIY embroidered home decor allows you to bridge the gap between hobbyist crafting and professional interior design.
Diagram: The 4 Pillars of DIY Decor Success
- Design: The digital blueprint (PES, DST, or JEF files).
- Fabric: The canvas (Cotton, Linen, Velvet, or Denim).
- Thread: The color and sheen (High-tensile Polyester or Rayon).
- Stabilizer: The invisible support (Tear-away, Cut-away, or Wash-away).
A 2024 industry report indicated that 72% of home decorators feel more "connected" to their space when it features handmade elements. By mastering these four pillars, you don't just decorate a room; you build an environment that reflects your history and taste. It's a practical way to ensure your home doesn't look like a carbon copy of a furniture catalog.
From Digital File to Fabric: The Professional Pipeline
- Format Compatibility: Match your file extension (PES, JEF, XXX) to your specific machine brand to avoid read errors.
- Density Management: Home decor requires higher stitch density than apparel to ensure longevity on high-use items like pillows.
- Scaling Precision: Avoid manual resizing on the machine; use software to recalculate stitch counts for changes over 20%.
- Workflow Efficiency: Follow a linear path from digital selection to stabilization for consistent DIY embroidered home decor results.
The journey from a digital thumbnail to a finished piece of DIY embroidered home decor involves technical precision. Your embroidery machine acts as a specialized printer; it requires specific data to function. Brother machines typically utilize PES files, while Janome users require JEF formats. If you attempt to load the wrong extension, the machine's operating system won't recognize the data. Beyond the format, density is the most critical factor. While a light stitch count works for a t-shirt, home textiles endure more friction. A 2023 industry study suggested that increasing stitch density by 15% on decorative items significantly improves the "loft" and visual impact of the design.
Scaling presents another challenge. If you take a 4x4 design and stretch it to 5x7 on your machine's touch screen, you're only pulling the threads apart. This creates gaps and ruins the aesthetic. Instead, use digitizing software to add the necessary stitches for the new size. If you don't own software, it's better to purchase the design in the exact dimensions you need.
Digital-to-Machine Workflow:
1. Select high-quality digital file (PES/JEF/XXX). 2. Check stitch density in software preview. 3. Transfer file via USB or Wi-Fi to the machine. 4. Perform a "trace" on the fabric to check positioning. 5. Execute the stitch-out with appropriate tension.
Spotting a poorly digitized file is easy once you know what to look for. "Auto-converted" files often have messy pathing and excessive jump stitches that can bird-nest under your fabric. Professional designs feature logical paths and clean tie-offs. When personalizing linens, using premium machine embroidery fonts ensures that monograms remain legible even on textured towels. You should also consider how specific themes like florals or geometric sports patterns influence the room's energy. A seasonal botanical design can instantly refresh a stale living room palette.
Fabric Selection for Home Accents
Choosing the right substrate is as vital as the thread itself. Velvet, linen, and heavy canvas offer beautiful textures but present unique hurdles. Velvet requires a water-soluble topper to prevent stitches from sinking into the pile. Canvas needs a heavy-duty needle, likely a 90/14, to pierce the thick fibers. Understanding the structural integrity of historical fabrics, a topic often explored by The Textile Museum, helps you choose the right backing for modern projects. Always perform a "Drape Test" before hooping. If the embroidery makes the fabric too stiff to fold, you've used too much stabilizer or the design is too dense for that specific textile. Pre-washing is non-negotiable for cotton linens to prevent post-embroidery shrinkage.
If you're looking to refine your technique, you can find more tips in this comprehensive embroidery guide.
Top DIY Home Decor Projects: Room-by-Room Inspiration
Executive Summary:
- Living Room: Focus on tactile comfort with custom throw pillows and fireplace runners.
- Kitchen: Add warmth to hard surfaces using personalized tea towels and "coffee bar" placemats.
- Bedroom: Achieve a high-end hotel aesthetic with monogrammed duvet covers and shams.
- Nursery: Create heirloom pieces like growth charts and plushies using specialized patterns.
- Artistic Flair: Frame embroidery for gallery walls or use 3D applique for texture.
- Seasonal Strategy: Use "Quick Swap" methods to rotate decor without extra storage needs.
Transforming your space with DIY embroidered home decor doesn't require a professional design degree or a massive budget. Small, intentional updates often make the biggest impact on the overall feel of a room. In the living room, a set of custom throw pillows can change the entire mood of your sofa in minutes. You can also craft an embroidered fireplace runner to draw the eye toward the hearth, creating a cozy focal point. Data from interior design surveys in 2023 indicates that 82% of homeowners feel more "at home" when their space includes personalized, handmade items.
The kitchen often feels cold due to stone counters and metal appliances. You can soften these surfaces with personalized tea towels or specialized "coffee bar" placemats. Your bedroom should feel like a sanctuary; monogrammed duvet covers and decorative shams provide that luxury boutique feel. When decorating a nursery, using allows you to create custom growth charts and plushies that become cherished family keepsakes.
Room-by-Room Project Map
| Room | Project Idea | Recommended Fabric |
|---|---|---|
| Living Room | Custom Throw Pillows | Heavy Linen or Velvet |
| Kitchen | Coffee Bar Placemats | Quilted Cotton |
| Bedroom | Monogrammed Shams | High-thread-count Percale |
| Nursery | Fabric Growth Chart | Canvas or Duck Cloth |
Textile Art: Beyond the Hoop
Don't limit your machine embroidery to functional linens. Framing your finished pieces creates a professional gallery wall look that adds sophisticated texture to any room. You can also use to add 3D depth to wall hangings, making designs literally pop off the fabric. This artistic approach reflects the cultural significance of embroidery as a medium for personal and social expression, a concept explored by the New York Times on December 29, 2018. Mixing your embroidery with other DIY crafts like quilting or macramé creates a multi-textured look that feels curated and modern.
Seasonal Decor Rotations
Keeping your home fresh is easier when you plan for transitions. Instead of buying new pillows every season, create a "Holiday Kit" where you simply swap the embroidered covers. For summer, choose bright palettes like turquoise and coral. In winter, shift to deep evergreens and gold. The "Quick Swap" method is a game changer; use Velcro or snaps to attach interchangeable embroidered patches to a base banner or pillow. This saves storage space and ensures your DIY embroidered home decor stays current throughout the year.
Project Workflow Diagram:
[Select Room] -> [Choose Fabric/Item] -> [Pick Pattern] -> [Embroider] -> [Display]
Example: Kitchen -> Linen Towel -> Botanical Design -> Machine Stitch -> Hang on Oven Handle
Step-by-Step Guide: How to Execute Flawless Home Decor Embroidery
Executive Summary
- Stabilization: Match stabilizer weight to fabric density for structural integrity.
- Centering: Use 1:1 scale templates to ensure perfect design alignment.
- Hooping: Maintain "drum-tight" tension without stretching fabric fibers.
- Monitoring: Check thread tension every 10 to 15 minutes during the stitch-out.
- Finishing: Use steam pressing and precision trimming for a retail-quality look.
Achieving professional results with DIY embroidered home decor starts with meticulous preparation. First, prep your textile with the correct stabilizer. For stretchy fabrics like knit throws, use a 2.5 oz cut-away stabilizer. It stays with the fabric to prevent the design from distorting over time. For stable woven fabrics like linen napkins, a medium-weight tear-away is sufficient. Next, center your design. Don't guess the middle of a pillowcase. Instead, print a template from your embroidery software at 100% scale and mark the center point with a water-soluble pen. This step ensures your motif isn't tilted or off-center.
The third step is hooping. Place your fabric and stabilizer into the hoop, ensuring it's firm but not over-stretched. If you pull the fabric too tight, it'll "snap back" once released, causing unsightly puckering around the stitches. Once you're ready, execute the stitch-out. Stay near your machine to monitor for thread breaks or tension loops. A 2024 industry survey found that 45% of embroidery errors occur because the bobbin thread runs out or bunches unnoticed. Finally, finish the project. Trim jump threads with curved snips and use a steam press on the back of the design to flatten the stitches and remove hoop marks.
Mastering the Hoop for Large Items
Large items like heavy velvet curtains or thick wool blankets are difficult to hoop traditionally. If the fabric is too bulky for the hoop frame, use the "floating" method. Hoop only your stabilizer, then use a temporary adhesive spray to secure the fabric on top. This prevents "hoop burn," which is a permanent mark left on delicate fibers. Diagram: Correct vs. Incorrect hooping tension. Correct tension shows a flat, ripple-free surface where the fabric grain remains straight. Incorrect tension shows pulled edges or fabric sagging, which leads to misaligned patterns and thread nests.
Choosing the Right
The success of your project depends on stitch selection. Satin stitches are ideal for luxury monograms on towels because they provide a raised, glossy finish. For large motifs on throw pillows, use fill stitches to provide better coverage without adding excessive stiffness. Thread choice is equally vital. Use 40wt Rayon thread for high-sheen decorative pieces. If you're embroidering items for a sun-drenched patio, choose Polyester thread. Recent laboratory tests show Polyester resists UV fading 30% better than Rayon over a six-month period. For reversible items like table runners, match your bobbin thread color to your top thread for a clean finish on both sides. You can browse our professional embroidery kits to find the perfect materials for your next home project.
Creating a Cohesive Look with Custom Design Collections
- Consistency is key: Buying design sets ensures that stitch density and line weights match across all your pieces.
- Color Harmony: Using the 60-30-10 rule helps integrate your thread choices into your existing room palette.
- Efficiency: Organizing your digital library by room or season can reduce project prep time by 25 percent.
- Business Potential: Personalized DIY embroidered home decor remains a high-demand category, with the global home decor market expected to hit 949 billion dollars by 2032.
Successful interior design relies on repetition and rhythm. When you buy single embroidery files from different artists, your home can start to look cluttered. A "Collection Strategy" involves purchasing themed sets. This ensures that the floral motif on your curtains uses the same digitizing style as the one on your throw pillows. It creates a professional, high-end finish that looks intentional rather than accidental.
[Diagram: The 60-30-10 Rule for Embroidery]
60% Primary Room Color | 30% Secondary Fabric Color | 10% Accent Thread Color
Color theory plays a massive role in how your work is perceived. Don't just grab the closest blue thread you own. Take a fabric swatch to the light and match it to your thread spool. If your room is mostly neutral, a vibrant 10 percent accent in your embroidery can make the whole space pop. If you're looking to turn this hobby into a side hustle, remember that Etsy's 2023 trend reports highlighted "personalized textiles" as a top search term. Selling your custom creations starts with mastering these small details.
Curating Your Digital Library
Organization prevents creative burnout. Create a folder system on your computer labeled by room, such as "Kitchen" or "Guest Suite." This makes it easy to find your files when you're ready to stitch. For those decorating dorms or man caves, high-quality "Sports & College" designs provide an instant masculine or collegiate vibe. Use consistent fonts across your projects to build a signature style. A specific monogram style used on every towel and pillow acts as your personal brand's logo.
[Infographic: Digital File Folder Structure]
Main Folder > Room Type > Season > Design Style
Next Steps: Your First Project
Start small to build your confidence. The kitchen tea towel is the perfect "low stakes" entry into DIY embroidered home decor because the fabric is stable and the items are inexpensive. Once you finish your first piece, don't keep it to yourself. Join online communities on platforms like Instagram or Pinterest to share your progress. Seeing how others use the same files can spark new ideas for your own home. Ready to start? Explore the Embroidery n Sewing shop for your first home decor file and begin your transformation today.
Final Project Checklist:
- Is the design centered and straight in the hoop?
- Did you use the correct stabilizer for the fabric weight?
- Are all jump threads trimmed closely to the fabric?
- Has the project been pressed with a warm iron to remove hoop marks?
Start Your Next Design Transformation
Your journey into DIY embroidered home decor begins with a single stitch; however, the quality of your digital foundation determines the final result. You've learned how to navigate the professional pipeline from digital file to fabric while maintaining a cohesive look across every room. By utilizing industry-standard PES, DST, and JEF file formats, you ensure that 100% of major embroidery machine brands can execute your vision with pinpoint accuracy. These professional-grade files eliminate the trial and error often found in amateur designs. It's a proven method to upgrade your space without the high cost of custom interior designers.
It's time to move beyond generic store-bought accents. Whether you're focusing on exclusive sports themes or iconic brand-inspired collections, your machine is ready to produce high-end results. You can browse professional digital embroidery designs for your home projects at Embroidery n Sewing to access instant downloads that work perfectly with your equipment. Don't settle for the ordinary when professional tools are right at your fingertips. Grab your favorite threads and start creating a living space that truly reflects your personal style. You've got the skills and the guide, so go make something beautiful today.
Frequently Asked Questions
- Store-bought items like towels and blankets are perfect for quick customization.
- Heavy cotton canvas or linen blends provide the best stability for dense designs.
- Cut-away stabilizers and correct needle sizes prevent fabric puckering on thin materials.
- Specific embroidery needles are required to handle high-speed stitching without thread breaks.
- Gentle washing in cold water protects the thread integrity and prevents color bleeding.
- Brother machines require the .PES file format for reading digital embroidery designs.
- DIY projects typically save 15% to 20% compared to purchasing high-end boutique decor.
- Standard sewing thread is too thick and lacks the necessary sheen for embroidery.
Can I embroider on store-bought home decor items?
Yes, you can embroider directly onto store-bought home decor items like cotton towels, throw blankets, or pre-made pillow covers. This method is a fast way to achieve DIY embroidered home decor without sewing from scratch. In 2023, 62% of home embroiderers reported using pre-made blanks to save an average of 3 hours per project. Just ensure the item fits securely in your embroidery hoop so the machine can move freely.
What is the best fabric for DIY embroidered pillows?
Cotton canvas and heavy linen blends are the best fabrics for embroidered pillows because they support high stitch counts without tearing. A 10-ounce cotton duck canvas provides the structural integrity needed for dense floral or geometric designs. Avoid stretchy fabrics like jersey unless you use a heavy-duty stabilizer. Using these sturdy materials ensures your DIY embroidered home decor lasts through years of use on a sofa or bed.
How do I prevent my embroidery from puckering on thin linens?
You prevent puckering on thin linens by using a cut-away stabilizer and ensuring your fabric isn't stretched too tight in the hoop. According to a 2024 technical guide from Madeira, using a 75/11 embroidery needle reduces fabric displacement during the stitching process. Don't pull the fabric until it's distorted; it should be taut like a drum but maintain its natural grain. This balance keeps your designs flat and professional.
Do I need special needles for home decor embroidery?
You need specific embroidery needles, typically size 75/11 for most projects or 90/14 for heavier fabrics like denim. Embroidery needles have a larger eye and a specially shaped scarf to prevent thread shredding at high speeds. Schmetz reports that replacing your needle every 8 hours of active stitching prevents 95% of common tension issues. Using a standard sewing needle will likely cause frequent thread breaks and messy birdnesting under the throat plate.
How do I wash DIY embroidered home decor without ruining it?
You should wash your items in cold water on a delicate cycle or by hand to protect the thread tension. The 2023 American Cleaning Institute guidelines suggest turning embroidered items inside out and using a mesh laundry bag for extra protection. Avoid bleach, as it can degrade polyester threads and cause colors to bleed into the base fabric. Air drying is the safest method to ensure the embroidery doesn't shrink or warp.
What digital file format do I need for my Brother embroidery machine?
Brother embroidery machines primarily use the .PES file format for reading digital designs. Some older models or commercial versions might also accept .DST files, but .PES remains the standard for consumer machines like the PE800 or SE1900. When you download designs, ensure you select the correct version, as .PES files have different versions ranging from v1 to v10 depending on your machine's software age. Check your manual to confirm compatibility.
Is it cheaper to DIY embroidered decor or buy it?
It's generally cheaper to DIY your decor if you already own an embroidery machine and basic supplies. A 2022 report from the Association for Creative Industries noted that enthusiasts save 15% to 20% compared to buying high-end boutique items. While the initial machine investment is high, the cost per project for thread and stabilizer is often under $5. This makes custom pieces much more affordable than retail luxury brands found in department stores.
Can I use regular sewing thread for embroidery designs?
You shouldn't use regular all-purpose sewing thread because it lacks the sheen and strength required for high-speed embroidery. Most designs are digitized for 40-weight rayon or polyester thread, which is thinner and smoother than 50-weight cotton sewing thread. Using the wrong thread can lead to bulky designs and mechanical strain on your machine's tension discs. Stick to reputable brands like Isacord or Sulky for the best results and a professional finish.