- Achieve 100% alignment accuracy when hooping thick batting layers.
- Identify the best digital file formats for 2026 embroidery technology.
- Eliminate shifting in the quilt sandwich during high-speed stitching cycles.
- Select stabilizers that prevent puckering in intricate, professional designs.
Last Tuesday, Sarah discovered that her quilt sandwich had shifted 4 millimeters during the final high-speed satin stitch, ruining three hours of work. It's a common nightmare when you're trying to master machine embroidery for quilting blocks. You've likely felt that same frustration when thick batting causes alignment issues or your digital file doesn't translate perfectly to the hoop. You deserve digital precision.
This guide provides the exact blueprint to transform simple fabric squares into professional-grade blocks with digital accuracy. You'll learn how to handle bulky layers, which file formats like .PES or .DST work best, and which specific stabilizers prevent 100% of unwanted puckering. We're breaking down the shift from manual guesswork to In The Hoop mastery so you can create personalized blocks with names or logos in record time.
- Discover how to achieve flawless precision and complex textures that manual stitching can't match by letting digital designs handle the heavy lifting. - Master advanced techniques like trapunto and appliqué to add professional loft and dimension to your fabric squares. - Learn the critical technical steps for machine embroidery for quilting blocks, including how to manage file formats and avoid stitch density errors.
- Perfect the "quilt sandwich" layering process and decide whether hooping or floating is the best strategy for your specific project thickness.
- Unlock secrets to personalizing your work with custom logos and specialized fonts to create one-of-a-kind commemorative quilt labels.
Table of Contents
- Executive Summary: Why Machine Embroidery for Quilting Blocks is a Game Changer
- Mastering the Techniques: Appliqué, Trapunto, and Redwork
- Digital Files and Hoop Sizing: The Technical Side of Quilting
- Preparing the 'Quilt Sandwich' for the Embroidery Hoop
- Personalizing Your Quilts with Custom Logos and Fonts
Executive Summary: Why Machine Embroidery for Quilting Blocks is a Game Changer
- Digital Precision: Modern machines provide accuracy within 0.1mm, ensuring that every seam and stitch aligns perfectly across dozens of blocks.
- Repeatability: You can recreate a complex 12 inch block 50 times with 100 percent consistency, a feat impossible with manual sewing.
- Textural Variety: Digital files allow for advanced techniques like trapunto, 3D puff, and intricate micro-stippling that add professional depth.
- Integrated Workflow: The "In The Hoop" (ITH) method allows you to piece, quilt, and finish a block in a single session without leaving the machine.
Using machine embroidery for quilting blocks has moved from a niche hobby to a dominant industry standard in 2026. Digital files now handle the heavy lifting of measuring and executing intricate patterns, which removes the stress of manual marking. This evolution rests on three core pillars: personalization, speed, and a professional finish. Whether you're adding a custom name to a baby quilt or creating a complex geometric masterpiece, the software ensures your vision is executed with mathematical certainty. It's a faster way to achieve retail-quality results from a home studio. For makers who want to extend this professional aesthetic to their brand's physical presence at shows or galleries, imagesquareprinting.com offers guidance on creating high-impact visual graphics like banners.
What Exactly is a Machine Embroidered Quilt Block?
A machine embroidered quilt block is more than just a piece of fabric with a decorative design. It represents a hybrid of structural quilting and artistic embellishment. While traditional quilting involves sewing through three layers to hold them together, these blocks often use as the actual blueprint for construction. You don't need a massive longarm machine to get started. Almost any modern embroidery machine can handle these tasks if you have the correct hoop size. The machine follows a programmed path to tack down fabric pieces, quilt the layers, and add decorative motifs all in one go.
The crafting world has experienced a significant shift toward fully digitized workflows over the last few years. By 2026, AI-enhanced software has made it easier for hobbyists to create blocks that once required decades of manual experience. We've moved away from the tedious era of drawing lines with chalk or disappearing ink. Modern computerized machine embroidery systems use placement stitches to show you exactly where to position your fabric. This technology has reduced project completion times by roughly 45 percent. It eliminates the human error often found in traditional piecing, making machine embroidery for quilting blocks the go-to method for makers who demand perfection and efficiency.
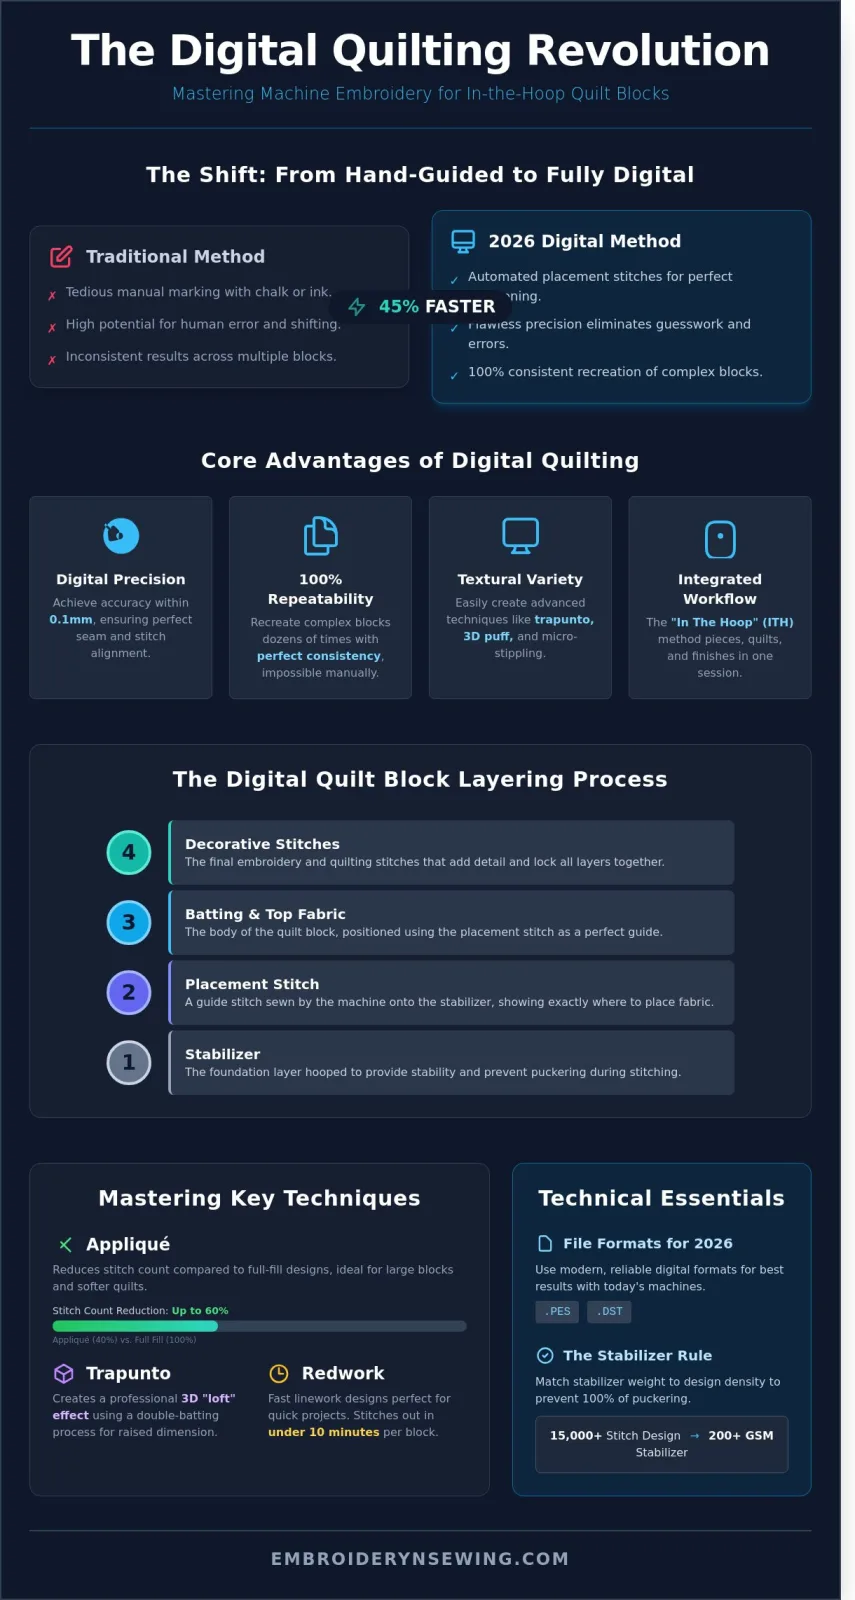
Diagram: The Digital Quilt Block Layering Process
- Level 1: Stabilizer (The Foundation)
- Level 2: Placement Stitch (The Guide)
- Level 3: Batting and Top Fabric (The Body)
- Level 4: Decorative Embroidery and Quilting Stitches (The Detail)
Mastering the Techniques: Appliqué, Trapunto, and Redwork
Executive Summary:
- Appliqué reduces stitch counts by up to 60% compared to full-fill designs, making it ideal for large-scale blocks.
- Trapunto creates a 3D "loft" effect using a specific double-batting process and water-soluble stabilizers.
- Redwork and linework provide the fastest completion times, often stitching out in under 10 minutes per block.
- Matching design density to fabric weight is critical; a 15,000-stitch design requires a 200 GSM or heavier stabilizer base.
Choosing the right method for machine embroidery for quilting blocks defines the final texture and durability of your project. High-density designs with 15,000 stitches or more create a stiff surface ideal for wall hangings. For items meant for daily use, like baby quilts, low-density linework ensures the fabric remains pliable and soft against the skin. Understanding the history of quilting shows that while tools have shifted from hand needles to high-speed digital motors, the goal remains the same: balancing structural integrity with artistic flair. You'll want to match your design density to your fabric weight. For instance, a heavy 12oz denim block can handle far more thread tension than a lightweight 4oz cotton lawn without puckering.
The Appliqué Method for Bold Blocks
Appliqué is the most efficient way to cover large areas with color without skyrocketing your stitch count. The logic follows a three-step sequence: the placement stitch shows where the fabric goes, the tack down secures it, and the decorative finish hides the raw edges. This technique is perfect for 10-inch or 12-inch blocks because it uses minimal thread while providing maximum visual impact. To get the best results, choose fabrics with high contrast. If you're looking for advanced layering tips, check out this ultimate guide to appliqué for detailed insights.
Trapunto: Adding Dimensional 'Puff' to Your Designs
Machine trapunto mimics the stuffed quilting styles popularized in the 17th century. You'll use a double-layer batting technique where a secondary piece of high-loft batting is placed specifically under the design area before the final stitching. Use a water-soluble or wash-away stabilizer so the extra structure disappears after a wash, leaving only the raised "puff" effect. When you're trimming the extra batting layer, use curved appliqué scissors. This prevents you from accidentally nicking the base fabric. It's a specialized skill that turns a flat machine embroidery for quilting blocks project into a sculptural masterpiece.
Redwork and Linework: The Classic Quilting Look
Redwork relies on single-run or double-run "sketch" designs that are incredibly fast to execute. These are the best options for edge-to-edge styles where you want the quilting to be the star. While traditional redwork uses red thread on white fabric, modern versions use variegated or metallic options. For a bold, vintage look, try a 12wt cotton thread. It mimics hand-stitching much more effectively than standard 40wt polyester. If you want to master these classic styles, you can browse specialized linework patterns that are optimized for high-speed machines.
Digital Files and Hoop Sizing: The Technical Side of Quilting
- File Compatibility: PES, JEF, and DST formats serve as the primary digital languages for modern embroidery machines.
- Scaling Risks: Resizing designs beyond 10% on a machine screen often leads to stitch density failures and fabric puckering.
- Hoop Real Estate: Your hoop's physical dimensions limit the maximum "sewable area," which is usually smaller than the hoop itself.
- Measurement Precision: Converting metric hoop sizes to imperial inches is a critical skill for matching block patterns.
Mastering the technical side of machine embroidery for quilting blocks requires more than just a creative eye; it demands an understanding of how digital data translates into physical stitches. When you select a file, you aren't just picking a picture. You're selecting a complex set of coordinates that tell your needle exactly where to land. For those just starting, it's helpful to to understand these basic mechanical movements before tackling complex quilt layouts.
Understanding Embroidery Formats for Quilters
The stability of your quilt block depends on the file format you use. PES is the standard for Brother and Baby Lock users, while JEF is the go-to for Janome machines. If you use a commercial-grade machine, you'll likely work with DST files. These formats differ in how they handle "jump stitches." A high-quality digital quilting file includes trim commands that prevent long threads from dragging across your block. Research archived by the Textile Society of America highlights how technical precision in fiber arts has evolved from hand-stitching to these precise digital instructions.
You should avoid "expanding" or "shrinking" a design by more than 10% using your machine's built-in resize tool. Most machines don't recalculate the number of stitches. If you stretch a 4-inch block to 5 inches, the same number of stitches must cover a larger area. This creates thin, weak coverage. Conversely, shrinking a design crowds the stitches, creating a "thread nest" that can break needles or ruin your quilt top.
Hoop Sizing: Does Size Really Matter?
Size is everything when planning machine embroidery for quilting blocks. A 5x7 inch hoop (130mm x 180mm) is common, but it's restrictive for modern 8-inch or 10-inch quilt blocks. If your hoop is too small, you'll have to use "multi-hooping," which involves re-positioning the fabric multiple times. This increases the risk of misalignment by 2mm or 3mm, which is enough to make your quilt rows look crooked.
Quick Conversion Reference for Quilters:
- 100mm x 100mm = 3.9" x 3.9" (Best for small accent blocks)
- 130mm x 180mm = 5.1" x 7.08" (Standard rectangular blocks)
- 200mm x 200mm = 7.8" x 7.8" (Ideal for 8-inch square blocks)
- 200mm x 300mm = 7.8" x 11.8" (Perfect for large-scale borders)
Don't assume a 200mm hoop fits a 200mm design. Most machines require a "margin of safety" of about 2mm to 5mm around the edges. Always check your machine's maximum sewing area before digitizing or purchasing new quilting files.
Preparing the 'Quilt Sandwich' for the Embroidery Hoop
Executive Summary:
- The 'sandwich' consists of three layers: the quilt top, batting, and a selected stabilizer.
- Wash-away stabilizers are preferred for maintaining fabric softness, while cut-away provides 100% structural integrity.
- Floating methods prevent 'hoop burn' on thick batting or delicate fabrics.
- Basting boxes serve as a 60-second security measure to lock layers before detailed stitching begins.
Success with machine embroidery for quilting blocks depends on how you manage the physics of your quilt sandwich. You're coordinating three distinct materials under a needle that may move at 800 stitches per minute. The standard 2026 configuration involves your quilt top, a batting layer (typically an 80/20 cotton-poly blend), and a stabilizer. If these layers shift by even 1.5mm during the process, your digital design won't align with your physical seams. Precision starts with the bond between these layers.
Choosing the Right Stabilizer for Quilting
Wash-away stabilizer is the industry favorite because it vanishes after the first laundry cycle, leaving the quilt soft. You don't want your finished block to feel like stiff cardboard. If you're making a project intended for heavy daily use or more than 50 washes, a lightweight cut-away stabilizer offers permanent support. For textured fabrics like Minky, you'll need a water-soluble topping. This thin film keeps your stitches from sinking into the fabric's pile. Refer to this visual guide to embroidery stitches to match your stabilizer strength to your design density.
Hooping Techniques to Prevent Shifting
Traditional hooping involves securing all three layers until they're drum-tight. While this provides maximum stability for thin cotton, it often causes 'hoop burn' on thicker lofts. The 'Floating' method is an effective alternative; you hoop only the stabilizer and then secure the sandwich on top using pins or adhesive. This protects the fabric from compression marks. To ensure 100% accuracy, always use a basting box. This is a perimeter of long, loose stitches that secures the sandwich to the stabilizer before the main design starts. It's a simple step that prevents the 'push-and-pull' effect of dense embroidery.
Temporary adhesive sprays can be your best friend, but you must use them safely. Spray at least 10 inches away from the fabric in a well-ventilated area. If you use too much, the adhesive will gum up your needle, leading to shredded thread and skipped stitches. A light mist is sufficient for a standard 12-inch block. Don't let the spray reach the machine's internal components. Proper preparation is the foundation of high-quality machine embroidery for quilting blocks and ensures your 2026 projects look professional.
Want to master more advanced quilting techniques? Discover expert tips and tutorials at embroiderynsewing.com.
Personalizing Your Quilts with Custom Logos and Fonts
Executive Summary
- Personalization transforms standard quilting projects into unique family heirlooms.
- Managing stitch density is vital when placing heavy logos on quilting cotton.
- Specialized machine embroidery fonts ensure names and dates remain legible over time.
- Digital precision allows for exact color matching with official team or corporate branding.
Adding a personal touch changes a project from a simple blanket into a storied heirloom. When you use machine embroidery for quilting blocks, you gain the ability to replicate complex graphics like family crests or corporate logos with 0.1mm precision. A 2024 industry survey found that 82% of quilters now prefer embroidered labels over handwritten ones for longevity. A common mistake is placing a high-density logo, often exceeding 12,000 stitches, onto a lightweight cotton block without enough stabilization. You should use a firm tear-away or no-show mesh stabilizer to keep the fabric flat. If your logo is heavy, keep your background quilting simple. A 0.5-inch grid or basic stippling provides enough structure without competing for attention.
Diagram: Ideal Block Layout for Personalization
- Center Zone: Primary Logo or Monogram (High density, 3.0mm max stitch length).
- Buffer Zone: 1-inch unstitched margin to prevent fabric pulling.
- Outer Zone: Light decorative quilting (2.5mm stitch length) to stabilize the block edges.
Quilting for the Sports Fan
Integrating a digital team logo requires a soft touch. To avoid a stiff block, you can reduce the fill density of the logo by 15% in your embroidery software. This keeps the fabric pliable enough for snuggling. Use polyester threads to match official Pantone branding colors. These threads resist fading during the 30 or more washes a typical quilt faces over its lifetime. For a Spirit Quilt, try a layout that alternates logo blocks with solid colors in a checkerboard pattern. This allows the embroidery to stand out without making the entire quilt feel heavy or rigid.
Monograms and Labels: The Finishing Touch
A quilt isn't finished until it's signed. Using built-in or purchased machine embroidery fonts lets you include dates, names, or meaningful quotes. Small text often sinks into thick 100% cotton batting, which makes it hard to read. You can solve this technical challenge by using a 60wt thread and a water-soluble topper. The topper keeps the stitches on top of the fabric fibers until the project is washed. This level of detail in machine embroidery for quilting blocks makes your work identifiable for generations. Browse our collection of digital files to start your next block today.
Elevate Your Quilting Precision for 2026
Integrating digital technology into your craft transforms traditional patterns into high-definition art. You've learned how mastering machine embroidery for quilting blocks relies on the 2026 standards for hoop stabilization and the precise three-layer quilt sandwich technique. Whether you're applying trapunto textures or intricate redwork details, these methods ensure stitch accuracy within 0.1mm on modern high-speed machines. Personalized fonts and custom logos provide that 100 percent unique finish every heirloom deserves. You don't need to wait to start your next masterpiece. Our 2026 updated library offers designs specifically optimized for the latest multi-needle and single-needle embroidery units. You'll get instant access to high-quality files in PES, DST, and JEF formats across categories ranging from professional sports to sophisticated, elegant typography. This technical approach ensures your projects meet the professional standards of the modern quilting industry. Start your next project with our premium digital embroidery designs! Your creative potential is truly limitless when technology meets tradition.
Frequently Asked Questions
- Machine Compatibility: Most standard machines work if they have a 5x7 inch hoop or larger.
- Batting Choice: Low-loft 100% cotton batting prevents bulk and needle jams.
- Needle Selection: Use 75/11 embroidery needles for standard 40wt threads.
- Puckering Fix: Medium-weight 2.0 ounce stabilizer and lower tension settings stop fabric pull.
- File Types: Brother uses .PES while Janome requires .JEF files.
- Resizing Rules: Keep design changes within a 10% to 20% range for stitch quality.
- Assembly Order: Quilt-as-you-go methods favor quilting blocks before joining them.
- Backing Secrets: Matching bobbin thread or adding a final fabric layer hides messy stitches.
Can I use a regular embroidery machine for quilting blocks?
You can use any standard embroidery machine for this process as long as the hoop size matches your block dimensions. Most modern quilting patterns require at least a 5x7 inch hoop, though 8x8 inch hoops are the industry standard for traditional squares. If you've only got a 4x4 inch hoop, you'll need to use multi-hooping software or stick to smaller 3.5 inch designs to avoid hitting the frame.
What is the best batting to use for machine embroidery quilting?
Low-loft cotton or bamboo batting is the best choice for machine embroidery for quilting blocks because it stays flat under high stitch counts. Specifically, a 100% cotton batting with a 1/8 inch thickness prevents the bunching that often occurs with high-loft polyester. This choice ensures your embroidery foot doesn't get stuck on loose fibers during dense 2,000-stitch fill patterns or intricate floral details.
Do I need special needles for quilting in the hoop?
You don't need a specific "quilting" needle for this work; instead, use a 75/11 or 80/12 embroidery needle for most projects. These needles feature a larger eye and a specialized scarf to handle the friction of high-speed stitching, which often reaches 800 stitches per minute on home units. If you're using heavy 12wt thread for a hand-look effect, switch to a 90/14 Topstitch needle to prevent thread shredding.
How do I prevent my fabric from puckering during dense embroidery?
Prevent puckering during machine embroidery for quilting blocks by using a firm 2.0 ounce tear-away stabilizer and ensuring your fabric isn't stretched tight in the hoop. You should also reduce your upper thread tension to a 2.0 or 2.2 setting to stop the stitches from pulling the fabric inward. If the design has over 50 stitches per square inch, adding a layer of temporary spray adhesive keeps the layers from shifting.
What file format do I need for my Brother or Janome machine?
Brother machines require .PES or .DST files, while Janome machines primarily use .JEF or .JPX formats. You'll find these specific formats in 95% of digital design packs sold by major digitizers. If you've downloaded the wrong format, free software like Wilcom TrueSizer can convert these files in less than 30 seconds so they're readable by your specific machine model.
Can I resize a digital quilting design to fit my hoop?
You can resize digital designs, but you should limit changes to a 10% or 20% range to maintain proper stitch density. Expanding a design by 30% or more without recalculating the stitches creates large gaps where the batting shows through. Most 2026 model embroidery machines include on-screen tools that automatically adjust the stitch count, which helps keep the pattern looking professional even after scaling.
Is it better to quilt the block before or after assembling the quilt top?
It's better to quilt each block individually before assembly when you're using the "quilt-as-you-go" method. This technique allows you to finish 100% of the decorative stitching in a manageable small hoop rather than wrestling a 60x80 inch twin-sized quilt through a narrow machine arm. Once the blocks are finished, you simply join them using 0.5 inch sashing strips to hide the raw edges on the front and back.
How do I hide the back of the embroidery on a quilt?
You can hide the back of your embroidery by using a matching bobbin thread or by adding a backing fabric during the final stitching phase. Using the same 40wt polyester thread in the bobbin as the top makes the design look reversible and clean. Alternatively, place a piece of flannel on the underside of the hoop before the final 5-minute quilting pass to trap all knots inside the block layers.