

You’ve found the perfect embroidery design online, your heart flutters with creative excitement, and you click 'buy'. But then... a mysterious ZIP file lands in your downloads folder. Suddenly, you're staring at a list of ten different file formats, wondering which one is right for your machine and how on earth you're supposed to get it there. If that moment of confusion feels all too familiar, you're in the right place.
The technical gap between your computer and your embroidery machine can feel intimidating, but it doesn't have to be. This guide is here to demystify the entire process and show you exactly how to use digital embroidery files with confidence. We will walk you through every simple step: from unzipping that folder and choosing the right format (like PES, DST, or JEF) to transferring the design and loading it onto your machine for a flawless stitch-out. Get ready to turn that digital purchase into a beautiful, tangible creation! [
Key Takeaways](https://embroiderynsewing.com/articles)
- Your embroidery machine cannot read a compressed ZIP folder; learn the essential first step of unzipping the file on your computer.
- Discover why selecting the correct file format (like PES, JEF, or DST) for your specific machine brand is the most critical step for success.
- This guide breaks down exactly how to use digital embroidery files, taking you from the initial download to being ready to press 'start' on your machine.
- Master the simple process of transferring your design from your computer to your embroidery machine using a USB drive or direct connection.
Table of Contents
[- What's Inside: Understanding Your Digital Embroidery File Download](/articles/car-logo-meanings-and-how-to-master-them-in-machine-embroidery) [- Step 1: From Download to Desktop - Unzipping Your Files](/designs/how-to-train-a-dragon-embroidery-design-toothless-embroidery-design-machine-pattern-baby-toddler-infant-embroidery) [- Step 2: Choosing the Right File Format for Your Machine](https://embroiderynsewing.com/articles/budgeting-for-machine-embroidery-projects-a-practical-guide-for-2026)
- Step 3: Transferring the Design to Your Embroidery Machine
- Step 4: Loading and Preparing the Design on Your Machine [- Troubleshooting: Common Digital File Problems and Solutions](https://embroiderynsewing.com/articles/15-easy-embroidery-projects-for-gifts-the-ultimate-2026-guide-to-personalized-crafting)
What's Inside: Understanding Your Digital Embroidery File Download
There's nothing quite like the thrill of finding the perfect embroidery design online. You click 'buy,' the download completes, and you're ready to bring a new creation to life. But what exactly did you just purchase? When you buy a digital embroidery design, you're not buying a physical patch; you're buying a detailed set of instructions that tells your embroidery machine precisely where and how to stitch. Learning how to use digital embroidery files can seem daunting at first, but once you understand the components, the process becomes simple and exciting.
The ZIP File: Your Design's Digital Package
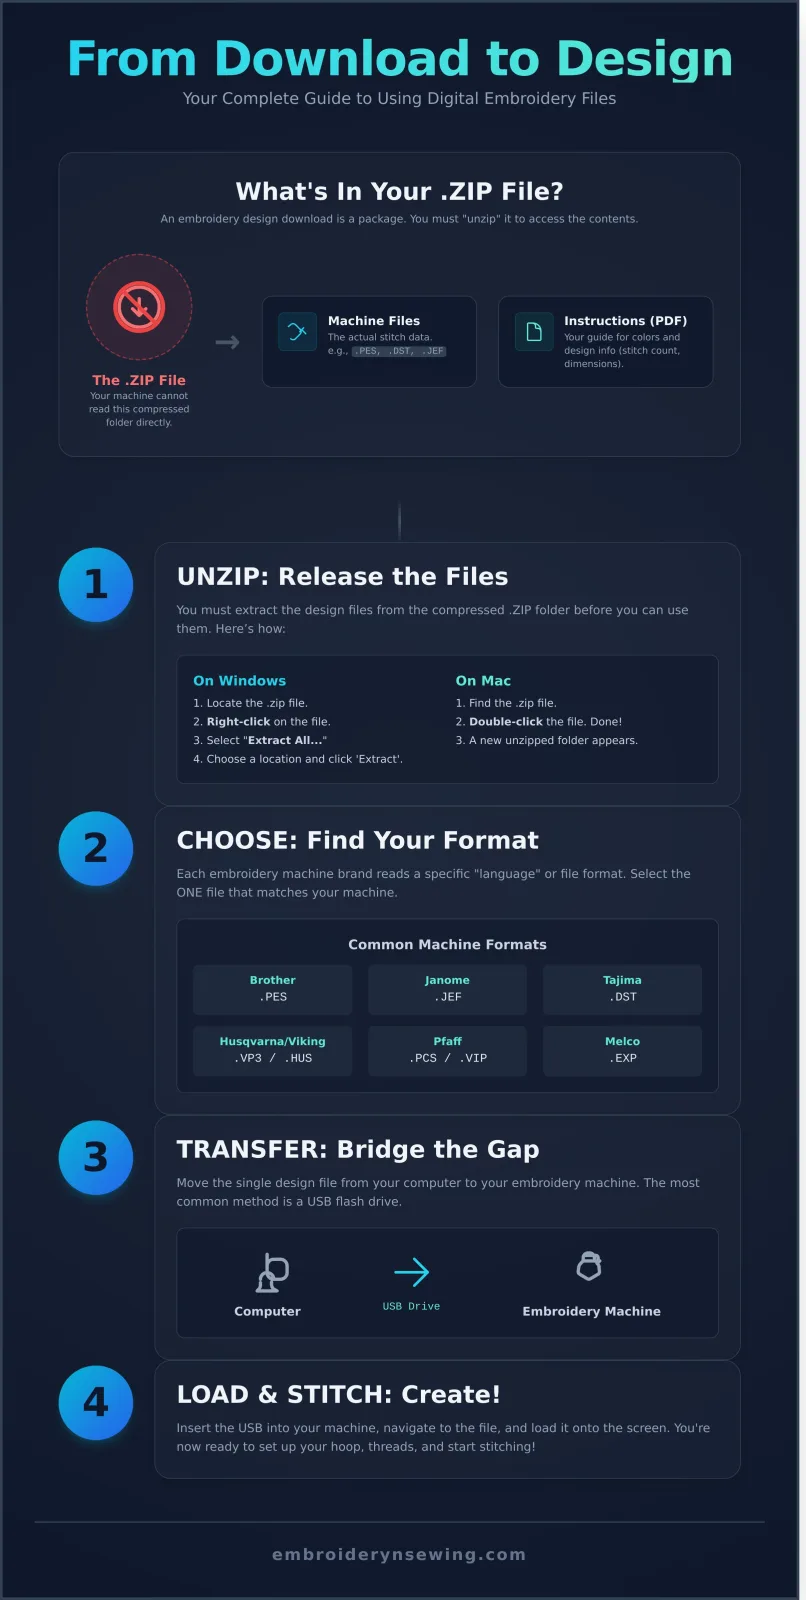
Your new design will almost always arrive as a single .ZIP file. Think of this as a compressed digital package, similar to a sealed envelope containing multiple documents. Designers use ZIP files to bundle everything together neatly and reduce the overall file size for a faster download. You cannot use the files directly from this compressed folder; you must first 'unzip' or 'extract' its contents to your computer before you can access them.
Multiple File Formats: Finding Your Machine's Language
Once unzipped, you'll likely see a list of files that look nearly identical but have different extensions (like .PES, .DST, .JEF). Each of these is a unique version of your design, formatted to work with a specific brand of embroidery machine. This process of converting artwork into machine-readable stitch data is a key part of the broader Machine Embroidery Overview. You only need to find the one file that speaks your machine's "language"-for example, Brother machines typically use PES, Tajima uses DST, and Janome uses JEF. The rest can be ignored.
Color Charts and Stitch Maps (PDFs)
Alongside the machine formats, you'll find one or more PDF documents. These are your instruction manuals, not the files you send to your machine. They are crucial for a successful stitch-out and typically include:
- A Color Chart: This guide shows the recommended thread colors in the order they should be stitched. It often lists brand-specific thread codes (like Madeira or Isacord) to help you match colors perfectly.
- A Stitch Map: This provides technical details like the design's exact dimensions, total stitch count, and sometimes a visual preview of the stitch sequence.
Understanding these three components-the ZIP package, the machine-specific format, and the PDF guides-is the essential first step on your journey from download to a beautifully finished stitch.
Step 1: From Download to Desktop - Unzipping Your Files
You’ve found the perfect embroidery design and downloaded it-congratulations! The first practical step in learning how to use digital embroidery files is getting them out of their delivery package. Most designs arrive in a compressed .zip file. Think of this as a sealed box containing all the different file formats for your design. Your embroidery machine can't read this box; it needs the individual files inside. Let's walk through how to "unzip" or "extract" them on your computer.
How to Unzip Files on Windows
For Windows users, extracting files is a straightforward process built right into the operating system. You don't need any special software. Just follow these simple steps:
- Locate the File: Find the downloaded .zip file. It will most likely be in your 'Downloads' folder.
- Right-Click: Right-click on the .zip file to open the context menu.
- Extract: Select 'Extract All...' from the menu. A new window will pop up.
- Choose a Destination: The window will suggest a location to save the new folder. You can accept the default or click 'Browse' to choose a different spot. Click 'Extract' to finish.
How to Unzip Files on a Mac
Apple makes this process incredibly simple. If you're working on a Mac, unzipping a file takes just a single action:
- Find the File: Navigate to your 'Downloads' folder or wherever you saved the .zip file.
- Double-Click: Simply double-click the .zip file. That's it! Your Mac will automatically create a new, unzipped folder in the same location, ready for you to use.
Organizing Your Embroidery Design Library
Before you know it, you'll have dozens, if not hundreds, of designs. A little organization now will save you a massive headache later. We highly recommend creating a dedicated folder system. Start with a main folder named something like "Embroidery Designs." Inside, create subfolders for different categories like 'Holidays,' 'Fonts,' 'Animals,' or 'Floral.' When you unzip a new design, you can move the resulting folder directly into its proper category. After unzipping, you'll notice the folder contains the same design in various formats (.PES, .DST, .JEF, etc.). This is because different machine brands require specific file types. Learning the differences is a key part of the process, and this guide on Choosing the Right File Format offers a fantastic explanation. This simple habit makes finding the perfect design for your next project quick and easy.
Step 2: Choosing the Right File Format for Your Machine
Once you've unzipped your design folder, you'll likely see a list of files with the same name but different three-letter extensions (like .PES, .JEF, or .DST). This is often the most confusing part for beginners learning how to use digital embroidery files. Don't worry, it's simpler than it looks. Each embroidery machine brand "speaks" a specific language, and these file extensions represent that language. Your machine can only read its native format.
If you try to load an incompatible file, your machine will either not see it at all or display an error message. The goal is to identify the one correct file for your specific machine and ignore the rest.
Common Embroidery Machine Brands and Their Formats
Most digital embroidery designs are packaged with multiple formats to cater to a wide range of machines. The table below lists the most popular brands and their corresponding file extensions. Find your machine's brand to identify the file you need.
| Machine Brand | Common File Format(s) |
|---|---|
| Brother / Baby Lock / Deco | .PES |
| Janome / Elna / Kenmore | .JEF or .SEW |
| Singer | .XXX or .CSD |
| Husqvarna / Viking / Pfaff | .VP3 or .HUS |
| Bernina | .EXP |
| Tajima / Commercial Machines | .DST |
| Melco | .EXP |
Note: This is a general guide. Always double-check your machine’s user manual for the most accurate information on compatible file types.
What If My Brand Isn't Listed?
If you don't see your machine's brand, your first step should be to consult its manual or the manufacturer’s website. Many machines, especially multi-needle or commercial models, can read the universal .DST format. For advanced users, specialized embroidery software can convert files from one format to another, giving you more flexibility.
Deleting the Unnecessary Files
Once you’ve identified the one file your machine needs, you can safely delete the other formats from your working folder. This cleans up your workspace, saves storage space on your USB drive, and prevents you from accidentally selecting the wrong file later. Just be sure to keep the original .ZIP archive you downloaded as a safe backup in case you need the other files in the future.
Step 3: Transferring the Design to Your Embroidery Machine
You've successfully downloaded and unzipped your design. Now comes the crucial step of moving that file from your computer to your embroidery machine. Think of this as the bridge between your digital design library and your physical creative space. This transfer is what makes digital embroidery possible, allowing a file you found online to become a tangible, stitched creation.
Before we dive into the methods, remember this golden rule: only transfer the specific, single design file that matches your machine's format. For example, if your Brother machine reads .PES files, you will only copy the design.pes file. Do not copy the entire folder or the original ZIP file to your machine, as it won't be able to read them. This is one of the most important steps in learning how to use digital embroidery files.
The USB Stick Method (Most Common)
For the vast majority of embroiderers, a simple USB stick (also called a thumb drive or flash drive) is the standard tool for the job. It's a reliable and straightforward way to get your designs ready for stitching. To ensure compatibility and prevent errors, follow these best practices:
- Use a dedicated, low-capacity USB. Many embroidery machines, especially older models, work best with smaller drives, typically 16GB or less. A large, cluttered USB can cause the machine to freeze or fail to find the file.
- Format the USB in your machine first. If your embroidery machine has a formatting option in its settings, use it. This prepares the drive perfectly for your machine's specific needs and clears any incompatible data.
- Copy, paste, and eject safely. Insert the formatted USB into your computer. Navigate to your unzipped design folder, right-click on the correct file (e.g., MyDesign.DST), and select 'Copy'. Then, open your USB drive and 'Paste' the file. Always use the 'Safely Eject' or 'Eject' function on your computer before physically removing the drive to prevent file corruption.
Wi-Fi or Direct Cable Connection
Many newer, higher-end embroidery machines offer the convenience of a wireless or direct cable connection. This modern approach eliminates the need for a USB stick and often allows you to manage and send designs directly from your computer's software to the machine's internal memory.
Because the exact steps vary significantly between brands like Brother, Janome, and Bernina, your machine's manual is your best guide. Consult your manual under sections like 'PC Connection,' 'Wireless Setup,' or 'Design Transfer Software' for precise, step-by-step guidance. This advanced method is a game-changer for streamlining a high-volume workflow.
Step 4: Loading and Preparing the Design on Your Machine
You've downloaded, unzipped, and transferred your file-now for the exciting part! This is the final stage where you bring your digital design to life on your embroidery machine. While every machine's interface is slightly different, the core steps for loading and preparing a design are remarkably similar across major brands like Brother, Janome, and Bernina. Mastering this on-screen process is a crucial step in learning how to use digital embroidery files effectively.
Selecting the File on Your Machine
Begin by inserting your USB stick into the designated port on your embroidery machine. Once it's powered on, navigate to the embroidery design selection screen. You will typically see an icon representing the USB drive. Select this icon to browse its contents. Scroll through your files until you find the design you wish to stitch and select it to load it onto the machine’s editing screen.
Positioning, Resizing, and Rotating
Your machine's screen now acts as your command center for final adjustments. You can typically move the design up, down, left, or right to position it perfectly within the hooped area. Most machines also offer options to rotate the design in set increments (like 90 degrees) or mirror it horizontally or vertically. A word of caution: avoid resizing the design on the machine by more than 10-20%. Doing so can corrupt the stitch data, leading to poor quality, gaps, or puckering, as the machine doesn't recalculate stitch density.
Final Checks Before Stitching
Before you press that "Start" button, run through this quick pre-stitch checklist to ensure a flawless result. This final review is one of the most important habits for anyone learning how to use digital embroidery files properly.
- Confirm Hoop Size: Double-check that the design's dimensions displayed on-screen are smaller than the physical hoop you have attached to the machine.
- Check Thread Colors: Compare the on-screen thread color sequence with the PDF color chart that came with your download. This ensures you load the correct thread for each color stop.
- Verify Hooping: Give your hooped fabric a final check. Is it taut like a drum? Is the stabilizer secure and smooth underneath?
Once everything is in place, you are officially ready to start stitching! Ready to find your next project? Browse our amazing collection of designs!
Troubleshooting: Common Digital File Problems and Solutions
Even with a perfect download, you might encounter a hiccup when transferring a design to your machine. Don’t panic! These issues are incredibly common and usually have a simple fix. Think of this as your quick-reference guide for getting back to stitching. Understanding these solutions is a key part of learning how to use digital embroidery files with confidence.
Problem: 'My machine can't read the file' or 'No design found'
This is the most frequent issue embroiderers face, but it's often the easiest to solve. If your machine displays an error or shows an empty folder on your USB, work through these steps before assuming the file is corrupt.
- Unzip the Folder: Digital designs almost always arrive in a compressed .ZIP folder. Your embroidery machine cannot read a .ZIP file. You must first extract or "unzip" the contents on your computer and then copy the individual design file to your USB drive.
- Check the File Format: Every embroidery machine brand uses a specific file type (e.g., .PES for Brother, .JEF for Janome, .DST for Tajima). Double-check that you have copied the correct format for your specific machine model from the unzipped folder.
- Reformat Your USB: Sometimes, the USB drive itself is the issue. For best results, format the USB stick in your embroidery machine, not on your computer. This ensures it's perfectly configured for your machine to read.
Problem: 'The design is the wrong size for my hoop'
You’ve loaded the design, but your machine says it won’t fit your attached hoop. This happens because digital designs are digitized for specific hoop dimensions (like 4x4, 5x7, etc.). Always check the design’s description on the seller's website for its exact height and width before you purchase. While some software allows for resizing, we strongly advise against scaling a design up or down by more than 10-20%. Doing so can severely distort the stitch quality, leading to gaps and puckering.
Problem: 'The colors are all wrong on my machine's screen'
You load a beautiful red and green floral design, but your machine displays it in purple and orange. This is completely normal! The colors shown on your machine's screen are just placeholders. Your machine doesn’t know what color thread you are using; it only knows when to stop for a color change.
Always trust the included PDF color chart or thread guide. This document is your true map for the design. Follow it step-by-step, threading the colors it lists for each stop, and your final project will look exactly as the designer intended.
From File to Fabric: Bringing Your Designs to Life
Navigating the world of digital embroidery might seem complex, but as you've seen, it boils down to a few key steps. The most important takeaways are understanding how to unzip your downloads, selecting the correct file format for your specific machine, and successfully transferring the design from your computer to your hoop.
With this guide, you now have the foundational knowledge for how to use digital embroidery files effectively. This process unlocks a universe of creative possibilities, empowering you to transform digital patterns into tangible, beautiful art right at home.
Feeling inspired and ready to put your new skills to the test? Ready to start stitching? Explore thousands of high-quality designs now! You'll find a huge library of popular patterns, all available for instant download and compatible with all major machine brands, so you can find the perfect design and get started immediately.
Don't be afraid to experiment and have fun-every stitch is part of your creative journey. Happy embroidering!
Frequently Asked Questions About Digital Embroidery Files
Do I need special embroidery software to use these files?
Not necessarily. To simply transfer a file from your computer to your embroidery machine via a USB stick and stitch it out, you do not need special software. However, if you want to edit a design-such as combining it with another, adding text, or changing colors before stitching-you will need an embroidery editing program. Many machines come with basic software, but more advanced programs are sold separately for greater customization and control.
Can I resize a digital embroidery design to any size I want?
It is not recommended to significantly resize a digital embroidery design. Most experts advise against resizing more than 10-20%. When you scale a design without using specialized software, you only change the dimensions, not the stitch count or density. This can lead to gaps in the stitching if you enlarge it too much, or thread breaks and puckering if you shrink it. It's best to use a pre-sized version provided by the digitizer.
What is a color chart and why is it important?
A color chart, often included as a PDF or image file, is a crucial guide that lists the sequence of thread colors for a design. It tells you which color to use for each step, ensuring the final result matches the designer's intention. The chart typically shows the order of color stops, provides thread color codes for popular brands like Madeira or Isacord, and lists the stitch count for each section. Following it makes stitching organized and accurate.
Why does my downloaded folder contain multiple sizes of the same design?
Designers provide multiple, pre-sized versions to guarantee optimal stitch quality across different hoop sizes. Each file is professionally digitized for its specific dimensions, with the stitch density and underlay perfectly calibrated. This saves you from the risks of resizing a file yourself and ensures your project looks clean and professional. It simplifies the process of how to use digital embroidery files, letting you choose the perfect size for your project without needing editing software.
Can I sell items I make using a purchased embroidery file?
In most cases, yes, but you must check the license agreement that comes with the file. Most designers allow for "small commercial use," meaning you can sell a limited number of physical items (like shirts, bags, or towels) that you've stitched the design onto. However, the license almost never permits you to resell, share, or trade the digital file itself. Always read the designer’s terms of use before selling your finished products.
How do I know what hoop size I need for a specific design?
The required hoop size is determined by the design's final dimensions, which are almost always listed in the product description or file name. For example, a design listed as 3.9" x 3.8" will require a hoop with a stitching area larger than that, such as a standard 4x4 inch hoop. Always compare the design's height and width with your machine's available hoop sizes before you begin stitching to ensure a proper fit.


