

- Analyzing 2026 market rates for essential consumables like polyester thread and stabilizers. - Strategies for sourcing high-quality sports and car embroidery designs to minimize project overhead. - Applying the 100% bonus depreciation from the OBBBA to your equipment and software costs. - A step-by-step workflow to calculate cost-per-project and eliminate expensive fabric waste.
Did you know that roughly 65% of consumers now prefer personalized fashion over mass-produced items? It's a massive market, but I've seen too many creators lose their margins to unexpected stabilizer costs and ruined test garments. I'm sorry to report that a lack of structured planning often creates a technical barrier, making budgeting for machine embroidery projects a game of guesswork that ends in wasted thread. You deserve to create professional-grade work without the financial stress of overspending on supplies.
I've designed this guide to help you master cost management while keeping your creative spark alive. We'll look at the 2026 costs for consumables and show you how to leverage pre-made digital embroidery designs, such as NFL or anime themes, to save money. By the end, you'll have a repeatable workflow that protects your wallet and your fabric.
Key Takeaways
- Master budgeting for machine embroidery projects by distinguishing between your fixed machine investments and your recurring project costs.
- I regret that custom digitizing fees are often prohibitive, but you can bypass this technical barrier by using ready-to-use Nike or car embroidery designs.
- Lower your overhead by purchasing the "Big Three" consumables in bulk, specifically using 5,000m cones for workhorse thread colors like black and white.
- I'm sorry to say that ruined blanks are a common profit killer, so I recommend a strict test-stitch workflow on scrap fabric for every new design.
- Avoid the technical barrier of an unexpected breakdown by establishing a maintenance fund based on your machine's total stitch count.
Table of Contents
-
Identify the difference between fixed investments like machines and variable project costs like thread and fabric.
-
Optimize design procurement by utilizing high-quality digital design shops instead of expensive custom services.
-
Implement a bulk and basic strategy for consumables to lower the cost-per-stitch on every project.
-
Reduce project overhead through rigorous test-stitching to prevent the loss of expensive garment blanks.
-
Allocate a small maintenance fund from every project to prevent technical barriers caused by machine failure.
Executive Summary: The Fundamentals of Embroidery Budgeting
I'm sorry to report that many hobbyists and small business owners struggle with the financial side of their craft because they don't separate their overhead from their daily expenses. I regret that this lack of clarity often leads to a technical barrier where projects become too expensive to justify. Successful budgeting for machine embroidery projects starts with a clear understanding of where your money is going before you ever hit the start button.
Understanding Your Fixed vs. Variable Costs
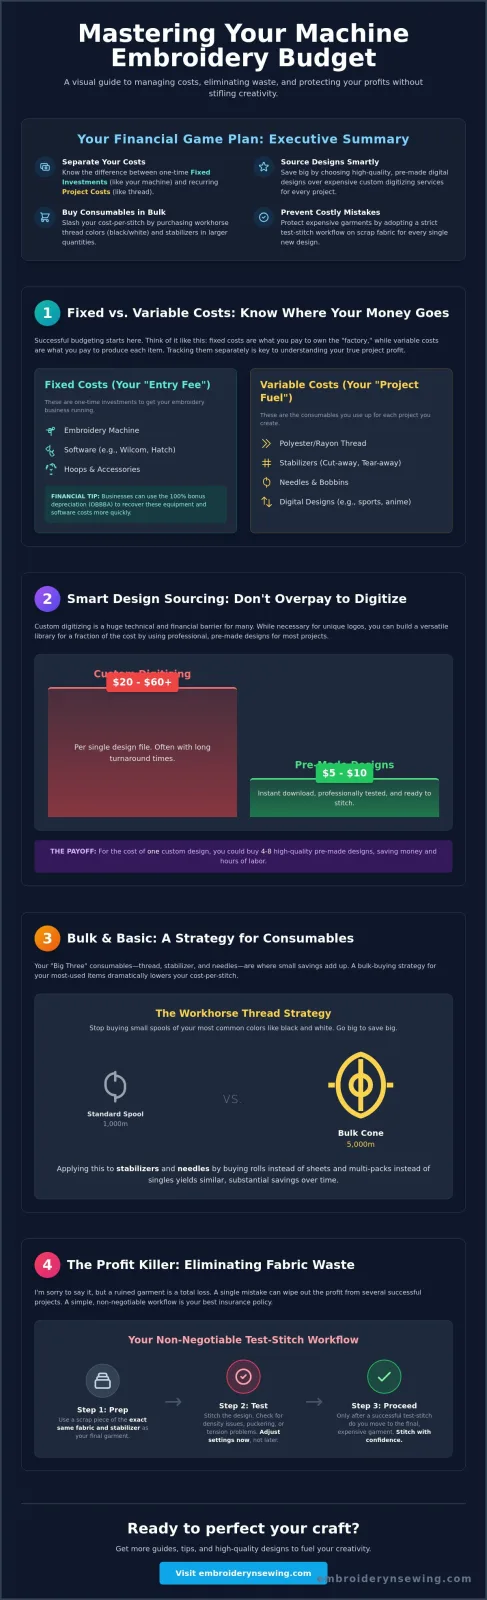
I find it helpful to look at costs in two distinct categories. Fixed costs are your "entry fees." These include your physical machine, hoops, and any software you use. I'm sorry that these represent a significant upfront cost, though the permanent 100% bonus depreciation under the OBBBA of 2025 helps businesses recover these costs quickly. Variable costs are the items you use up, such as fabric, stabilizers, and digital designs like car or anime embroidery designs. Tracking these per project is the only way to see your true profit or cost. For those seeking a comprehensive overview of machine embroidery as a process, you'll see that variable costs are the most controllable part of your budget.
[Placeholder for Diagram: Fixed vs. Variable Cost Breakdown]
This diagram will illustrate the split between one-time investments (Machine, Hoops) and recurring expenses (Thread, Designs, Stabilizer).
Why a "Per Project" Budget Matters
I've noticed that "hobby creep" is a common issue. It's that feeling when you buy ten spools of thread because they're pretty, not because you need them. I recommend setting a specific budget for every item you create. This is especially important for beginners who are still learning machine embroidery sewing basics. By calculating the cost of your stabilizer, thread, and digital design upfront, you can decide if a project is worth the investment. It's a simple step that keeps your creativity from becoming a financial burden.
Sourcing Designs and Fonts: The Smart Way to Save
I'm sorry to report that many creators overlook the cumulative cost of design files when they're first starting out. I regret that these costs are often treated as an afterthought, but they represent a major part of budgeting for machine embroidery projects. If you're following the SBA guidance on calculating startup costs, you'll see that digital assets are a recurring variable expense that can quickly eat into your margins if you aren't careful.
I find that the most significant technical barrier for beginners is the high price of custom digitizing. A single custom file can cost between $20 and $60. For instance, French Press Custom currently charges a flat $45 per design. I'm sorry to say that doing this for every project is simply not sustainable for most budgets. Instead, I recommend building a library of high-quality, pre-made files. You can find professional [embroidery designs] for a fraction of that price, often between $5 and $10, which are already optimized for your machine.
The Value of Pre-Made Digital Patterns
I've noticed that using pre-made patterns saves more than just money. It saves hours of labor and the need for expensive software like Wilcom EmbroideryStudio 2026 or Hatch Embroidery 4. I regret that "free" designs from unverified sources often have poor stitch density, which can lead to birdnesting or even mechanical damage. It's much safer to invest in curated collections. If you're looking to personalize gifts, our college embroidery designs or NFL patterns provide a professional look without the custom price tag.
Investing in Versatile Embroidery Fonts
I also suggest viewing professional fonts as a one-time investment. While a font set might cost more than a single design, it allows you to create endless monograms and names. I'm sorry that generic font generators often produce "choppy" results on difficult fabrics. A professional stitch file font is a "workhorse" that works across various projects, making it a cornerstone of any smart budget. By choosing versatile styles, you avoid the need to buy new assets for every single order.
![Budgeting for Machine Embroidery Projects: A Practical Guide for 2026]
Managing Consumables: Thread, Stabilizer, and Needles
I'm sorry to report that consumables are the silent profit killer in this craft. When you're budgeting for machine embroidery projects, it's easy to focus on the machine and forget the "Big Three": thread, stabilizer, and needles. I regret that these recurring costs can spiral out of control without a clear plan. I find that a transparent look at your cost-per-stitch is the best way to maintain your financial health and keep your projects sustainable.
The Cost Efficiency of Quality Thread
I've noticed that buying 5000m "king spools" for around $3.00 is much smarter than buying small spools for workhorse colors like black and white. While it's tempting to grab cheap thread from discount marketplaces, I'm sorry to say this creates a technical barrier. Low-quality thread sheds lint that clogs your machine and causes frequent breaks. This lost time is a massive hidden expense when you're managing your business finances. I suggest building your library slowly with high-quality polyester spools to keep your machine running smoothly and avoid expensive repairs.
[Placeholder for Picture: Comparison of thread spool sizes and cost-per-yard]
Stabilizer Selection: Don’t Throw Money Away
Stabilizer selection is another area where I see a lot of money thrown away. I regret that many creators discard large scraps that could easily support smaller [embroidery patterns]. Buying rolls, which often range from $14.88 to $27.99, is significantly cheaper than buying pre-cut sheets. I suggest keeping a scrap bin for your cut-away and tear-away leftovers. Using a scrap for a small logo instead of a fresh sheet can save you a surprising amount of money over the course of a year. It's a simple habit that keeps your project overhead low without sacrificing quality.
Reducing Project Waste Through Smart Planning
I'm sorry to report that most creators don't realize how much a single mistake costs until they're staring at a ruined jacket. I regret that poor planning creates a technical barrier that turns a profitable project into an expensive lesson. When you're budgeting for machine embroidery projects, you have to account for the risk of ruined "blanks." These physical garments are often your most expensive variable cost, and losing one can wipe out your entire supply budget for the month.
I find that the "Measure Twice, Stitch Once" philosophy is your best financial defense. I suggest using test-stitching on scrap fabric for every new design. This allows you to verify the density and pull compensation before risking your expensive materials. If you understand how different [embroidery stitches] interact with your fabric, you can better predict thread usage and prevent bird-nesting. Proper hooping is also vital. A loose hoop leads to registration errors that force you to throw the whole project away.
The Hidden Cost of "Oops" Moments
I've seen many people lose $30 or more on a single hoodie because of poor placement. I'm sorry that this happens, but you can avoid it by using these simple planning steps:
- Use template software or paper printouts for perfect alignment.
- Mark your center points clearly with a water-soluble pen.
- Double-check your needle clearance before starting the machine.
I regret that "winging it" rarely works in professional embroidery, so taking five minutes to plan saves you the cost of a replacement garment. Smart planning is the most effective way to keep your budgeting for machine embroidery projects on track.
Efficient Hooping and Fabric Usage
I've noticed that many people waste stabilizer by hooping only one design at a time. I recommend maximizing your hoop space by grouping multiple small patterns into a single session. This is particularly effective for small logos or monograms. I'm sorry that stabilizer is expensive, but using techniques like "hoopless" embroidery allows you to use every square inch of your roll. I also suggest buying fabric remnants from local shops for your test runs. It's a much cheaper way to practice than using full-priced materials. If you want to start with designs that are already optimized for efficiency, check out our collection of anime embroidery designs to see how professional digitizing reduces waste.
[Placeholder for Diagram: Efficient Design Placement in a 5x7 Hoop]
Long-Term Financial Health: Maintenance and Scaling
I'm sorry to report that many creators forget to plan for the day their machine needs professional care. I regret that this oversight often leads to a technical barrier when a sudden repair bill arrives and stalls your production. I find that the most sustainable way to handle budgeting for machine embroidery projects is to set aside a small maintenance fund. I suggest allocating $0.05 for every 1,000 stitches your machine runs. This sinking fund ensures that when you hit a major service interval, the money is already there to keep you stitching.
I also recommend that if you're scaling up to a professional studio, you explore Commercial Electrical Fit‑out to ensure your workspace can safely handle the increased power demands of multiple industrial machines.
DIY Maintenance to Save on Service Calls
I've noticed that many "broken" machines just need a bit of basic care. I'm sorry to say that a dull needle is responsible for a huge percentage of tension issues, yet it's only a $1 fix. I recommend a strict daily cleaning and oiling routine to extend your machine's life. Keeping a simple log of your stitch counts helps you know exactly when it's time for professional servicing. This proactive approach prevents the catastrophic failures that cost hundreds of dollars to fix and keeps your budgeting for machine embroidery projects predictable.
Pricing for Profit (If You Sell Your Work)
If you're moving from a hobby to a side-hustle, I'm sorry that pricing can feel awkward. I find that a transparent formula is the best way to stay profitable. You should add up your supplies, the cost of your embroidery designs, and your labor. Verified 2026 data shows that many professionals charge between $0.50 and $2.00 per 1,000 stitches. If you're using premium techniques like [appliqué], make sure to factor in the extra fabric and cutting time. I regret that many people undercharge by forgetting to include the cost of their digital assets. Being clear about these costs with your customers builds trust and protects your bottom line.
- Track your total stitch count to predict maintenance needs.
- Update your pricing quarterly to reflect changes in thread and stabilizer costs.
- Invest in "workhorse" digital designs that appeal to a wide customer base.
Take Control of Your Embroidery Finances
I'm sorry to report that many creators allow their creative passion to lead to financial strain. I find that separating your fixed machine costs from your per-project variables is the only way to stay in the green. I regret that technical barriers often arise from a lack of structure, but by using test-stitches and buying consumables in bulk, you can lower your overhead significantly.
Mastering budgeting for machine embroidery projects doesn't mean you have to stop creating. It just means being smarter about where you spend your resources. I suggest focusing your budget on high-quality digital assets that you can use repeatedly across different items. This strategy protects your margins while allowing for the hyper-personalization that 2026 consumers demand.
Browse our affordable, high-quality digital embroidery designs to start your next project today! We offer over 30,000 professional designs that are compatible with all major machine formats. Every purchase includes an instant download so you can start your project immediately. You now have the strategic tools to make 2026 your most profitable and creative year yet.
Frequently Asked Questions
How much should I budget for my first year of machine embroidery?
I find that you should plan for the cost of your machine plus an additional $500 to $1,200 for your initial setup. I'm sorry to report that consumables like stabilizers and thread libraries add up quickly. You'll also need to account for a variety of digital embroidery designs to get started. I suggest prioritizing quality over quantity to avoid the technical barrier of cheap, unreliable supplies that can hinder your progress.
Is it cheaper to digitize my own designs or buy them?
I regret to inform you that digitizing your own designs is rarely the cheaper option for beginners. Professional software like Hatch Embroidery 4 or Wilcom EmbroideryStudio 2026 costs hundreds or even thousands of dollars. I find it's much more economical to buy pre-made embroidery designs, which typically cost between $5 and $10. This approach saves you from the steep learning curve and high software overhead of custom digitizing.
How many needles do I really need to buy at once?
I suggest keeping at least twenty to fifty needles in your stash at all times. A 5-pack of needles usually costs between $2.99 and $6.99, making them a very affordable part of your budget. I'm sorry to say that a dull needle is a common cause of bird-nesting and thread breaks. Since you should change your needle every 8 to 10 hours of stitching, buying in bulk prevents project delays.
What is the most expensive part of an embroidery project?
I've noticed that the "blank," or the physical garment itself, is usually the highest variable expense. However, if you don't use pre-made files, custom digitizing fees of $20 to $60 represent a massive portion of budgeting for machine embroidery projects. I regret that a single hooping error on an expensive jacket can double your project cost. I find that using test-scraps is the best way to protect this investment.
Can I use regular sewing thread for embroidery to save money?
I'm sorry to report that using regular sewing thread is not a viable way to save money. Sewing thread is often too thick and produces excessive lint, which can clog your bobbin case and tension discs. I find that it creates a technical barrier that leads to frequent thread breaks and potential machine damage. It's much safer to use dedicated polyester or rayon embroidery thread designed for high-speed machines.
How do I calculate the cost of thread for a specific design?
I recommend using the stitch count from your design file as a baseline for your budgeting for machine embroidery projects. As a general rule, 1,000 stitches use approximately 5 yards of thread. If you buy 5,000m king spools for around $3.00, your thread cost per project is often just a few cents. I find that tracking this helps you price your work accurately if you decide to sell your items.
Is buying a used embroidery machine a good way to save money?
I find that a used machine can be a great investment, but I'm sorry to say it requires careful inspection. You should always ask for the total stitch count and recent service records to avoid hidden mechanical issues. I suggest testing a complex design on the machine before you commit to the purchase. This ensures you aren't inheriting a technical barrier that will lead to expensive professional repairs later on.


