

Does this sound familiar? You have the perfect project in mind, the fabric is hooped, and your machine is threaded with the perfect color. But then, the creative momentum comes to a screeching halt as you spend the next thirty minutes digging through a chaotic ‘Downloads’ folder, scrolling past duplicate files and cryptic names like 'rose_final_v2.pes'. When the search for a design takes longer than the stitching, it’s easy to feel frustrated. If you're tired of the digital clutter, the good news is there's a simple solution. Mastering the skill of organizing digital embroidery designs is the key to unlocking more creative time.
In this ultimate guide, we’ll walk you through a clear, step-by-step system to transform your file mess into a beautifully organized, searchable library. You'll learn how to create a logical folder structure, handle duplicates, and securely back up your entire collection. Get ready to say goodbye to stressful searching and hello to having the perfect design at your fingertips, so you can spend more time doing what you truly love: creating. [
Key Takeaways](https://embroiderynsewing.com/articles)
- Create a logical folder hierarchy, starting with one master folder, to instantly know where every design belongs and end the frustration of searching. - A smart workflow for new downloads is the secret to successfully organizing digital embroidery designs and preventing future clutter.
- Go beyond folders by adopting a consistent file naming system that makes your entire collection searchable at a glance. - Learn how to implement a simple backup strategy to protect your valuable design library from computer crashes or accidental loss.
Table of Contents
- Why a System for Organizing Embroidery Files is a Game-Changer
- The Foundation: Creating a Logical Folder Structure
- A Smart Workflow: From Download to Final Placement
- Beyond Folders: Smart File Naming and Visual Catalogs
- Protect Your Investment: Backup and Cloud Storage Solutions
Why a System for Organizing Embroidery Files is a Game-Changer
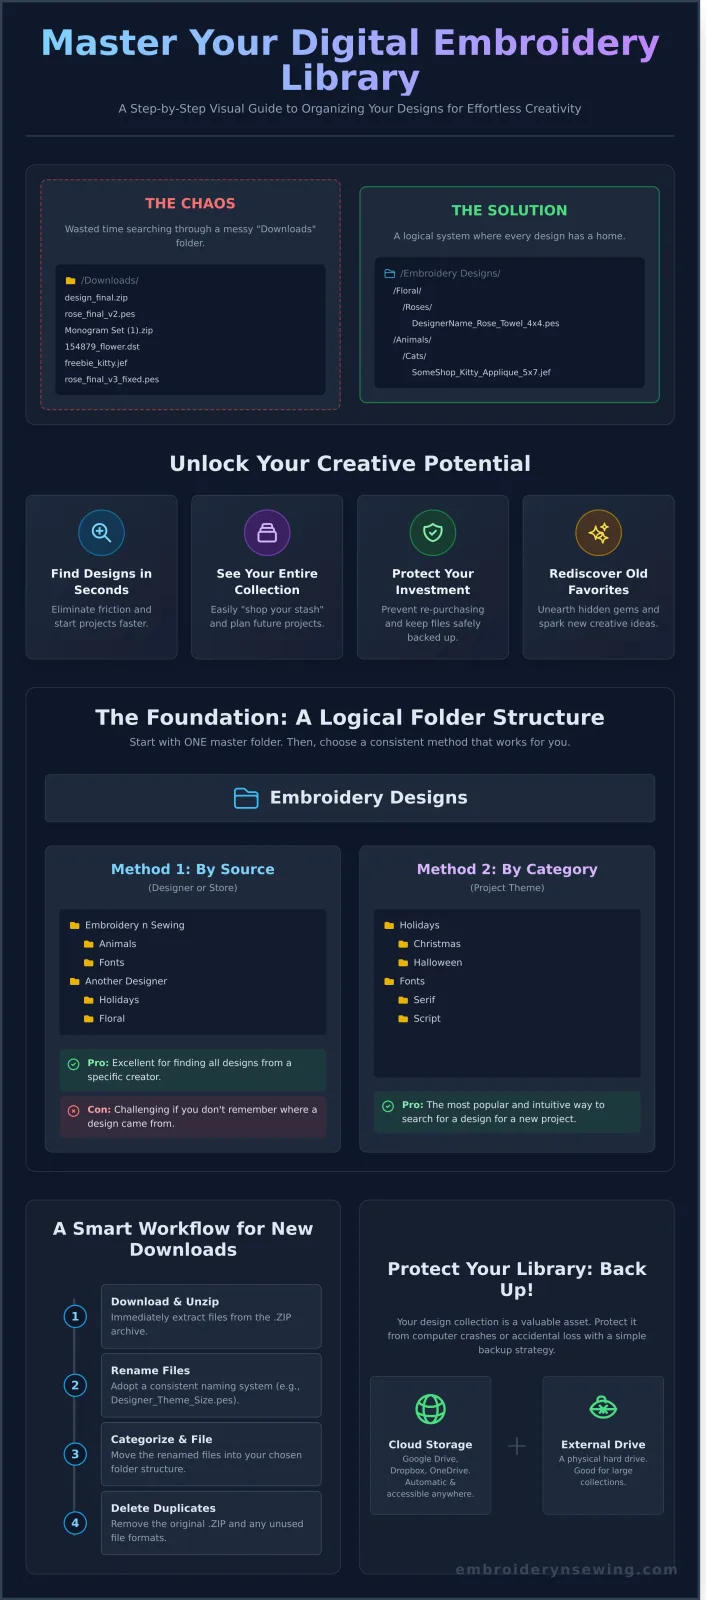
If your computer’s "Downloads" folder looks like a digital fabric sale bin-chaotic, overflowing, and impossible to navigate-you're not alone. That quick ITH (in-the-hoop) design you bought last month is now buried under dozens of generic ZIP files and cryptically named folders. This is more than a minor annoyance; it’s a roadblock to your creativity. A dedicated system for organizing digital embroidery designs isn't just about being tidy; it's about reclaiming your time and your passion for the craft.
The true cost of a messy design library goes beyond the money spent on files you can't find. It's the 15 minutes you waste searching for that perfect floral border for a tea towel, the mounting frustration that makes you abandon a project before it starts, and the sinking feeling when you realize you just re-purchased a monogram set you already owned. When your digital workspace is cluttered, your inspiration gets stifled. Each design is an investment, and without a system, that investment is at risk of being lost or forgotten.
Benefits of a Clean Embroidery Library
Now, imagine a different scenario: you have an idea for a project and can pull up the exact design you need in under 30 seconds. That’s the power of an organized library. This becomes even more critical when you consider the sheer variety of machine-specific embroidery file formats like PES, DST, and JEF that you have to manage. A clear structure brings immediate and lasting benefits.
- Find any design in seconds: Eliminate project-start friction by locating files instantly.
- Easily see what you own: Plan future projects with a clear inventory of your assets and "shop your stash" first.
- Protect your investment: Prevent accidental re-purchasing and ensure your valuable designs are safely backed up.
- Rediscover old favorites: Unearth gems you completely forgot you had, sparking brand-new creative ideas.
Ultimately, taking the time for organizing digital embroidery designs transforms your collection from a source of stress into a powerful, accessible toolkit. You'll move from feeling overwhelmed by the digital mess to feeling empowered and in complete control of your creative assets, ready to bring your next beautiful idea to life without hesitation.
The Foundation: Creating a Logical Folder Structure
Before you can tame the chaos, you need a place to put everything. A well-planned folder structure is the backbone of any successful system for organizing digital embroidery designs. This isn't just about tidiness; it's about creating a permanent, searchable library for your valuable collection. A solid framework is the first step in long-term file care, echoing core Digital preservation principles that ensure your designs remain accessible for years to come.
Start by creating one master folder on your computer's hard drive or cloud storage. Name it something simple and clear, like "Embroidery Designs." All your downloaded and purchased files will live inside this single location. From there, you can choose a sub-folder strategy that best fits the way you think and work.
There is no single "right" way to do this. The key is to pick one method and apply it consistently. Let's explore three popular and effective approaches.
Method 1: Organize by Source (Designer or Store)
If you have favorite designers or frequently shop at the same online stores, this method is very intuitive. You create a primary folder for each source and then categorize the designs within that folder. It’s a great way to keep track of where your purchases came from.
For example, your main folder Embroidery Designs could contain:
-
Embroidery n Sewing
- Animals
- Fonts
-
Another Designer
- Holidays
- Floral
-
Pros: Excellent for quickly finding all designs from a specific creator or remembering where you bought a particular file.
-
Cons: Can be challenging if you don't remember the source of a design you're looking for.
Method 2: Organize by Category or Theme
This is arguably the most popular method for organizing digital embroidery designs because it aligns with how most people search for a file for a new project. You create broad category folders and then get more specific with subfolders inside them.
In this approach, your main Embroidery Designs folder might look like this:
-
Holidays
- Christmas
- Halloween
-
Animals
- Farm
- Dogs
-
Pros: Highly intuitive for project-based searching (e.g., "I need a Christmas design").
-
Cons: Some designs can fit into multiple categories, forcing you to make a choice or duplicate the file.
Method 3: Organize by Project Type
If you specialize in embroidering specific items, this system is incredibly efficient. Your main folders are based on the final product, helping you find files that are already sized or styled appropriately for a particular application, like hats or kitchen towels.
An example structure for Embroidery Designs using this method would be:
-
Hat Designs
- Sports Logos
- Text
-
Towel Toppers
- Kitchen
- Holiday
-
Pros: Perfect for a production-focused workflow, making it fast to find suitable designs for specific items.
-
Cons: Less effective for general browsing or creative exploration outside your usual projects.
Ultimately, the best system is the one you will actually use. Choose the method that makes the most sense to you, and most importantly, be consistent! A consistently used "good" system is far better than a "perfect" system that you abandon after a week.
A Smart Workflow: From Download to Final Placement
The biggest challenge in keeping your design library tidy isn't the initial big sort-it's managing the constant flow of new files. Without a system, your perfectly organized folders can quickly become cluttered. A simple, repeatable workflow is the secret to successfully organizing digital embroidery designs for the long term. This process takes only a few minutes per design but saves hours of searching later.
Step 1: The 'Incoming' Folder Method
Create a single, temporary folder on your computer's desktop and name it "Incoming Embroidery" or "To Be Filed." Make it a rule: every new design you download, purchase, or receive goes directly into this folder. It acts as a digital quarantine zone, preventing new files from getting lost in your main 'Downloads' folder. Set aside 15 minutes each week to process everything inside.
Step 2: Unzip and Identify Your File Format
Most embroidery designs are delivered in a compressed .ZIP file to save space. Your first action in the 'Incoming' folder is to extract these files. Right-click the ZIP file and select "Extract All." Inside, you'll find multiple versions of the same design in different formats. Your job is to find the one your machine uses.
- Identify your format: Look for the file extension your machine reads (e.g., .PES for Brother, .JEF for Janome, .DST for many commercial machines).
- Save space: Once you've found your format, you can safely delete the others to avoid confusion and free up disk space.
Step 3: Rename and File Immediately
With the correct file isolated, it's time for final placement. First, rename the file using the consistent naming convention we'll cover in the next section. Then, move the design file-along with its corresponding image file or PDF color chart-to its permanent home in your categorized folder structure. The final, crucial step is to delete the original .ZIP file and the now-empty extracted folder from your 'Incoming' folder. Your processing is now complete!
Making this three-step process a habit is the most critical part of organizing digital embroidery designs. It ensures your collection is always up-to-date, and you can always find the exact design you need right when inspiration strikes.
Beyond Folders: Smart File Naming and Visual Catalogs
A well-planned folder structure is a fantastic start, but it's only half the battle when it comes to truly mastering the art of organizing digital embroidery designs. To find any file in seconds, you need a system that works both inside and outside those folders. This involves creating a consistent naming convention and using tools to make your collection visual and searchable.
Creating a Consistent Naming Convention
A smart file name acts like a digital label, telling you everything you need to know at a glance. We recommend a simple formula: Category_Subject_Designer_Size.filetype. Using underscores or dashes instead of spaces prevents issues with some software. This method makes your files searchable on your computer, so you can find all "Holiday" designs instantly, regardless of which folder they are in.
- Bad example: santa 1.pes
- Good example: Holiday_SantaFace_ENS_4x4.pes
Must-Have Software for Viewing Design Thumbnails
By default, your computer's operating system doesn't know how to display a preview of embroidery files like .PES, .JEF, or .DST. You just see a generic icon, which isn't helpful. Installing a thumbnailer program is a complete game-changer. Software like Embrilliance Thumbnailer or the viewer included with SewWhat-Pro allows your file explorer to display a small image of each design, transforming your browsing experience from guesswork to a visual delight.
Creating a Master Spreadsheet or Visual Catalog
For the ultimate level of control, create a master list of your collection. A simple spreadsheet in Google Sheets or Excel can serve as your design database. Track key information for each file, such as:
- File Name
- Source/Designer
- Stitch Count & Colors
- Hoop Size
- Link to the original product page
- Project ideas
If you're a more visual person, a private Pinterest board can serve as a beautiful catalog. Pin an image of each design and use the description to note important details. Ready to grow your collection with files that are easy to track from day one? Browse our curated designs!
Protect Your Investment: Backup and Cloud Storage Solutions
You’ve invested significant time, effort, and money into building and curating your embroidery collection. Imagine the heartbreak if a sudden computer crash or hard drive failure wiped it all out in an instant. After carefully organizing your digital embroidery designs, implementing a robust backup strategy is the most critical final step to protect your work.
Professionals follow the 3-2-1 backup rule: maintain at least three copies of your data, store them on two different types of media (e.g., your computer and an external drive), and keep one copy off-site (away from your home).
Physical Backups: The Pros and Cons
Using a USB flash drive or an external hard drive is a great starting point. Periodically copying your entire embroidery design folder to one of these devices ensures you have a second copy. However, this method has its limitations.
- Pros: It’s a simple one-time purchase with no recurring fees, and you have complete physical control over your backup.
- Cons: Drives can be lost, stolen, or damaged by fire or water. They can also fail without warning, and you must remember to perform the backups manually.
Cloud Storage: The Modern Solution
Cloud storage services like Dropbox, Google Drive, or OneDrive are the ideal solution for meeting the "off-site" requirement of the 3-2-1 rule. They automatically synchronize a folder on your computer with secure online servers.
- Pros: Syncing is automatic, so your backup is always current. You can access your files from any device with an internet connection, and your collection is safe from local disasters.
- Cons: While most services offer a free starting amount of storage, you may need a small monthly subscription for larger collections.
Setup is incredibly simple: just move your main embroidery folder into the special folder created by the cloud service (e.g., the "Dropbox" folder). From then on, every design you add or change is backed up seamlessly. A solid backup plan is the ultimate assurance that your efforts in organizing your digital embroidery designs are safe for good.
From Digital Clutter to Creative Clarity
Taming your digital embroidery collection transforms it from a source of frustration into a wellspring of inspiration. By implementing a logical folder structure and a consistent file-naming system, you’ll spend less time searching and more time stitching. Remember, a solid workflow-from download to backup-is the secret to maintaining order long-term. Mastering the art of organizing digital embroidery designs is a skill that empowers your creativity, ensuring your beautiful patterns are always ready for your next project.
Ready to grow your newly organized library with stunning new patterns? It’s time to explore a collection worthy of your system. Start building your dream library with high-quality patterns from Embroidery n Sewing! You'll find a vast collection of popular designs, all available as instant digital downloads and compatible with all major machine brands. Go ahead, take that first step. Your future, more creative self will thank you for it. Happy stitching!
Frequently Asked Questions
What do I do with all the different file formats inside a single ZIP file?
When you download a design, the ZIP file often contains multiple formats for different machine brands (e.g., .PES, .DST, .JEF). You only need the specific format your embroidery machine uses. A great practice is to create a main folder called "Original ZIPs" to store the untouched downloads. Then, extract only the file format you need into your organized folder structure. This saves space on your working drive but ensures you have the originals if you ever change machines.
Is there any good free software for viewing or organizing embroidery designs?
Yes, there are excellent free options available. Embrilliance Express is a popular choice that allows you to view, resize (with stitch recalculation), and print templates for most embroidery formats. It also lets you manage colors and add lettering. Another free tool is My Editor by Wings Systems, which offers basic viewing and editing capabilities. These programs are invaluable for seeing a design's thumbnail image instead of just a generic icon, making visual organization much easier.
How often should I back up my embroidery design collection?
You should back up your collection regularly to prevent accidental loss. A good rule is to back up immediately after purchasing and organizing new designs. For your entire collection, a full backup once a month is a safe strategy. Consider using the 3-2-1 backup rule: have three copies of your data, on two different types of media (like your computer and an external hard drive), with at least one copy stored off-site (like a cloud storage service).
What's the best way to handle designs that I've customized myself?
When you modify a design, it's crucial to save it without overwriting the original file. A simple and effective method is to add a suffix to the new file name, such as "_mod" or "_v2". For example, `rose_design_v2.pes`. Store this modified version in the same folder as the original or in a dedicated subfolder called "My Edits." This keeps your customized work easy to find while preserving the original design file for future use.
How can I organize my embroidery fonts collection?
Organizing embroidery fonts can be done by creating folders based on their style. For instance, create parent folders like "Script Fonts," "Block Fonts," and "Serif Fonts." You can also organize by size if you frequently use fonts designed for specific dimensions, like "Mini Fonts." Always keep the entire set of letter files and any accompanying PDF key chart together in the font's main folder. This ensures you can easily reference which keyboard key creates which character.
Is it better to organize by theme or by the store I bought the design from?
This often comes down to personal preference and how you search for designs. Organizing by theme (e.g., "Holidays > Christmas" or "Animals > Birds") is incredibly intuitive when you're looking for a design for a specific project. However, organizing by designer or store can be useful for remembering a certain style or for licensing purposes. Many embroiderers find a hybrid system works best, starting with a theme and perhaps adding the designer's name to the file itself.
My collection is already a huge mess. What's the best way to start tackling it?
The best way to start organizing digital embroidery designs when you have a huge mess is to not try to do it all at once. Start small to avoid feeling overwhelmed. Choose one specific category, like all your Christmas designs or all designs from a single favorite designer, and organize just that folder. Another strategy is to organize designs as you use them. Before starting a new project, take a few minutes to properly file the design you've chosen.


