

Is there anything more frustrating than pulling a project from the hoop only to find a mess of loops and visible bobbin thread? You've spent hours on the perfect design, only to have it ruined by those dreaded stitch issues. For many, the thought of touching the tension settings on an expensive machine is terrifying, but effective troubleshooting machine embroidery tension is the single most important skill for achieving flawless results. It’s the secret that separates homemade-looking projects from professional, store-quality embroidery.
This ultimate guide is here to transform your fear into confidence. We will walk you through everything, step-by-step, from identifying the subtle signs of an imbalance to understanding the root cause of the problem. You’ll learn exactly what a perfect stitch is supposed to look like and gain a clear, logical checklist to follow whenever issues arise. Get ready to take control of your machine and finally produce the clean, beautiful stitches you’ve always dreamed of, every single time.
- Discover the five essential pre-checks that solve most stitch issues before you ever need to touch a tension dial. - Master the simple 'I' and 'H' test method to accurately diagnose your stitch quality and see what adjustments are needed. - Simplify your approach to troubleshooting machine embroidery tension by following a clear, step-by-step process that starts with the top thread. - Learn to identify problems that mimic bad tension, such as incorrect needles or stabilizers, to solve stubborn stitch issues for good.
Table of Contents
- Understanding Embroidery Tension: What a Perfect Stitch Looks Like
- The 5 Essential Pre-Checks: What to Do Before Touching Tension Dials
- How to Perform a Reliable Tension Test: The 'I' and 'H' Method
- Making Adjustments: A Cautious, Step-by-Step Approach
- Advanced Troubleshooting: When the Problem Isn't Just Tension
Understanding Embroidery Tension: What a Perfect Stitch Looks Like
At its core, embroidery tension is the delicate balance between your top (needle) thread and your bottom (bobbin) thread. Think of it as a perfect handshake happening within the layers of your fabric and stabilizer. When this balance is correct, the threads meet precisely in the middle, locking each stitch securely and creating a beautiful, professional finish. Understanding this concept is the foundation of sewing machine tension basics and is absolutely critical for embroidery.
Achieving this balance is the first and most important step in troubleshooting machine embroidery tension. Properly balanced tension not only ensures your designs look flawless but also prevents common issues like thread breaks, fabric puckering, and even unnecessary wear on your machine.
The Anatomy of a Perfect Stitch
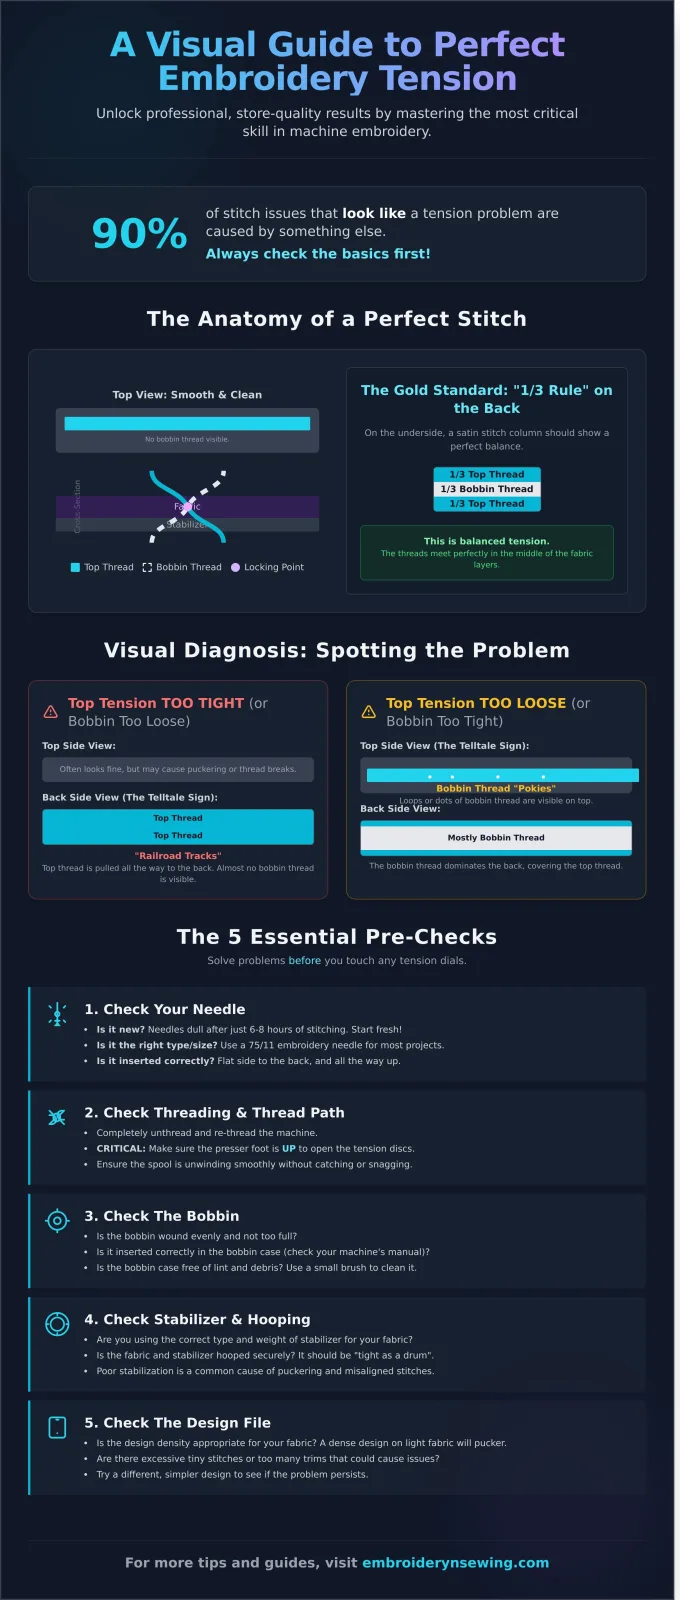
A visual check is the fastest way to assess your tension. On the top side of your embroidery, the stitches should look smooth, even, and consistent, with no bobbin thread visible. The real story, however, is told on the back.
Flip your project over and examine a column of satin stitches. For a perfect stitch, you should see what’s known as the “1/3 rule”: the column should be composed of roughly 1/3 top thread, 1/3 bobbin thread running down the center, and 1/3 top thread again on the other side. This is the gold standard for balanced tension.
Visual Signs of Poor Tension (Top Side)
If your top thread is too loose or your bobbin thread is too tight, you'll see problems on the front of your design. Look for these common symptoms:
- Bobbin thread pulling up: You might see tiny dots or loops of your bobbin thread color appearing between stitches, sometimes called "pokies."
- Looping top thread: Stitches look loose, loopy, or don't lay flat against the fabric.
- Fabric puckering: The fabric bunches up or wrinkles around the embroidered area, indicating the thread is pulling too tightly.
Visual Signs of Poor Tension (Bottom Side)
When the top thread tension is too tight or the bobbin is too loose, the evidence will be clear on the underside of your embroidery. Key indicators include:
- "Railroad tracks": The top thread is pulled all the way to the back, showing two parallel lines of top thread with almost no bobbin thread visible in the center.
- Hidden bobbin thread: The bobbin thread is almost completely covered by the top thread.
- "Bird's nests": Messy, tangled loops of thread form underneath the fabric, which is often a sign of a severe tension or threading issue.
The 5 Essential Pre-Checks: What to Do Before Touching Tension Dials
Before you even think about turning a tension dial, stop. It might surprise you, but experts agree that roughly 90% of stitch quality issues that look like tension problems are caused by something else entirely. Working through this checklist first is the single most effective way of troubleshooting machine embroidery tension. Make these checks a routine before every project to save yourself hours of frustration and wasted materials.
Check #1: Your Needle
A worn or incorrect needle is a primary cause of shredded threads and skipped stitches. A needle isn't a "set it and forget it" component. Ask yourself these questions:
- Is the needle new? Needles become dull after just 6-8 hours of active stitching time. Start every large project with a fresh needle.
- Is it the right type and size? Using a 75/11 embroidery needle is standard, but delicate fabrics or metallic threads may require a different size or type (like a topstitch needle).
- Is it inserted correctly? Ensure the flat side of the needle shank is facing the back of the machine and that it's pushed all the way up into the needle clamp before tightening.
Check #2: Threading and Thread Path
Improper threading is the most common culprit behind poor stitch quality. Don't just glance at it-completely unthread your machine and start over with the presser foot up. Raising the presser foot opens the tension discs, allowing the thread to seat correctly between them. This single step solves a surprising number of issues. In fact, many official guides, like Brother's tension troubleshooting tips, list proper threading as a primary solution before ever adjusting dials. As you re-thread, check that the thread spool isn't nicked and is unwinding smoothly without snagging on any part of the machine.
Check #3: The Bobbin
Your bottom thread is just as important as your top thread. A poorly prepared or inserted bobbin will cause looping and bird's nests on the underside of your embroidery. Verify the following:
- Is the bobbin wound evenly and not overfilled? A lumpy or too-full bobbin will not spin freely.
- Is it inserted correctly into the bobbin case, with the thread unwinding in the proper direction for your machine model?
- Is the bobbin case free of lint and dust? Even a small piece of fluff can disrupt the thread flow.
Check #4: Hooping and Stabilizer
Problems outside the machine can often look like a machine issue. If your fabric is not properly stabilized and hooped, it can move or pucker during stitching, which pulls on the thread and mimics a tension problem. Ensure your fabric and stabilizer are hooped "drum tight" and that you're using the correct type and weight of stabilizer for your fabric and design density.
Check #5: Machine Cleanliness
Lint, dust, and tiny thread clippings are the enemies of a smooth-running embroidery machine. These particles build up and can interfere with the thread path and moving parts. At a minimum, remove your throat plate and use a small brush to clean out the entire bobbin area and around the feed dogs. A clean machine is essential for consistent stitch quality and is a critical step in troubleshooting machine embroidery tension before making mechanical adjustments.
How to Perform a Reliable Tension Test: The 'I' and 'H' Method
Before you start turning dials, it's crucial to perform a diagnostic test. A tension test isn't just a fix; it's a window into your machine's performance, providing a clear baseline. This simple process is the most effective first step in troubleshooting machine embroidery tension. For accurate results, always run your test on a scrap piece of fabric and stabilizer that closely matches your actual project materials. Different fabrics and stabilizers can subtly alter tension, so testing on similar materials is non-negotiable.
Setting Up Your Test
A successful test requires a controlled setup where results are easy to see. The high-contrast colors are essential for a clear diagnosis. Your goal is to create the perfect conditions to reveal any tension imbalances.
- Fabric and Stabilizer: Use a light-colored, plain-weave fabric (like a cotton broadcloth) hooped with a medium-weight cut-away stabilizer.
- Thread: Use a dark-colored polyester embroidery thread for the top and a standard white bobbin thread.
- Test File: Find or create a simple design file with a capital 'I' and a capital 'H', each about one inch tall. Many machines include these as built-in test patterns.
Reading the 'I' Test Results (For Fill Stitches)
The 'I' test is your go-to for evaluating tension on fill stitches. After stitching, remove the hoop and look at the back of the fabric. You are looking for a thin column of white bobbin thread running down the center of the letter. Ideally, this white column should make up about one-third of the total stitch width. If the white column is wider than one-third, your top tension is too loose. If you see no white bobbin thread at all, your top tension is too tight.
Analyzing the 'H' Test Results (For Satin Stitches)
The 'H' test is the gold standard for checking satin stitch tension. Examine the back of the two vertical columns of the 'H'. The perfect result is a clean division of thirds: 1/3 top thread, 1/3 bobbin thread, and 1/3 top thread. This visual confirmation shows that the top and bobbin threads are pulling against each other in a perfectly balanced "tug-of-war." If your 'H' test shows this ratio, your tension is likely not the source of your problem, preventing you from making unnecessary adjustments.
Once you achieve a perfect stitch-out, save it! Label it with the thread and fabric type. This "perfect" sample becomes your physical reference point, making future troubleshooting machine embroidery tension quicker and more accurate.
Making Adjustments: A Cautious, Step-by-Step Approach
Now that you've identified the problem with your 'H' test, it's time to make adjustments. The golden rule when troubleshooting machine embroidery tension is to proceed slowly and methodically. Always start with the top tension, as this is the most common culprit and is designed for frequent adjustment. Your machine's bobbin tension is calibrated at the factory and should be considered a last resort.
Remember to make one small change at a time and then re-run your 'H' test. This isolates the variable and shows you the direct impact of your adjustment, preventing you from overcorrecting and creating a new problem.
Adjusting the Upper Thread Tension
Your machine's upper tension dial or digital setting is your primary tool. Refer to your manual to locate it, and then make a tiny adjustment based on your test results:
- If bobbin thread is visible on top: Your upper tension is too loose. Increase the tension slightly by turning the dial to a higher number or increasing the setting by the smallest increment (e.g., from 4.0 to 4.1).
- If top thread is being pulled to the back: Your upper tension is too tight. Decrease the tension by turning the dial to a lower number or reducing the setting.
When and How to Adjust Bobbin Tension (The Last Resort)
Only touch the bobbin tension if you have made significant upper tension adjustments with no success. Using a small screwdriver that fits the screw perfectly, make a minuscule turn on the bobbin case screw. A simple mnemonic is 'righty-tighty, lefty-loosey.' An adjustment of just 1/8th of a turn can have a dramatic effect, so be patient and re-test after each tiny change.
Document Your Settings
Turn your trial-and-error into a valuable resource. Keep a dedicated notebook where you log settings for different materials and threads. For a perfect result, note the thread brand, stabilizer used, and the final upper tension number. Staple your successful 'H' test swatch directly onto the page. This personal tension guide will save you immense time on future projects and become an invaluable part of your embroidery toolkit, complementing the expert guides you find on sites like embroiderynsewing.com.
Advanced Troubleshooting: When the Problem Isn't Just Tension
Have you adjusted your bobbin, re-threaded the top, changed needles, and still see puckering, looping, or thread nests? It’s a frustrating place to be. When standard fixes don’t work, it’s time to look beyond the thread path. Often, issues that look like tension problems are actually caused by your materials or the design file itself. This final step in troubleshooting machine embroidery tension is about examining the entire project ecosystem before calling for professional help.
The Role of Stabilizer and Fabric
Your stabilizer is the foundation of your embroidery. If it’s weak or incorrect for the job, your stitches will sink, pull, and pucker, no matter how perfect your tension is. Ensure your stabilizer choice matches your fabric type and the design's stitch count-a delicate tear-away for a light linen won't support a dense design, while a heavy cut-away might be too stiff for a baby onesie. Proper hooping is equally critical; your fabric and stabilizer should be smooth and taut like a drum, but not stretched.
How Embroidery Design Quality Affects Stitches
Not all digital designs are created equal. A poorly digitized file can be the hidden culprit behind constant thread breaks and poor stitch quality. Designs with excessive stitch density-too many stitches packed into a small area-put immense strain on your machine and fabric, leading to a stiff, distorted result. A professionally crafted design works with your machine, not against it. Our library of embroidery designs are professionally digitized to ensure smooth, beautiful stitch-outs every time.
When to See a Professional Technician
If you have worked through every step in this guide and the problems persist, it may be time to consult an expert. There are mechanical issues that no amount of user-level troubleshooting can solve. You should schedule a service appointment if:
- You have exhausted all troubleshooting steps without success.
- Your machine is making unusual grinding, clunking, or squealing noises.
- You suspect the timing is off (e.g., the needle is hitting the bobbin case).
Even if your machine runs well, an annual professional servicing is a great investment to keep it in peak condition for years of happy stitching. For all your other creative needs, explore our resources at embroiderynsewing.com.
Master Your Machine: Final Thoughts on Flawless Tension
You now have the knowledge to transform tension troubles into stitching triumphs. Remember that the path to a perfect stitch-out often begins before you touch a single dial-with essential pre-checks like re-threading and changing your needle. By mastering the 'I' and 'H' test and making cautious, step-by-step adjustments, you gain true control over your craft. This systematic approach is the secret to successfully troubleshooting machine embroidery tension and leaving frustration behind.
Of course, a beautiful result also depends on a high-quality file. When you start with a flawless foundation, you can focus purely on your machine's performance. Ready to see the difference an expertly crafted file makes? Browse our professionally digitized designs for a flawless stitch-out! We offer thousands of options, each tested for smooth performance on all major machine brands. You can get an instant download to start your next beautiful project right now.
Don't be discouraged by the occasional hiccup. Every challenge is a chance to better understand your machine. Keep practicing, be patient, and happy stitching!
Frequently Asked Questions
Why is my bobbin thread showing on top of my embroidery?
If you see bobbin thread on the top side of your fabric, it typically means your upper tension is too tight or your bobbin tension is too loose. The top thread is pulling the bobbin thread upwards. Try lowering your machine's upper tension setting one number at a time. Also, ensure your bobbin is inserted correctly and that there isn't lint or debris inside the bobbin case affecting its tension spring.
What causes 'bird nesting' on the underside of my embroidery?
Large, tangled loops of thread on the back of your embroidery, known as 'bird nesting,' are almost always caused by an issue with the upper threading. The most common culprit is not threading the machine with the presser foot in the 'up' position. This prevents the thread from seating correctly in the tension discs. Completely re-thread your machine from the start, making sure the thread is securely in every guide and the take-up lever.
Can the type of thread I use affect my machine's tension?
Absolutely. Different thread materials like polyester, rayon, and metallic, as well as different weights (e.g., 40 wt vs. 60 wt), have unique thicknesses and textures that interact with the tension discs differently. Slippery metallic threads, for example, often require a looser upper tension and a special needle. It's a best practice to run a quick tension test on a scrap piece of fabric whenever you change your thread type or brand to ensure a balanced stitch.
How often should I clean my embroidery machine to prevent tension issues?
Regular cleaning is crucial for preventing tension problems. Lint and dust buildup in the bobbin area and thread path can disrupt the thread flow. For best results, perform a quick cleaning of the bobbin case with a small brush after every 8-10 hours of stitching. A more thorough cleaning, including carefully clearing the upper tension discs with unwaxed dental floss, should be done monthly. This simple maintenance is a core part of effective troubleshooting machine embroidery tension.
Does the embroidery design file itself cause tension problems?
Yes, a poorly digitized design can create issues that look like tension problems. A design with stitch density that is too high for the fabric, improper underlay, or too many small stitches in one spot can cause thread breaks, puckering, and an unbalanced appearance. If you've checked all mechanical settings, try stitching a different design from a trusted source. If it sews perfectly, the original design file is likely the source of the issue.
Is it better to use pre-wound bobbins or wind my own?
Pre-wound bobbins offer superior consistency. They are wound by specialized machinery to a uniform tension from start to finish, which helps produce a clean, balanced stitch. While winding your own is more economical, it can introduce variables. An unevenly or loosely wound bobbin can cause significant tension fluctuations and stitching problems. For reliability and to eliminate a potential variable when troubleshooting, many embroiderers prefer using high-quality pre-wound bobbins.


