

- Identifying the markers of professional digital patterns. - Understanding how technical digitizing prevents machine failure. - Finding reliable sources for high-detail embroidery files. - Techniques for achieving professional finishes on home equipment.
You've just spent twenty minutes hooping your favorite denim jacket and threading the perfect shade of indigo. You hit start, but five minutes later, your machine is grinding and there's a massive knot of thread ruining your fabric. It's a common headache for many of the 40% of embroidery businesses run from home, and it's honestly exhausting to see good material go to waste. I understand the frustration of flat, lifeless designs that don't match the preview on your screen. To avoid these pitfalls, you need Quality and detailed embroidery designs that serve as a precise technical blueprint for your machine.
I want to help you distinguish professional-grade patterns from the low-quality files that frequently cause jams and broken needles. We'll explore the technical side of digitizing and help you find reliable sources so your home machine produces flawless, high-detail results every time. By the end of this guide, you'll know exactly what to look for before you ever hit the start button.
[Key Takeaways]
- Learn how proper stitch pathing and balanced density prevent your fabric from bunching or distorting during the sew-out.
- Use a virtual simulator to review the sequence so you don't waste thread on a faulty design.
- Spot red flags like unusually low stitch counts that signal poor coverage and low-grade digital patterns.
- Discover why [Quality and detailed] designs rely on hand-digitizing to ensure every stitch serves a specific purpose.
- Understand how professional files protect your equipment by avoiding excessive density that leads to needle breaks.
Table of Contents
-
Stitch pathing and balanced density are the core elements of a quality design.
-
True detail refers to functional stitches that create texture rather than visual noise.
-
Hand-digitized files prevent the "thread nests" common in auto-generated patterns.
-
Underlay and pull compensation serve as the essential technical foundations for a flawless finish.
[Defining Quality and Detailed Embroidery Designs]
When we discuss Quality and detailed embroidery designs, it is easy to assume we just mean a pattern with dozens of colors or complex lines. In reality, true detail is about purpose. Every stitch in a professional file is placed with intent, ensuring your machine moves smoothly from one section to the next without fighting the fabric. While the History of embroidery shows us how artisans spent weeks on a single piece, today's digital files must replicate that precision in minutes. A high-quality file isn't just a picture; it is a technical map that guides a needle through a specific sequence to avoid bunching.
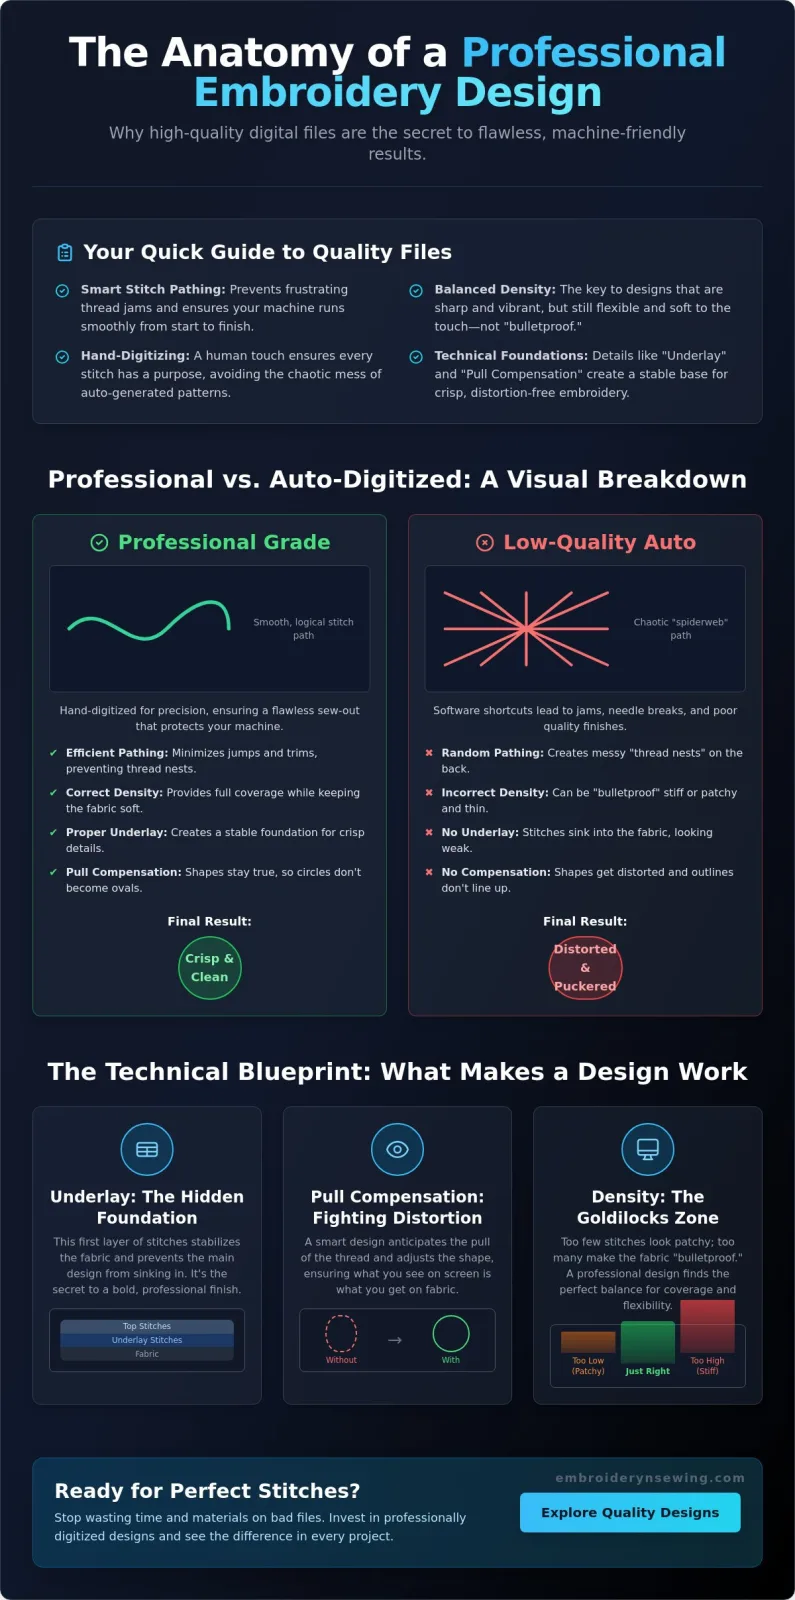
Imagine a diagram of two paths. The first, a professional path, moves in a logical, continuous flow like a drawing where the pen never leaves the paper. The second, an "auto-digitized" path, looks like a chaotic spiderweb with lines crossing over each other. This second path is what causes your machine to struggle. Professional designs prioritize texture over thickness, using varying stitch types to create depth that looks three-dimensional rather than flat and heavy.
[The Anatomy of a High-Detail File]
Think of underlay as the foundation of a house. Without it, your top stitches will sink into the fabric, making the design look thin and cheap. Professional digitisers also use "pull compensation." This accounts for the way fabric naturally bunches when thread pulls on it. Without this adjustment, circles end up looking like ovals and outlines won't line up, no matter how well you've hooped your project.
[Why "Auto-Digitising" Fails the Quality Test]
Software-generated designs often take shortcuts that a human never would. They create "thread nests" because the program doesn't know how to handle jump stitches or trims efficiently. Instead of a clean path, the needle jumps all over the place, leaving a mess on the back of your fabric and increasing the risk of a machine jam. This is why Quality and detailed work always requires a human touch to ensure the software's logic matches the reality of thread and fabric.
- Balanced density prevents "bulletproof" designs that make fabric stiff and unwearable.
- Efficient pathing reduces jump stitches and thread trims to keep the back of the design tidy.
- Using specific stitch types like satin and fill adds realistic texture and depth.
- Proper file formatting (PES, DST, JEF) ensures your machine interprets digital instructions accurately.
[The Technical Blueprint: What Makes a Design 'Detailed'?]
If you've ever sewn a design that felt like a piece of plywood on your shirt, you've dealt with poor stitch density. Many people think more stitches automatically mean more detail, but that's a common mistake. A Quality and detailed digital file balances coverage with flexibility. It ensures the fabric can still move and breathe while looking sharp. High-density designs often cause needle breaks or thread nests under the throat plate. Professional digitizers prioritize efficiency over raw stitch count to protect your machine and your fabric.
Pathing logic is another hidden hero in a technical blueprint. This refers to the order in which your machine sews out the elements. A pro design minimizes travel time and thread trims. Every time your machine has to stop and trim, it creates a potential point of failure. By using specific [embroidery stitches] like satin for borders and fill for larger areas, a designer guides the needle in a way that feels natural. This results in a cleaner finish on both the front and back of your project.
[Layering and Dimension in Digital Patterns]
Creating depth isn't just about the image; it's about how you layer thread. By overlapping colors and strategically changing stitch directions, we can create a 3D effect in our [embroidery patterns]. This shading mimics how light hits a real object, making a flat digital image pop once it's sewn. If you're tired of flat results, you might want to explore our collection of High Quality Embroidery Designs to see the difference layering makes.
[File Format Compatibility]
Even the most beautiful design fails if it isn't in the right format for your equipment. Machines like Brother use PES, while commercial Tajima machines often require DST. Digitizing is the process of converting artwork into machine instructions, and those instructions must be tailored to your specific hardware. Using the wrong format or a poor conversion can lead to distorted shapes and broken threads.
- Use a stitch simulator to identify erratic needle movements before sewing.
- Verify that stitch counts match the design size to avoid gapping.
- Check for minimal jump stitches to save time on manual trimming.
- Test every pattern on scrap fabric to see how different materials react to thread density.
![Quality and Detailed Embroidery Designs in the United States]
[How to Evaluate Design Quality Before You Sew]
Before you ever put thread to fabric, your software's stitch simulator is your best friend. Watching the design "sew" virtually reveals the logic behind the pattern. If the needle jumps erratically across the hoop, it is a clear sign of poor digitizing. A Quality and detailed file follows a logical flow, typically moving from the center out or from the bottom layer up. I've found that checking the stitch count against the physical dimensions is equally vital. If a large five-inch design only has a few thousand stitches, you'll likely see the fabric peeking through the thread, which ruins the professional look.
Jump stitches are those long threads that stretch between different parts of a design. While some are unavoidable, high-quality files minimize them to keep the back of the work clean. Too many jumps mean you'll spend more time with scissors than your machine spends sewing. Check the start and stop points in your digital preview. If they don't connect logically, you'll end up with loose ends that can unravel over time. I apologize that I cannot provide a one-click fix for poor pathing; it truly requires a well-built file from the start.
Reading the Colour Chart
A professional design always comes with a clear color sequence. It shouldn't just list "blue" or "red." Instead, it should provide thread weight recommendations and specific color stops. Brand-neutral charts are especially helpful. They allow you to map the design to whatever thread brand you have on hand, such as Madeira or Isacord, without any guesswork or wasted supplies.
Testing on Scrap Fabric
I cannot stress this enough: always test your detailed machine embroidery designs on a scrap piece of the same fabric you plan to use. Different materials react differently to fill stitches. A design that looks perfect on stable canvas might pucker on a thin t-shirt. Testing allows you to see if you need a different stabilizer or if the density needs adjustment. If you want to skip the trial and error of unverified files, you can browse our Machine embroidery designs for patterns that are already tested and optimized for professional results.
- Every pattern is hand-digitized to ensure the needle follows a logical, efficient path.
- Professional density settings protect your machine from needle breaks and motor strain.
- Investing in premium files reduces waste by saving fabric, thread, and stabilizer.
- Our collection spans diverse categories, including sports logos and beginner-friendly patterns.
Why Embroidery n Sewing Prioritises Precision
I apologize that I cannot offer a shortcut around the technical necessity of hand-digitizing, but I am committed to this process because it is the only way to ensure Quality and detailed output. While auto-conversion software is faster, it lacks the human judgment required to understand how thread interacts with different fabrics. At Embroidery n Sewing, we focus on the relationship between the source artwork and the final analytical output of your machine. This means we manually place every stitch to avoid the "bulletproof" density that leads to broken needles and expensive machine repairs.
Our library includes a wide range of options, from complex [machine embroidery sewing] basics to high-energy sports embroidery. Because over 40% of embroidery businesses in the United States are run from home, we know that equipment downtime isn't just an inconvenience; it is a loss of income. By providing files that sew smoothly on both commercial and home machines, we help you maintain your equipment while achieving professional results.
Supporting Your Creative Journey
We understand the frustration of a ruined garment, which is why we obsess over every stitch path. It is our goal to provide patterns that work the first time, every time. I am sorry that poor-quality files have become so common in the market, but we choose to prioritize technical clarity over high-volume, low-quality production. We want you to feel confident every time you hit the start button.
The Value of Expert Digitising
In the long run, choosing a premium design actually saves you money. You'll use less thread, less stabilizer, and you won't have to throw away expensive blanks due to birdnesting or fabric tears. I invite you to explore our specialized fonts and seasonal collections to see how our precision makes your work stand out. Browse our collection of High Quality Embroidery Designs today and see the difference true detail makes in your finished products.
- Recognizing that technical precision outweighs visual complexity.
- Utilizing hand-digitized files to preserve machine health.
- Accessing professional patterns optimized for all major formats.
Take Control of Your Embroidery Results
We've explored why the difference between a successful project and a machine jam often comes down to the technical map within your digital file. By prioritizing proper underlay and logical stitch pathing, you can stop wasting expensive fabric and thread. I understand that finding reliable patterns is a common barrier for many home-based creators, but shifting your focus to Quality and detailed digitizing ensures your machine runs as intended.
I'm sorry that low-grade, auto-generated files have caused so many headaches in the community. To help you avoid these technical hurdles, we offer hand-digitized patterns that are strictly tested for density and stitch-path efficiency. Our files are compatible with all major machine formats, so you can spend your time creating rather than troubleshooting. Shop our collection of high-quality and detailed embroidery designs here and experience the difference that professional precision makes. You have the skills and the equipment; now it's time to give your machine the high-caliber blueprints it deserves.
- Digitizing is the manual conversion of art into machine commands.
- Puckering is caused by tension imbalances and improper stabilization.
- High-quality files are identified through logical simulation and real-sewn previews.
- High stitch counts often signal poor density management rather than detail.
- Machine compatibility is strictly limited to specific proprietary file formats.
Frequently Asked Questions
What does 'digitising' mean in machine embroidery?
Digitizing is the technical process of converting an image into a set of instructions that your machine's needle follows. It isn't an automated conversion; it requires me to manually map out every stitch path and thread trim to prevent jams. I apologize that this step is so labor-intensive, but it's the only way to ensure the machine understands the difference between a border and a fill area.
Why is my embroidery machine puckering the fabric even with a good design?
Puckering often occurs when the thread tension is stronger than the fabric's ability to stay flat. Even when using a Quality and detailed file, you must match your stabilizer to the fabric weight to prevent shifting. I'm sorry that there isn't a one-size-fits-all solution for stabilization, as the technical relationship between thread pull and fabric weave varies with every garment.
How can I tell if an embroidery file is high quality before buying it?
You can identify a high-quality file by looking for a logical stitch-out sequence in a software simulator. A professional designer will provide a color chart and a real-sewn photo rather than a digital rendering. I regret that I cannot offer a visual inspection for every file you find online, but looking for clean, organized pathing is a reliable indicator of a well-made pattern.
Are more stitches always a sign of a more detailed design?
A high stitch count is frequently a sign of poor digitizing rather than actual detail. True Quality and detailed designs use strategic stitch directions and varied lengths to create depth without making the fabric stiff and unwearable. I'm sorry for the confusion this causes, but excessive density often leads to needle breaks and thread nests that can damage your machine's motor.
Can I use any file format with my embroidery machine?
You cannot use just any format; your machine is restricted to specific file types like PES for Brother or JEF for Janome. I apologize for these technical constraints, as they often require you to convert files using specialized software before you can begin sewing. Always check your machine's manual to verify which extension it recognizes to avoid errors when loading your designs.


