Ever found the perfect embroidery design, only to freeze when you see its dimensions listed in inches while your machine's hoop is stubbornly metric? That moment of hesitation-wondering if your beautiful new pattern will even fit-is a frustration every stitcher knows. Navigating the world of metric versus imperial measurements shouldn't stand between you and your next creative masterpiece. If you're trying to figure out the conversion for 180mm to inches, you've come to the right place. The quick answer is 7.087 inches.
But knowing the number is only half the battle. In this ultimate guide, we’ll go beyond the simple math. We will help you visualize what this popular 7-inch hoop size really means for your craft. You'll discover a world of exciting projects that are a perfect match, from intricate quilt blocks to personalized tote bags and apparel. By the end, you’ll feel completely confident selecting and purchasing designs, transforming that measurement confusion into creative power. Let's get you stitching without the guesswork! [
The Quick Answer: 180mm is 7.087 Inches. Now, What Does This Mean for Your Embroidery?](https://embroiderynsewing.com/articles)
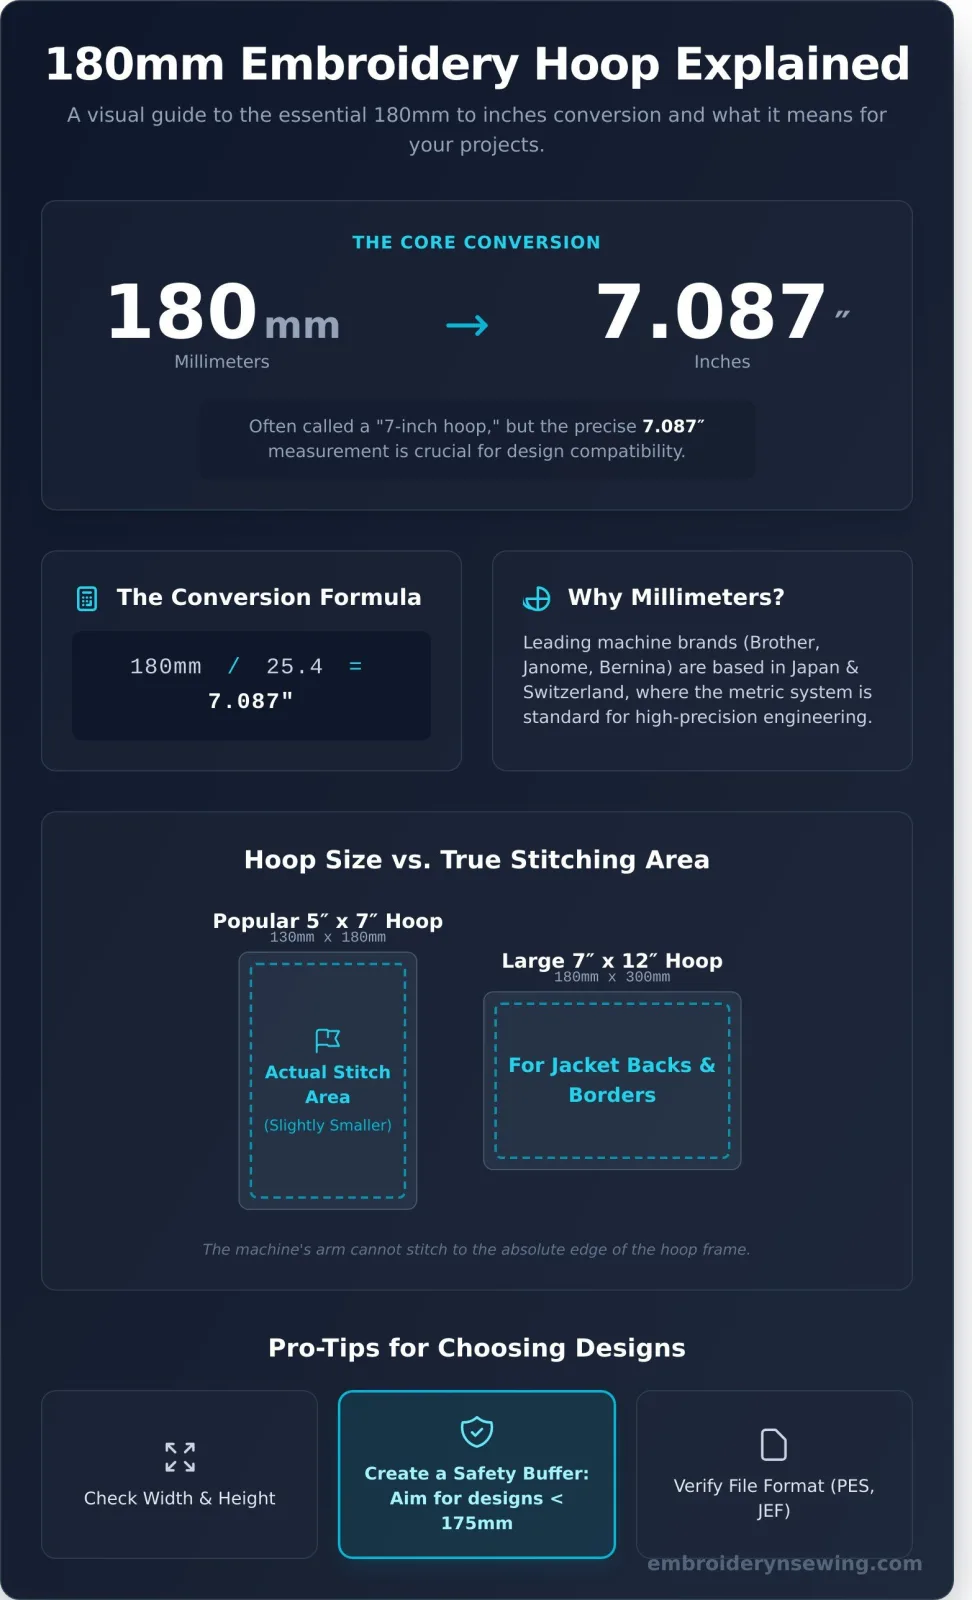
Let's get straight to the point: 180 millimeters is equal to 7.087 inches. While this is a simple mathematical conversion, understanding its practical application is what truly empowers your machine embroidery projects. This measurement isn't just an abstract number; it represents the maximum stitching field of a very common hoop size. Knowing the precise conversion for 180mm to inches ensures that the beautiful digital designs you purchase will actually fit your machine's capabilities. For a deeper dive into the mechanics and history, understanding the 180mm embroidery hoop and its role in modern crafting provides essential context for any stitcher.
### The Conversion Formula Explained
The formula for converting millimeters to inches is wonderfully simple: just divide the millimeter value by 25.4. This is because there are exactly 25.4 millimeters in one inch, making it a universal constant for this type of conversion.
- The Exact Math: 180mm / 25.4 = 7.086614... inches
- The Practical Answer: We round this to 7.087″ for accuracy.
You might hear this hoop size casually referred to as a "7-inch hoop," but that fractional difference is critical. When you're buying digital embroidery files, designers list precise design dimensions. If a pattern is 7.1 inches wide, it simply won't fit in your 7.087-inch hoop. This precision is key to avoiding the frustration of purchasing a design you can't use.
### Why Embroidery Hoops Use Millimeters
If you're in the United States, you might wonder why your embroidery machine "thinks" in millimeters. The reason lies with the manufacturers. Many of the world's leading embroidery machine brands, such as Brother, Janome, and Bernina, are headquartered in countries like Japan and Switzerland where the metric system is the standard for all engineering and manufacturing. The metric system's base-10 structure offers a higher degree of precision and consistency, which is vital for engineering the intricate parts of an embroidery machine and its hoops. While it requires a quick conversion for those of us used to inches, it ultimately leads to better-engineered equipment for all stitchers. Don't worry-with a simple formula and a handy chart, you'll be navigating both systems like a pro in no time.
Understanding the 180mm Embroidery Hoop: Size, Machines, and Capabilities
When you see "180mm" on an embroidery hoop, it's more than just a measurement-it represents a gateway to larger, more intricate designs. This size is a favorite among hobbyists and professionals for its versatility. However, it's crucial to understand that 180mm typically refers to just one dimension of a rectangular hoop. Because the embroidery world often mixes metric and imperial systems, a solid understanding of conversions like 180mm to inches is essential. For a deeper dive into why these different units are used in the textile industry, a comprehensive Embroidery Hoop Conversion Chart can provide valuable context.
The most popular hoop in this class is the 130mm x 180mm hoop, widely known as the 5" x 7" hoop. This size offers a significant upgrade from smaller 4"x4" hoops, allowing for larger single designs, combined lettering, and more detailed projects. For those with larger-format machines, you might also encounter a 180mm x 300mm (approximately 7" x 12") hoop, perfect for jacket backs and long, continuous borders.
Machine Brands and Compatibility
The 5" x 7" (130mm x 180mm) embroidery field is a standard for many best-selling machines. It provides a great balance of capability and affordability. You'll find this hoop size is standard or compatible with models such as:
- Brother: PE800, PE900, SE1900, NQ1700E, and many others in the Innov-is series.
- Janome: Several Memory Craft models support a 5x7 field.
- Babylock: Many models in their lineup are designed for this popular hoop size.
Always consult your machine's manual or official specifications to confirm its maximum embroidery area before purchasing a new hoop or design file.
Actual Stitching Area vs. Hoop Dimensions
This is one of the most important concepts for new embroiderers to grasp: the hoop's physical dimension is not the same as the machine's stitchable area. The machine's embroidery arm has physical limits, and sensors prevent the needle from striking the inner frame of the hoop. This means the actual embroidery field will always be slightly smaller than the hoop's inner dimensions. To find your true maximum stitch size for a 180mm to inches conversion, check your machine’s settings or look for the "maximum embroidery area" in its specifications.
Choosing Designs for Your 180mm (7.09″) Hoop
With a generous 7-inch embroidery area, the 180mm hoop opens up a world of creative possibilities. But before you hit "purchase" on a new design, it's crucial to ensure it will fit perfectly. Now that you understand the 180mm to inches conversion, you can shop with confidence. This foundational step is a frequent topic among seasoned stitchers, and as experts on sites like NeedlenThread illustrate when discussing project setup, choosing designs for your 180mm (7.09″) hoop requires careful attention to size to prevent puckering and misalignment.
Reading Design Specifications
Every reputable digital embroidery store lists the exact dimensions of their designs. Look for a specification chart or description that provides the following details, often in both millimeters and inches:
- Width: The design's measurement from the farthest left point to the farthest right point.
- Height: The design's measurement from the highest point to the lowest point.
- File Format: Ensure the seller includes your machine's required format (e.g., PES, DST, JEF, HUS).
As a best practice, always choose designs that are slightly smaller than your hoop's maximum stitch field. For a 180mm hoop, look for designs under 175mm (6.8″) to leave a small buffer, which helps ensure a clean stitch-out.
Best Design Categories for a 180mm Hoop
The 7-inch space is perfect for making a statement. It's large enough for intricate detail without being overwhelming. Some designs that truly excel in this size include:
- Jacket Backs: Create bold logos, intricate monograms, or artistic patches that serve as a stunning focal point.
- Home Decor: Stitch detailed designs on decorative pillows, placemats, or tote bags to add a personalized, high-end touch.
- Quilting Projects: This size is ideal for creating beautiful and complex quilt blocks or repeating patterns for borders.
Find beautiful designs for your 7-inch hoop here!
A Note on Resizing Embroidery Files
While it may be tempting to shrink a larger design to fit, proceed with caution. Most embroidery experts advise against resizing a design by more than 10-20%. Drastically changing the size without adjusting the stitch data can cause significant quality issues, such as gapping, excessive thread density, and poor registration. This is especially true for complex designs with delicate fill stitches. If you must make minor adjustments, use professional software like Embrilliance, which can recalculate stitch density for a much cleaner result.
Creative Project Ideas for a 180mm x 130mm (7″ x 5″) Hoop
The 180mm x 130mm hoop is a fantastic workhorse for any machine embroiderer. It hits the sweet spot between being large enough for substantial designs but small enough to manage easily. Now that you've mastered the 180mm to inches conversion (approximately 7" x 5"), it's time for the fun part: bringing your creative visions to life!
This hoop size is incredibly versatile, making it perfect for beginners and seasoned stitchers alike. Below are some popular and achievable project ideas to get you started.
Personalizing Home Goods
Easily add a touch of custom elegance to your living space. The 7" x 5" area is ideal for making a statement without overwhelming the item. It’s perfect for detailed monograms, favorite quotes, or beautiful floral arrangements that turn everyday items into cherished pieces.
- Guest Towels: Stitch elaborate single-letter or three-letter monograms to add a luxurious feel to your bathroom.
- Pillow Covers: Create stunning decorative pillows with meaningful quotes, graphic designs, or seasonal motifs for your couch or bed.
- Kitchen Linens: Customize aprons, tea towels, and placemats with witty sayings or charming kitchen-themed embroidery.
Upgrading Your Wardrobe
Transform basic apparel into unique, custom fashion. This hoop allows you to add significant designs to clothing and accessories, giving them a high-end, personalized look. From bold graphics on a sweatshirt to delicate patterns on a tote, the possibilities are endless.
- T-Shirts & Sweatshirts: Add a large, eye-catching design to the center front for a true statement piece.
- Denim Jackets: This size is perfect for embroidering on the back panel or even a larger pocket area.
- Canvas Tote Bags: Cover your tote with a beautiful repeating pattern or a single large piece of artwork.
Crafting Unique Gifts
Nothing says "I care" like a handmade, personalized gift. The 180mm to inches hoop size is your best friend for creating heartfelt presents. It's especially great for popular 'in-the-hoop' (ITH) projects, where you construct an entire item right in your embroidery machine.
- Baby Items: Personalize baby blankets, bibs, or onesies with the baby's name, birth stats, or a cute animal design.
- 'In-the-Hoop' Projects: Create small zipper pouches, key fobs, luggage tags, or coasters entirely within the hoop for a professional finish.
- Custom Patches: Design and stitch unique iron-on or sew-on patches for friends to add to their jackets, backpacks, or hats.
Feeling inspired? Grab your 180mm x 130mm hoop and get stitching! For more tutorials and design ideas, explore the resources available at embroiderynsewing.com.
Essential Embroidery Hoop Conversion Chart: MM to Inches
Navigating the world of embroidery often means speaking two languages: metric and imperial. While embroidery machines and hoop manufacturers list sizes in millimeters (mm), many designers and patterns refer to them in inches. This can lead to confusion when you're trying to match a design to the right hoop. To simplify your creative process, we've created a definitive conversion chart for the most common hoop sizes.
Use this table to quickly find the imperial equivalent of your metric hoop. Understanding the exact conversion for 180mm to inches (7.09") can be the difference between a perfect stitch-out and a frustrating resizing session.
Small to Medium Hoops
These sizes are the workhorses of any embroidery studio, perfect for monograms, patches, and most standard designs. The 130x180mm (5x7) hoop is one of the most versatile and widely used sizes for home embroiderers.
Large Hoops
When you're ready to tackle bigger projects like quilt blocks or jacket backs, you'll need a larger hoop. Sizes like the 160x260mm (6x10) and the 180x300mm (7x12) give you the space to create more ambitious and impactful designs.
| MM Size | Inches (Exact Conversion) | Common Hoop Name |
|---|---|---|
| 100 x 100 mm | 3.94 x 3.94 in | 4x4 Hoop |
| 130 x 180 mm | 5.12 x 7.09 in | 5x7 Hoop |
| 140 x 140 mm | 5.51 x 5.51 in | 5.5x5.5 Hoop |
| 150 x 150 mm | 5.91 x 5.91 in | 6x6 Hoop |
| 160 x 260 mm | 6.30 x 10.24 in | 6x10 Hoop |
| 180 x 300 mm | 7.09 x 11.81 in | 7x12 Hoop |
| 200 x 200 mm | 7.87 x 7.87 in | 8x8 Hoop |
| 200 x 300 mm | 7.87 x 11.81 in | 8x12 Hoop |
How to Use This Chart
Using this chart is simple. First, identify the size of your embroidery hoop, which is almost always embossed or printed on the plastic in millimeters (e.g., "130x180"). Next, find that measurement in the "MM Size" column of our table to see its exact inch conversion and common name. This helps you instantly know if your "5x7" design file will fit.
- Bookmark This Page: Keep this chart handy for quick reference whenever you start a new project. You'll never have to guess at conversions again.
- Check Your Stitch Field: Remember, the hoop size is not the same as the maximum stitch area. Always confirm your machine's specific stitch field in its manual to avoid loading a design that is too large.
- Names are Approximations: As you can see, the "common names" are rounded. The exact conversion is what matters for a perfect fit. For more expert tips, explore the resources at embroiderynsewing.com.
From Millimeters to Masterpieces: Your Next Stitch Awaits
Navigating the world of embroidery hoops no longer needs to be a guessing game. By now, you understand that mastering the conversion of 180mm to inches (approximately 7.09") is the key to unlocking your machine's full potential. This knowledge empowers you to confidently choose the right designs and materials for that versatile 7" x 5" hoop, ensuring your projects are perfectly centered and beautifully executed every single time. You're now equipped to move beyond the numbers and focus on what truly matters: your creativity.
Ready to put that knowledge into practice with a stunning new pattern? Explore thousands of high-quality embroidery designs now! Our huge library features categories from sports to holidays, ensuring you'll find the perfect match. Best of all, every design is available for instant download and is compatible with all major machine brands, so you can start stitching your next masterpiece in minutes.
Go ahead, embrace the creative freedom your 180mm hoop offers. Happy stitching!
Frequently Asked Questions
What is the most common embroidery hoop size?
The most popular embroidery hoop sizes are the 4x4 inch (100x100mm) and the 5x7 inch (130x180mm). The 4x4 inch hoop is a standard for many entry-level machines and is perfect for small projects like monograms and logos. The 5x7 inch hoop offers more versatility, allowing for larger, more intricate designs without needing to re-hoop the fabric. These two sizes cover a wide range of common embroidery projects, making them staples for most hobbyists.
Can I use a 7x5 inch design in my 180x130mm hoop?
Yes, you can. A 180x130mm hoop is the metric equivalent of a 5x7 inch hoop. When you convert 180mm to inches, it's approximately 7.08 inches, and 130mm is about 5.11 inches. This means your 7x5 inch design will fit comfortably within the hoop's dimensions. Always double-check your machine's specific stitch field, as it can sometimes be slightly smaller than the internal hoop measurement, but generally, this combination is perfectly compatible.
How do I know what my embroidery machine's maximum hoop size is?
The best place to find your machine's maximum hoop size is in its user manual. Look for a specifications chart or a section on embroidery capabilities. You can also often find this information directly on the machine's LCD screen in the settings or hoop selection menu. If you no longer have the manual, a quick search on the manufacturer's website with your specific machine model number will provide the maximum embroidery area and all compatible hoop sizes.
Is it better to work with millimeters or inches for embroidery?
While both are used, working in millimeters (mm) is generally better for machine embroidery. Digital embroidery files (like PES, DST, JEF) are created using metric measurements, and machine manufacturers specify their hoop sizes and stitch fields in millimeters. Using millimeters ensures greater precision and helps you avoid potential sizing errors that can occur when converting between systems. Sticking to the industry standard simplifies the process from design selection to the final stitch-out.
What happens if I use a design that is too big for my hoop?
Your embroidery machine will not allow you to stitch a design that is larger than the recognized hoop's maximum stitch area. It will typically display an error message on the screen, such as "Design is too large," and will refuse to start the embroidery process. This is a critical built-in safety feature to prevent the needle from striking the hoop frame, which could damage your needle, your hoop, and potentially your machine's mechanics.
Does the thickness of the fabric affect the hoop size I should use?
No, the thickness of your fabric does not directly determine the hoop size. Your hoop size should always be chosen based on your design size-select the smallest hoop that the design fits into comfortably for the best tension. However, fabric thickness does impact your hooping technique. For thicker materials like fleece or denim, you will need the appropriate stabilizer and may not need to tighten the hoop as much to avoid "hoop burn" or marks.