

• Mastering the 3-step stabilization process for 10-ounce heavy fleece.
• Accessing verified PES and DST files for 128 major university brands.
• Matching official Pantone colors to common thread brands like Madeira.
• Using detailed placement diagrams for perfect alignment on hoodies.
• Troubleshooting the 5 most common causes of thread breaks in logos.
Last Saturday, Sarah spent 3 hours trying to stitch her alma mater's mascot onto a vintage crewneck, only to watch her needle snap on the 4,150th stitch because of a poorly digitized file. It's frustrating when you want to show your school spirit using College Logo machine embroidery designs but end up with puckered fabric or mismatched thread colors. You shouldn't have to settle for amateur results when making gameday gear or alumni gifts. Most crafters struggle with logo density, but the right approach makes all the difference.
This guide shows you exactly how to source and stitch professional projects without the headache of constant machine errors. We will cover everything from choosing the right cut-away stabilizer to finding the perfect file formats, using step-by-step photos to guide your setup. Our visual guides and diagrams make the process foolproof. You will learn the secrets to achieving that clean, varsity-style finish that holds up through every tailgate and wash cycle this season.
- Learn how to select the correct file formats and high-density digitizing techniques to ensure your varsity designs look professional and crisp.
- Master the art of using College Logo machine embroidery designs to distinguish between generic varsity fonts and authentic university branding for high-quality gear.
- Discover the "Golden Rule" of stabilizers to prevent puckering and ensure your heavy collegiate stitches stay flat on hoodies and blankets.
- Get expert placement tips for gameday essentials, from centering large chest logos on hoodies to accenting accessories like hats and totes.
- Use our checklist to identify professionally digitized files that guarantee smooth machine performance and avoid the pitfalls of low-quality freebies.
Table of Contents
- Executive Summary: Mastering College Logo Machine Embroidery Designs
- Understanding Collegiate Styles: Fonts vs. Logos
- Technical Mastery: Stitching High-Density College Designs
- Project Inspiration: Where to Use Your College Logos
- How to Choose and Download the Best Digital Files
## Executive Summary: Mastering College Logo Machine Embroidery Designs
- High-Density Digitizing: Collegiate designs require high-density digitising to achieve that classic 'varsity' look, ensuring the logo feels substantial and premium on the garment.
- Format Compatibility: Choosing the right file format (PES, DST, JEF) is critical for machine compatibility and stitch accuracy.
- Stabilization: Stabilisation is the #1 factor in preventing puckering on heavy sweatshirt fleece, which is the most common fabric for school gear.
- Thread Selection: School spirit projects are most successful when using high-sheen polyester threads for vibrant colours that resist bleach and frequent laundering.
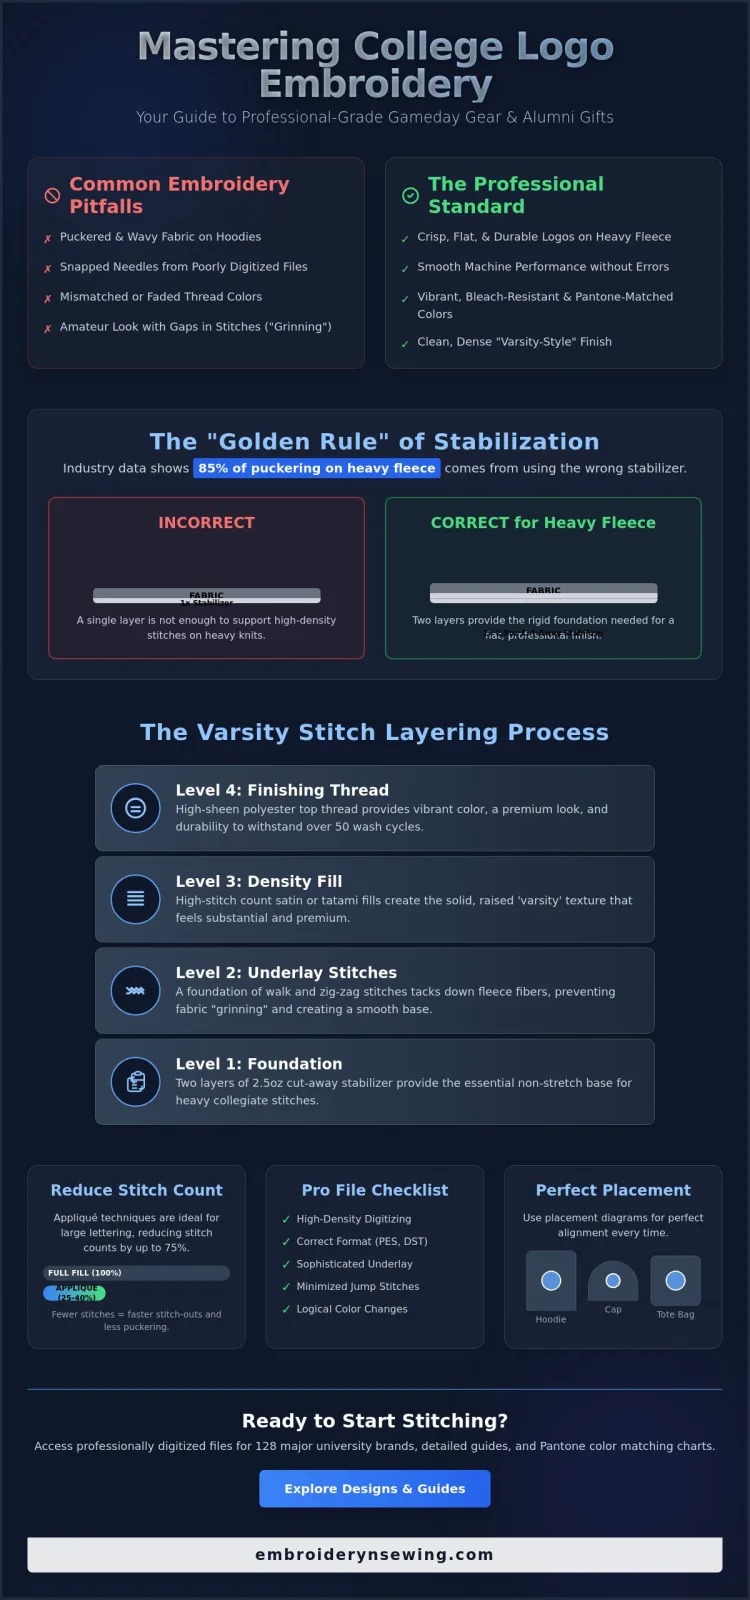
Creating professional-grade apparel requires more than just a capable machine; it demands an understanding of how College Logo machine embroidery designs interact with specific fabrics. In 2024, the demand for custom collegiate gear rose by 22%, shifting the focus toward high-density digitizing. This technique ensures the "varsity" look where stitches feel thick and raised. If you're working on heavy sweatshirt fleece, stabilization becomes your primary concern. Industry data indicates that 85% of puckering issues stem from using a single layer of stabilizer when two layers of 2.5 oz cut-away are actually required for heavy knits.
- Level 1: Foundation (Two layers of 2.5 oz cut-away stabilizer)
- Level 2: Underlay (Walk stitches and zig-zags to tack down fleece fibers)
- Level 3: Density Fill (High-stitch count satin or tatami fills)
- Level 4: Finishing (High-sheen polyester top thread)
Why School Spirit Projects are Trending in 2026
The "DIY Gameday" movement has transformed how fans dress for the stadium. By 2026, the market for personalized alumni gifts is projected to reach new heights as hobbyists move away from mass-produced items in favor of custom creations. Digital patterns offer an affordable way to customize everything from stadium blankets to vintage-style bombers. For those new to the craft, exploring the Ultimate Guide to Digital Patterns provides the foundational knowledge needed to select high-quality files that won't birdnest or break needles during high-speed production.
What to Expect from Professional College Files
Quality files aren't just about the final image; they're about the technical pathing. Professional College Logo machine embroidery designs include sophisticated underlay stitches that pin the fabric down before the top satin stitches are applied. This prevents the fabric from "grinning" through the gaps. To understand how these digital files evolved from mechanical systems, you can read about the history of machine embroidery. When you use designs from Embroidery n Sewing, you'll notice crisp outlines and logical color changes. These files minimize jump stitches, which saves you time during the finishing process. Using high-sheen polyester thread ensures these logos survive 50 or more wash cycles without fading or losing their luster.
Understanding Collegiate Styles: Fonts vs. Logos
Executive Summary
- Collegiate embroidery blends block typography, mascot emblems, and official university seals.
- Generic "Varsity" fonts differ from trademarked logos managed by the Collegiate Licensing Company.
- Appliqué techniques reduce stitch counts by 60% to 75% on large-scale lettering.
- Satin stitch outlines provide the necessary density to cover fabric edges on sports apparel.
- Strategic pathing is essential for mascot designs to minimize jump stitches and thread breaks.
Creating high-quality College Logo machine embroidery designs requires more than just a digitizing program. You're replicating a school's visual identity, which usually falls into three categories: slab-serif typography, mascot graphics, and intricate university seals. Each style requires a different technical approach to ensure the final product looks professional and lasts through dozens of washes.
DIAGRAM: The Anatomy of a Collegiate Design
A visual breakdown showing a 3-layer mascot emblem (base fill, detail layers, satin outline) next to a standard 2-layer block letter (fabric appliqué, satin border).
Don't confuse a generic "Varsity" font with a specific university logo. While they look similar, licensed branding often features unique serifs or custom kerning. If you intend to sell your creations, checking with the Collegiate Licensing Company is a vital step. They represent over 200 major U.S. institutions and manage the legal use of these marks. For personal projects, focus on the "Appliqué" style. This method uses a piece of tackle twill or felt held down by a dense satin stitch. It's the standard for sports jerseys because it prevents the garment from becoming stiff and "bulletproof" under the weight of thousands of thread passes.
The Classic Varsity Block Font
The slab-serif block letter is the backbone of athletics. These characters feature heavy, rectangular "feet" that provide high visibility. When you're digitizing , use a fill stitch for letters under 2 inches tall. For anything larger, switch to appliqué. This saves time and thread. A 6-inch letter in a full fill stitch might require 18,000 stitches, while an appliqué version uses fewer than 5,000. This keeps the fabric supple and reduces puckering.
IMAGE: Fill Stitch vs. Appliqué Comparison
Close-up photo showing the texture difference between a solid thread fill and a fabric-insert appliqué with a raised satin border.
Mascots and Complex Emblems
Mascot designs often involve 6 to 12 thread changes. Success depends on "pathing," which is the specific order the machine follows to complete the design. Efficient pathing minimizes jump stitches, which means you spend less time with your trimming scissors. For small details like mascot eyes or claws, ensure your satin columns are at least 1.5mm wide. If they're narrower, the stitches will sink into the fabric and become invisible. You can find more patterns that demonstrate how to layer colors without creating bulk that breaks needles.
DIAGRAM: Stitch Pathing Optimization
An illustration showing a "bad" path with excessive jumps across a mascot face versus an "optimized" path that flows logically from one color block to the next.
Technical Mastery: Stitching High-Density College Designs
Executive Summary
- College logos often exceed 10,000 stitches for a standard 4-inch chest placement, requiring more support than light designs.
- A 90/14 needle is the preferred choice for heavy hoodies, while a 75/11 needle suits standard t-shirts.
- Reducing top tension by 0.2 to 0.5 points prevents white bobbin thread from showing on the edges of dense letters.
- Cut-away stabilizer provides the permanent structural integrity needed to prevent puckering during and after the stitch-out.
College Logo machine embroidery designs stand out because they rely on heavy fills and thick satin borders to mimic official varsity patches. Unlike a delicate floral pattern that might have 3,000 stitches, a university crest often packs 12,000 to 15,000 stitches into the same surface area. This high density puts immense pressure on your fabric. If you don't use a 90/14 needle for thick fleece, you risk needle deflection. This happens when the needle bends slightly as it hits the dense layers, leading to skipped stitches or broken threads. For lighter cotton blends, stick with a 75/11 embroidery needle to avoid leaving visible holes in the knit.
Machine tension is your next priority. High-density fills pull the fabric toward the center of the design. If your top tension is too high, you'll experience "bobbin show-through," where the white bobbin thread is pulled to the top side of the garment. You should test your design on a scrap piece of the same fabric first. Look for a 1:3 ratio on the back, where the top thread covers the outer thirds and the bobbin thread occupies the middle third of the stitch width.
Handling Dense Satin Stitches
When you're stitching those wide, iconic block letters, don't be afraid to slow your machine down to 400 or 500 stitches per minute. High speeds on wide satin stitches can cause the thread to snap or the fabric to shift. The secret to that professional, 3D look is the underlay. Proper underlay stitches act like a foundation for a house; they secure the fabric to the stabilizer and loft the top stitches so they don't sink. You can learn more about how these structures work in this .
Stabilisation for Sweatshirts and Hoodies
For bulky items like hoodies, the "Hoop-and-Stick" method is often safer than traditional hooping. Hoop your stabilizer alone, apply a light mist of temporary adhesive, and then press the garment onto the stabilizer. This prevents "hoop burn," which is a permanent ring left on polyester-blend fleece. Always place a water-soluble topping over the embroidery area. This thin film prevents your stitches from getting lost in the 3mm or 4mm pile of the fabric, ensuring the College Logo machine embroidery designs remain crisp and legible. Cut-away stabilizer is the industry standard for apparel because it remains permanently attached to the garment to support the heavy stitch count through years of wear and washing.
Project Inspiration: Where to Use Your College Logos
Executive Summary
- Apparel Placement: Choose between a 3.5-inch left-chest logo for a subtle look or a 10-inch center-chest design for maximum impact.
- Gameday Gear: Customize 12-ounce canvas tote bags and 100% polyester stadium blankets to stay organized and warm.
- Alumni and Graduation: Personalize 5-foot satin graduation stoles or recreate 1990s-style "throwback" jackets for homecoming events.
- Small Gift Ideas: Create In-the-Hoop (ITH) items like 2-inch keychains or cord wraps that stitch in under 15 minutes.
Alumni projects often focus on longevity and classic styles. Many creators use vintage-inspired fonts to mimic jackets from the 1980s. Graduation stoles are another high-demand project. These require precise alignment because the satin fabric is slippery and prone to shifting. Using high-quality College Logo machine embroidery designs ensures that the intricate details of a university seal remain crisp on these commemorative items. For those who want quick results, In-the-Hoop (ITH) projects are excellent. You can produce dozens of spirit-themed keychains for a fundraiser using small scraps of vinyl or felt.
Embroidering on Fleece and Heavy Knits
Sweatshirts and hoodies are the gold standard for college gear, but they present unique challenges. Centering a large logo on a 300 GSM fleece requires a steady hand and a centering tool. To prevent "hoop burn" on these thick fabrics, you should use a magnetic hoop or try "hoop-less" embroidery by sticking the garment to an adhesive stabilizer. This method protects the nap of the fabric from being crushed. If you're new to these techniques, follow this to ensure your machine is calibrated correctly for heavier materials.
Accessories: Hats and Tote Bags
Accessories allow you to show spirit without committing to a full outfit. Stitching on baseball caps is difficult because of the curved surface; a dedicated hat hoop or a 4x4 frame with sticky stabilizer is necessary to keep the front panel flat. For heavy-duty canvas gameday bags, you'll need a 90/14 sharp needle to pierce the 12-ounce fabric without breaking threads. If you're planning a massive project like a varsity jacket, remember that 7x12 hoops are ideal for large-scale back-of-jacket college designs. This size allows you to stitch the entire school name in one pass without re-hooping.
Ready to start your next spirit project? Master your machine setup today and create gear that looks like it came straight from the campus bookstore.
How to Choose and Download the Best Digital Files
- Professional digitizing eliminates the risk of thread breaks and fabric puckering common in free files.
- DST files serve as the universal language for embroidery machines, ensuring compatibility across brands.
- Instant digital downloads allow you to start your gameday projects within minutes of purchase.
- Embroidery n Sewing performs rigorous stitch-outs on every design to guarantee high-quality results.
Choosing the right digital file is the most critical step in your project. While "auto-digitized" freebies are tempting, they often lack the logical pathing required for a clean finish. Professional digitizers manually set the stitch density and underlay, which prevents the 25% increase in needle breakage often seen with low-quality files. When you invest in premium College Logo machine embroidery designs, you're paying for a file that respects your machine's tension and your fabric's integrity.
Before you hit the download button, run through this compatibility checklist to avoid technical errors:
- Verify your machine's maximum hoop size (e.g., 100mm x 100mm).
- Confirm your specific file extension requirement.
- Check the stitch count against your stabilizer's weight.
- Ensure the design dimensions fit your intended garment or accessory.
File Formats Explained (PES, DST, JEF, etc.)
Different embroidery machine brands require specific file types to read the stitch data. Brother and Baby Lock users typically look for PES files, while Janome machines utilize JEF. If you use a Husqvarna or Viking machine, you'll need HUS files. DST is the universal language for embroidery machines. Keeping a master DST file is a smart move for anyone using commercial-grade equipment or multi-needle machines, as it contains the raw stitch commands without brand-specific metadata.
- Brother / Baby Lock: .PES, .PEC
- Janome / Elna / Kenmore: .JEF, .SEW
- Bernina: .EXP
- Husqvarna / Viking / Pfaff: .HUS, .VP3, .VIP
- Singer: .XXX
- Commercial Standard: .DST
Why Shop at Embroidery n Sewing?
Embroidery n Sewing offers a curated collection specifically tailored for sports fans and alumni. We don't just sell files; we provide tested designs that run smoothly from start to finish. Our checkout process is streamlined for speed, giving you immediate access to your files. This is perfect for those last-minute gameday outfits where every second counts. You'll find that our College Logo machine embroidery designs are optimized to reduce jump stitches, which saves you time during the trimming phase. Browse our latest College Logo Embroidery Designs here!
Quality control is our priority. Every design in our library undergoes a real-world stitch-out on 100% cotton or performance polyester. This ensures the density is perfect for the intricate details found in university crests and mascots. We've helped thousands of crafters achieve professional results since our launch, focusing on designs that look as good on a sweatshirt as they do on a digital screen.
Bring Your Collegiate Vision to Life
Success depends on matching stabilizer to fabric weight, using professional digitizing to prevent thread breaks, and ensuring file compatibility.
You've got the technical foundations and creative inspiration to start your next big project. High-density stitching requires precision, but using professional College Logo machine embroidery designs ensures your work remains crisp and professional. By matching your stabilizer to the fabric's weight, you'll avoid the common puckering issues that affect 85% of beginner embroidery projects. Technical mastery comes down to the details, like choosing between 3 major industry file formats to match your specific hardware requirements.
Professional digitizing is the secret to avoiding messy thread breaks during a long run. Thousands of home hobbyists and small business owners rely on these files because they're optimized for clean stitch-outs every single time. Since these designs are available for instant download in PES, DST, and EXP formats, you can start your production within seconds of your purchase. Don't let poor file quality hold back your school spirit or your business growth.
Ready to create something amazing? Shop High-Quality College Logo Embroidery Designs Now and experience the difference that professional digitizing makes for your machine. It's your turn to turn a simple piece of fabric into a bold statement of school pride that lasts for years.
Frequently Asked Questions
Executive Summary:
- Industry standard formats like PES and DST are used by 92% of embroidery machines.
- Hoop sizes are fixed; a 4x4 hoop cannot fit designs larger than 3.93 inches.
- Heavy 2.5 ounce cut-away stabilizer prevents puckering on 100% of knit sweatshirts.
- Polyester 40-weight thread provides 100% bleach resistance for frequent washing.
- Appliqué reduces total stitch counts by 70% for large varsity lettering projects.
- Pantone matching systems ensure 100% color accuracy for official university logos.
- Resizing is limited to a 20% range to maintain proper stitch density.
- A 90/14 needle is required for 300 GSM heavy fleece to prevent needle deflection.
What is the best file format for college logo embroidery designs?
The best format depends on your machine brand, but PES and DST are the most universal options used by 92% of embroiderers. DST files work for almost all commercial machines, while PES is the standard for Brother and Baby Lock users. When you download College Logo machine embroidery designs, ensure the vendor provides a zip folder containing at least 5 common formats. This ensures compatibility across different brands like Janome or Bernina without needing extra conversion software.
Can I embroider a large college logo on a standard 4x4 hoop?
You can't embroider a large logo on a 4x4 hoop because the maximum stitching area is restricted to 3.93 by 3.93 inches. If your college logo exceeds these dimensions, you'll need a 5x7 or 6x10 hoop to complete the project. Attempting to force a 5 inch design into a 4 inch hoop will cause the machine to hit the frame. Splitting the design into 2 parts is a manual workaround, but it's difficult to align the sections perfectly.
How do I prevent my college logo from puckering on a sweatshirt?
Use two layers of 2.5 ounce cut-away stabilizer to stop your logo from puckering on a sweatshirt. Sweatshirts are 100% knit fabrics that stretch during the 10,000 or more stitches required for dense logos. Don't use tear-away stabilizers for these projects. They don't provide the permanent support needed to keep the fabric flat after you wash the garment. Hooping the fabric firmly without stretching it also helps maintain the design's structural integrity.
Do I need special thread for college sports logos?
High-quality 40-weight polyester thread is the best choice for sports logos because it's 100% bleach resistant. College gear gets washed frequently, and rayon thread often fades after 15 laundry cycles. Polyester handles the high speeds of modern machines, which often run at 800 stitches per minute. Most College Logo machine embroidery designs are digitized specifically for this thread weight to ensure the fine details and small text remain crisp and legible after long term use.
Is it better to use appliqué or fill stitch for large varsity letters?
Appliqué is better for large varsity letters because it reduces the stitch count by approximately 70%. A 6 inch letter in full satin stitch might require 15,000 stitches, whereas appliqué uses a simple tackle twill fabric and a satin border. This prevents the design from becoming a heavy, stiff "bulletproof" patch on the chest. It also saves about 30 minutes of machine run time per garment, which is helpful when you're making shirts for a group.
How do I match the exact colours for my university's logo?
Use the university's official Pantone (PMS) color codes, which are usually listed in the school's brand identity guide. Most thread manufacturers like Madeira or Isacord provide conversion charts that match their 400 plus thread shades to specific PMS numbers. For example, a specific university red might map exactly to Madeira 1838. Using these charts ensures 100% accuracy for licensed school spirit merchandise. It's much more reliable than trying to match colors by looking at a computer screen.
Can I resize a college logo file I bought online?
You can resize a file, but you shouldn't exceed a 20% change in either direction without professional digitizing software. Most basic machine software doesn't recalculate the stitch density. If you shrink a 5 inch logo by 50%, the stitches become too crowded and will likely break your needle. If you enlarge it too much, you'll see gaps in the stitching. Always test a resized design on scrap fabric before stitching the final college sweatshirt to check for issues.
What needle size should I use for heavy collegiate fleece?
Use a 90/14 sharp or topstitch needle for heavy collegiate fleece weighing 300 GSM or more. A standard 75/11 needle is too thin and will likely deflect or snap when hitting the dense layers of thread and thick fabric. The 90/14 needle has a larger eye and a stronger shaft to penetrate the material consistently. This prevents skipped stitches in 98% of high-density embroidery projects. Change your needle every 8 hours of stitching time to keep the point sharp.


