Silk embroidery success is 10% design and 90% stabilization strategy, and mastering these tips for embroidering on silk is the only way to protect your luxury fabric investment.
Executive Summary:
- Eliminating fabric puckering through advanced stabilization techniques - The 2026 "cheat sheet" for precision needle and stabilizer pairings - Navigating sustainability laws like California's SB 707 and EU textile bans - Boosting productivity by 30% using high-performance machine settings
You've likely felt that heart-sinking moment when a $60-per-yard silk charmeuse starts puckering or develops "runs" under your needle. It's the most common hurdle for creators, but this masterclass will transform your results from amateur to atelier-quality. You'll learn exactly how to prevent stabilizer show-through on sheer fabrics while maintaining the soft drape silk is known for. With 65% of hobbyists now preferring machines with at least an 8" x 8" embroidery area, mastering large-scale designs on delicate surfaces is more important than ever. This guide gives you the confidence to use high-end digital designs on your most expensive garments without the risk of fabric damage.
- Swap your standard ballpoint needle for a new Microtex or Sharp needle to ensure clean punctures without snagging the delicate weave.
- Adjust your digitizing software to reduce design density by 10-15%, preventing the machine from damaging the fabric with excessive needle penetrations.
- Follow our professional tips for embroidering on silk by capping your machine speed at 500 SPM to eliminate heat-related puckering.
- Select the right stabilizer for your specific fabric, such as using water-soluble versions for organza to maintain its signature transparency.
- Master post-embroidery care techniques to safely remove stabilizers and "erase" accidental needle marks using fiber-massaging methods.
Table of Contents
- Executive Summary: The Golden Rules for Embroidering on Silk
- Essential Tools: Selecting Needles, Threads, and Hoops
- Stabilization Strategy: Matching Stabilizer to Silk Type
- Machine Settings and Design Optimization for Silk
- Troubleshooting and Post-Embroidery Care
Executive Summary: The Golden Rules for Embroidering on Silk
Embroidery on silk is often viewed as the final boss of the sewing world. It's slippery, delicate, and completely unforgiving. Unlike cotton, silk doesn't forgive a misplaced stitch; once the needle pierces the fiber, that hole is usually there to stay. To achieve professional results, you need a strategy that prioritizes fabric integrity over stitch count. These core tips for embroidering on silk serve as your foundation for every luxury project you undertake in 2026.
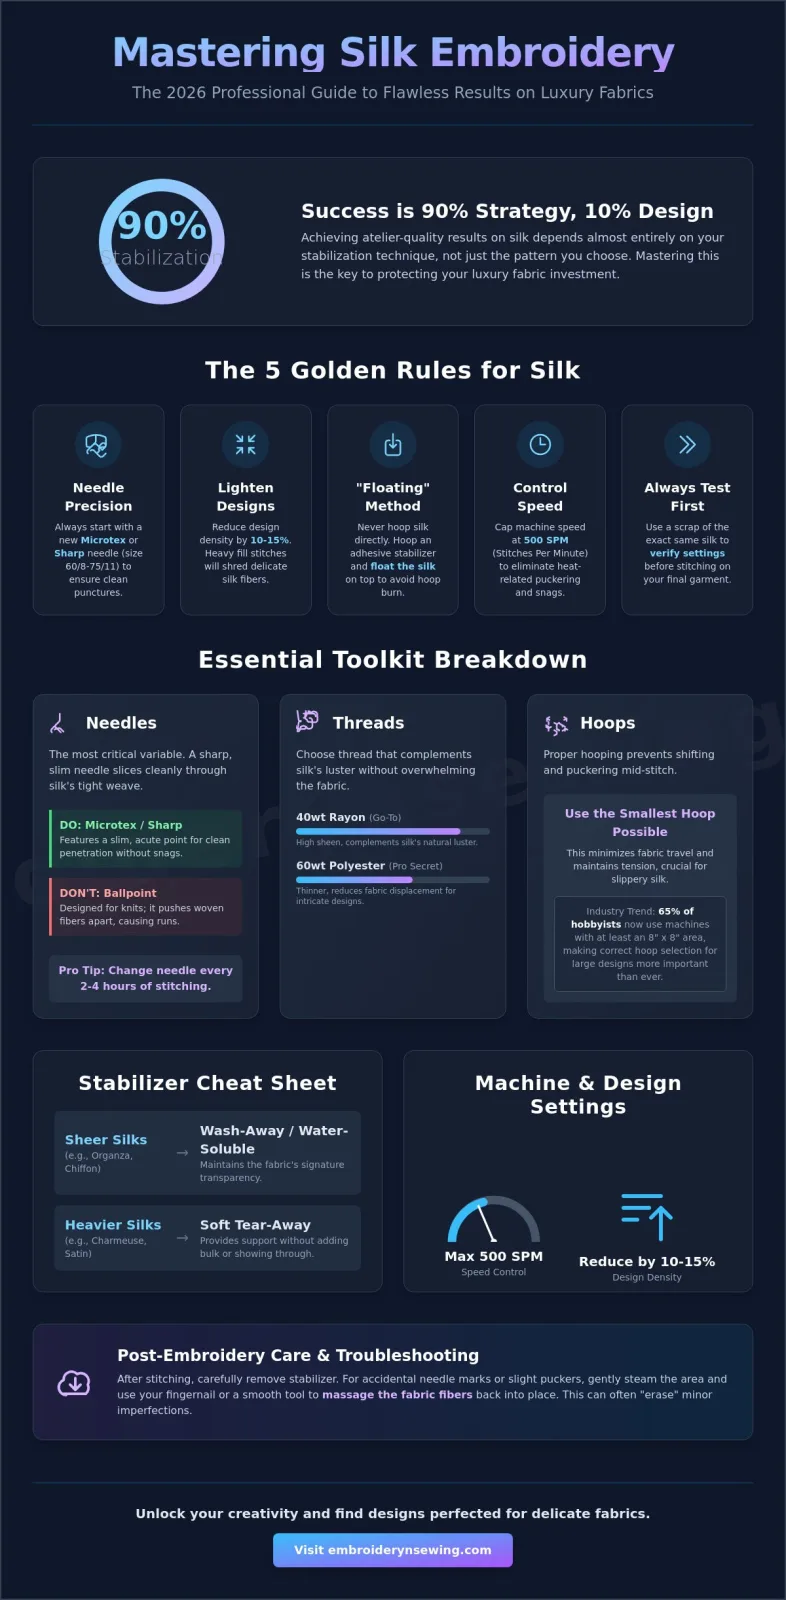
- Needle Precision: Always start with a fresh Microtex or Sharp needle in sizes 60/8 to 75/11. A dull needle will snag the weave instantly.
- Design Density: Opt for lightweight patterns. Heavy, fill-heavy designs will cause the silk to shred or pucker beyond repair.
- The Floating Method: Never hoop your silk directly. Use an adhesive stabilizer in the hoop and "float" the silk on top to avoid permanent hoop burn.
- Stabilizer Matching: Use wash-away stabilizers for sheer silks like organza and soft tear-aways for heavier satins.
- The Scrap Test: Never skip a test run. Use a scrap of the exact same silk to verify tension and stabilizer performance before touching the final garment.
Why Silk Requires a Different Approach
Silk is a protein fiber, which gives it that incredible luster and drape, but it also means it behaves differently than cellulose-based fabrics like cotton. It has a high "memory" for trauma. When a needle enters the fabric, it doesn't just push fibers aside; it can actually break the delicate filaments if the point isn't sharp enough. This leads to thread displacement, where the tight weave of the silk is pushed out of alignment, creating visible lines or "runs" that look like a snag in a pair of stockings. Understanding the computerized machine embroidery process helps you realize that the machine's speed and force must be tempered to respect these natural protein bonds.
The Role of Digital Design Quality
High stitch counts are the natural enemy of luxury fabrics. If you're used to standard machine embroidery sewing on denim or canvas, you'll need to shift your mindset. For silk, you want designs that "breathe." This means choosing embroidery designs specifically digitized for delicate work, or manually reducing the density of your files by 10% to 15%. A design that's too dense acts like a perforated line on a piece of paper, making it easy for the silk to tear right out of the embroidery frame during the stitching process.
Essential Tools: Selecting Needles, Threads, and Hoops
Choosing your kit is where most projects succeed or fail. When looking for the best tips for embroidering on silk, you'll find that the needle is your most important variable. Most beginners reach for a ballpoint needle, thinking it's gentle, but that's a mistake. Ballpoints are designed to push aside loops in knits. Silk is a dense, tight weave; you need a needle that slices through the fibers cleanly rather than forcing them apart.
A 2026 industry report shows that 65% of hobbyists now use machines with at least an 8 inch by 8 inch embroidery area. While larger hoops offer versatility, using the smallest hoop possible for your design reduces fabric travel and prevents the silk from shifting mid-stitch. High-performance machines can increase your productivity by 30% if you calibrate your tools correctly before the first stitch.
Needle Anatomy for Silk
The Microtex needle features a slim, acute point and a thin shaft. This design allows it to penetrate silk without creating the large, permanent holes that standard universal needles leave behind. Change your needle every 2 to 4 hours of active stitching. It sounds excessive, but a slightly dull tip will cause invisible snags that ruin a luxury garment. For machine embroidery on silk, use a size 60/8 needle for lightweight habotai and a size 75/11 needle for heavier silk dupioni to ensure the needle diameter matches the fabric density.
Thread Tension and Type
Standard 40wt rayon thread is the go-to for its high-sheen finish that complements silk's natural luster. However, 60wt polyester is the secret weapon for intricate digital designs. It's thinner, which means it displaces less fabric and significantly reduces the risk of puckering. You must also balance your tension carefully. Tight bobbin tension is a primary cause of fabric distortion on silk. Loosen your upper tension slightly so the "tug" of the stitch happens within the stabilizer, not on the silk surface. If you want to dive deeper into equipment, check out our guide on embroidery machine essentials for luxury fabrics.
The "No-Hoop" Solution
Traditional hooping is the fastest way to ruin silk. The pressure of the inner and outer rings creates "hoop burn," a permanent bruising of the fibers that no amount of steam can fix. Instead, hoop only your stabilizer. Use a "sticky" tear-away or a light spray adhesive to secure the silk on top of the stabilized area. This floating technique keeps the silk flat and secure without the destructive mechanical pressure of the hoop frames. This approach is one of the most vital tips for embroidering on silk for anyone working with delicate charmeuse or satin.
Stabilization Strategy: Matching Stabilizer to Silk Type
Stabilization is the invisible backbone of any successful project. While the design gets the glory, the stabilizer does the heavy lifting to prevent the fabric from shifting under a needle moving at 1,000 stitches per minute. These tips for embroidering on silk focus on choosing the right support for the specific weave you're using. If you pick the wrong one, you'll end up with a puckered mess or a design that looks "sunken" into the fabric. Since high-performance embroidery machines can increase productivity by up to 30%, having a clear stabilization plan saves you from wasting expensive luxury materials.
- Silk Charmeuse and Satin: These fabrics are incredibly slick. Use a "sticky" tear-away or a wash-away stabilizer to lock the fibers in place. If the fabric can slide even a millimeter, your outlines won't align.
- Silk Organza: Transparency is the goal here. Use a heavy-duty water-soluble stabilizer (WSS) that disappears completely after a quick rinse. This ensures no ugly white mesh shows through the sheer fabric.
- Silk Dupioni: This fabric has "slubs," which are natural thick and thin spots in the weave. These can deflect a needle easily. A firm cut-away stabilizer provides the rigid foundation needed to keep the design registered correctly.
The Floating Method Framework
To avoid the dreaded "hoop burn" mentioned earlier, you must master the floating technique. Visualize your setup as a precisely engineered stack. First, you hoop only the stabilizer. Next, apply a light layer of temporary spray adhesive or peel back the paper on a self-adhesive stabilizer. Then, carefully smooth your silk over the top. Finally, add a water-soluble topping to keep the thread from getting lost in the silk's natural sheen. This setup ensures the fabric stays stable without being crushed by the hoop's plastic rings. Most modern machines include a "basting box" feature, which is a large rectangle of stitches that secures the silk to the stabilizer before the main design begins. It's a safer alternative to pins, which often leave permanent holes.
Dealing with Sheer and Lightweight Silks
Sheer silks present a unique challenge because any leftover stabilizer is visible. For these projects, always use a water-soluble version. Once you're done, the stabilizer dissolves, leaving only the stitches behind. This aligns with the 2026 trend toward water-saving and eco-friendly embroidery practices. If you're new to these setups, our guide on how to embroider offers foundational hooping advice that applies here. For garments worn against the skin, consider applying a soft mesh "cloud cover" over the back of the finished embroidery. This prevents the stitches from feeling scratchy, ensuring the luxury feel of the silk remains intact from the inside out.
Once you've secured your tools and stabilizer, the next hurdle is your machine's "brain." Even with the perfect needle, running your machine at full throttle will likely cause disasters. While modern high-performance machines can reach 1,000 stitches per minute (SPM), you shouldn't use that speed for luxury projects. These tips for embroidering on silk focus on the delicate balance between speed and stitch delivery. Slowing down reduces the heat generated by the needle's friction, which is vital because excess heat can actually melt or weaken the protein fibers in silk.
Set your machine speed to a "sweet spot" of 400 to 500 SPM. This controlled pace allows the machine to place each stitch with precision, reducing the risk of needle deflection. It also gives you more time to react if a thread loop starts to form or if the fabric begins to shift. Minimizing jump stitches and color changes is also a priority. Every time the machine trims a thread, it performs a "tie-off" stitch that adds density and bulk. Too many of these in one area will create a "bird-nest" of thread on the back, which can cause the silk to tear when you try to clean it up.
Software Tweaks for Silk
Density is the primary reason silk projects fail. Most standard [embroidery patterns] are digitized for medium-weight cotton or polyester. For silk, you must use your software to reduce the stitch density by 10% to 15%. This creates more space between needle penetrations, preventing the fabric from becoming a perforated mess. You should also swap heavy "fill" underlays for a light "contour" underlay. A contour underlay follows the shape of the design and provides just enough stability without adding the weight that causes puckering. If you're working with satin stitches, try increasing the stitch length slightly; shorter satin stitches are too aggressive for fine silk weaves.
Tension Calibration
Tension on silk should be a gentle embrace, not a restrictive grip, to ensure the fabric remains flat after it's removed from the hoop. To find this balance, perform an "H-test" on a silk scrap. Stitch a series of 1 inch tall capital "H" letters while gradually lowering your top tension. You want to see about one-third of the bobbin thread showing on the underside of the satin columns. If the top thread is pulling the bobbin thread all the way to the top, your tension is too high and will cause immediate puckering. Ready to upgrade your equipment? Explore our full range of machine embroidery resources to find the perfect setup for luxury fabrics.
Troubleshooting and Post-Embroidery Care
The final stage of your project is where your patience is tested most. Removing the fabric from the machine requires a surgical touch to ensure all that hard work isn't undone by a single slip of the scissors. These finishing tips for embroidering on silk are designed to help you clean up the design without compromising the luxury feel of the garment. With 2026 regulations like California's SB 707 emphasizing the repair and longevity of textiles, mastering these recovery techniques is more than just a hobbyist skill; it's a sustainable practice for the modern creator.
Start by removing the stabilizer. If you used a tear-away, don't just rip it. Place one hand firmly on the stitches and gently tear toward the design, not away from it. For cut-away stabilizers, use duckbill or applique scissors. The "paddle" on these scissors protects the silk, allowing you to cut the stabilizer within 1/8 inch of the design without nicking the fabric. Finally, inspect for stray needle holes. Since silk has a high memory, you can often "erase" these by gently massaging the fibers with a clean fingernail or a blunt tapestry needle. This physical manipulation moves the displaced threads back into their original weave, effectively closing the gap.
The "Pressing Cloth" Technique
Never let a hot iron touch silk directly, especially over textured. High heat can scorch the protein fibers, and steam often leaves permanent "water rings" or tidal marks on sensitive dyes. To finish your piece, place a plush, clean towel on your ironing board. Lay the embroidery face-down on the towel. Use a dry iron set to the "silk" or "low-medium" setting and press from the back. The towel allows the stitches to sink in, preserving their 3D loft while flattening the surrounding fabric. This prevents the embroidery from looking crushed or unnaturally shiny.
Fixing Common Mistakes
If you encounter a "bird-nest" under the hoop, don't pull the fabric. This is a common panic point. Instead, use a seam ripper to cut the tangled threads from the bobbin side first. If the needle has struck the fabric and left a small hole or a "run," you don't have to scrap the project. In many cases, you can cover the damage by converting that section of the design into an element. Layering a small piece of matching silk over the error not only hides the mistake but adds a professional, multi-textured look to your work. These tips for embroidering on silk ensure that even when things go wrong, you have a clear path toward a high-end finish.
Transform Your Silk Projects Today
You now have the technical blueprint to handle the most temperamental fabric in your collection. Success comes down to the small details, like reducing your design density by 15% and maintaining a strict 500 SPM speed limit to protect those delicate protein fibers. These tips for embroidering on silk ensure your luxury garments maintain their drape while showcasing crisp, professional-grade stitches. You've learned how to "float" your fabric to avoid hoop burn and how to use the "surgical" approach to finishing that 2026 quality standards demand.
Don't risk your expensive materials on poorly digitized patterns. To ensure your next project is a success, browse high-quality digital designs perfect for luxury fabrics at Embroidery n Sewing. We provide professional-grade PES and DST files that are specifically optimized for minimal puckering. Each design is available for instant digital download worldwide, so you can start stitching immediately. You've got the skills and the strategy; now it's time to create something breathtaking.
Frequently Asked Questions
Do I need a special foot for my embroidery machine to work on silk?
You don't need a specialized foot, but your standard "U" or "O" embroidery foot must be completely smooth. Even a tiny scratch on the metal can snag silk fibers as the hoop moves. Check the bottom of your foot with a magnifying glass before you start. If you find a burr, use a fine-grit emery board to polish it away so the foot glides effortlessly over the luxury surface.
Can I wash silk after it has been embroidered?
Whether you can wash embroidered silk depends on the stabilizer used and the silk's "momme" weight. Most experts recommend dry cleaning for embroidered luxury items to prevent water rings and color bleeding. If you must wash it, use cool water and a pH-neutral detergent. Avoid twisting the fabric, as this can distort the embroidery stitches and cause the silk fibers to break.
What is the best needle size for silk charmeuse?
A size 60/8 Microtex needle is the best choice for silk charmeuse, particularly for weights between 16 and 19 momme. This ultra-thin needle creates the smallest possible entry point, which is essential for the tight, satin weave of charmeuse. Using these specific tips for embroidering on silk helps you avoid the "runs" that occur when a larger needle breaks the delicate horizontal threads of the fabric.
How do I prevent "hoop burn" on dark silk fabrics?
You prevent hoop burn on dark silk by never allowing the hoop to touch the fabric directly. Dark dyes show "bruising" or shiny marks much more clearly than lighter shades because the pressure of the hoop rings permanently flattens the silk's pile. By hooping only the stabilizer and using the floating method, you ensure the dark fibers remain untouched by mechanical pressure, keeping the deep color uniform and rich.
Is it better to use polyester or rayon thread on silk?
Rayon is traditional for its high shine, but 2026 sustainability trends favor high-performance recycled polyester threads. These modern polyester threads offer 20% more tensile strength than rayon, which means they're less likely to snap during high-speed stitching. Polyester also resists fading better than rayon, making it a smarter choice for garments that might see sunlight.
Why does my silk fabric keep puckering even with a stabilizer?
Silk often puckers because the needle is pulling the fabric into the throat plate of the machine. This "flagging" happens when the stabilizer isn't rigid enough to resist the needle's downward force. If you've already reduced your design density and the puckering persists, try using two layers of lightweight stabilizer instead of one heavy layer. This provides better multidirectional support for the fabric's weave.
Should I use a "topping" on silk?
You should use a water-soluble topping on silk to keep your stitches sitting on top of the fabric's natural luster. Without a topping, the fine embroidery threads can sink into the weave, making the design look thin or uneven. A single layer of 20-micron water-soluble film ensures your satin stitches remain crisp and reflect light beautifully, matching the silk's own radiance.
Can I use a heat-away stabilizer on silk?
Avoid using heat-away stabilizers on silk because the high temperatures required to crumble the stabilizer can damage the fabric. Silk fibers begin to yellow or become brittle when exposed to temperatures above 148 degrees Celsius (300 degrees Fahrenheit). Since most heat-away stabilizers require a hot, dry iron to work, you risk scorching your project. Stick to wash-away or tear-away options to stay safe.