Have you ever spent hours on a beautiful embroidery design, only to pull it from the hoop and see puckered fabric and misaligned stitches? That frustrating moment is often the result of one simple thing: not using the best stabilizer for embroidery for your specific project. If you've ever felt overwhelmed by the wall of options at the craft store-cut-away, tear-away, wash-away-and afraid of ruining another expensive garment, you're in the right place.
This guide is your roadmap to achieving flawless, professional-looking results every single time. We are going to demystify the entire process, breaking down exactly what those confusing weights and types mean and how to match them perfectly to your fabric, from delicate chiffon to stretchy knits. You will gain the confidence to tackle any project without fear, understanding the 'why' behind each choice.
Get ready to say goodbye to guesswork and sinking stitches for good. By the end of this article, you'll have the knowledge to choose the right stabilizer with confidence and create the stunning, store-bought quality embroidery you've always wanted.
- Stabilizer is the essential foundation that prevents fabric from puckering and shifting, ensuring your stitches look clean and professional. - Learn the four main types of stabilizer-Cut-Away, Tear-Away, Wash-Away, and Heat-Away-to understand the building blocks for any project. - Discover a simple 3-step formula to choose the best stabilizer for embroidery by matching it to your specific fabric and design density.
- Quickly troubleshoot common embroidery issues like poor registration by learning which stabilizer to use for different project types.
Table of Contents
- What is Embroidery Stabilizer (and Why You Absolutely Need It)?
- The 4 Main Types of Embroidery Stabilizer Explained
- How to Choose: A 3-Step Formula for Perfect Results
- Practical Guide: Stabilizer Pairings for Common Projects
- Troubleshooting: Is Your Stabilizer Causing These Common Issues?
What is Embroidery Stabilizer (and Why You Absolutely Need It)?
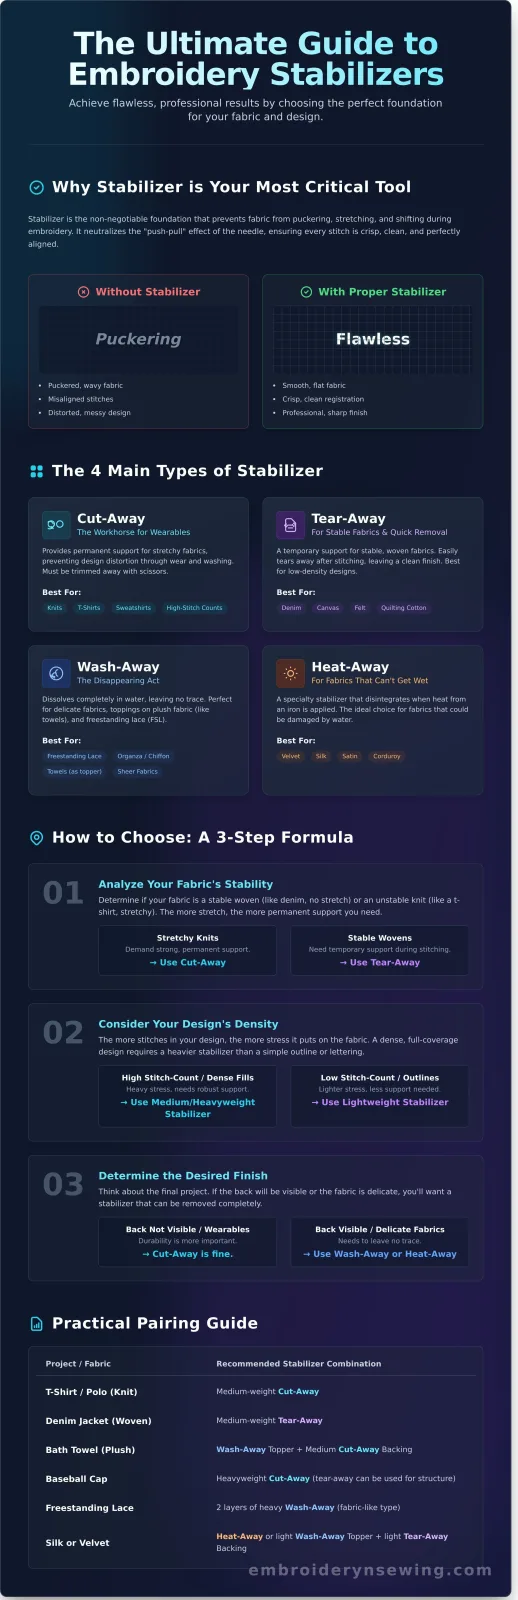
Think of embroidery stabilizer as the unsung hero of your sewing room-the essential foundation that ensures your stitches come out perfect every time. Without it, your fabric can stretch, shift, and pucker under the rapid motion of the embroidery needle, leading to distorted designs and frustration. Choosing the best stabilizer for embroidery is the most critical first step toward achieving a crisp, professional finish.
To put it simply, stabilizer is to an embroiderer what a primed canvas is to a painter. It creates a firm, stable surface, allowing the "paint" (your thread) to be applied exactly where you intend it, resulting in clean lines and flawless fill stitches.
On the left: A design stitched without stabilizer shows significant puckering and misalignment. On the right: The same design on identical fabric, stitched with the proper stabilizer, is smooth and precise.
Stabilizer vs. Interfacing: What's the Difference?
While they might feel similar, stabilizer and interfacing serve very different purposes and are not interchangeable for embroidery. Interfacing is a permanent addition, fused or sewn into a garment (like a shirt collar) to add lasting body and structure. Stabilizer, on the other hand, is a temporary support designed specifically to withstand the unique stresses of embroidery and is typically removed-by tearing, washing, or cutting-after the stitching is complete.
The Core Problem Stabilizer Solves: The 'Push-Pull' Effect
Every time your machine's needle penetrates the fabric, it pushes the fibers down. When it retracts, it pulls the thread and the fabric upward. This constant motion creates a "push-pull" effect that distorts the material. This is a fundamental challenge in the Machine embroidery process, and it's amplified by dense, high-stitch-count designs. Stabilizer works by gripping the fabric threads, holding them taut and preventing them from shifting, effectively neutralizing these forces for a perfect stitch-out.
Understanding this foundational role is crucial. It’s not just an accessory; it’s a non-negotiable tool that directly impacts the quality of your work. Getting this right is the secret to making your projects look store-bought, not homemade. Now, let's dive into the different types so you can find the best stabilizer for embroidery projects you have in mind.
The 4 Main Types of Embroidery Stabilizer Explained
Before you can find the best stabilizer for embroidery, you need to know your options. Think of stabilizers as the foundation of your project-the right one ensures your stitches are crisp, flat, and durable. Nearly every stabilizer on the market falls into one of four main categories: Cut-Away, Tear-Away, Wash-Away, and Heat-Away. Understanding the core function of each is crucial, as the interaction between fabric, thread, and stabilizer dictates final quality. In fact, the Technical aspects of embroidery stabilizers are a key focus in professional applications, ensuring optimal stitch formation and support.
Cut-Away Stabilizer: The Workhorse for Wearables
If you're stitching on anything you'll wear and wash, a cut-away is often the best stabilizer for embroidery. It's designed for stretchy, knit fabrics like t-shirts, sweatshirts, and polos, providing permanent support that prevents the design from warping or stretching out of shape. After stitching, you simply use scissors to trim the excess stabilizer away from the back of your design, leaving a soft, permanent backing that continues to support the stitches through countless laundry cycles.
Tear-Away Stabilizer: For Stable Fabrics and Quick Removal
As its name suggests, tear-away stabilizer is easily removed once your embroidery is complete. It's the ideal choice for stable, non-stretchy woven fabrics such as denim, canvas, quilting cotton, and felt. Because it offers no permanent support, it works best for designs with lower stitch counts or simple outlines. Be cautious using it on delicate fabrics, as the act of tearing it away can distort the stitches you just worked so hard to create.
Wash-Away Stabilizer: The Disappearing Act
Wash-away stabilizer is the magician of the embroidery world, dissolving completely in water and leaving no trace behind. This makes it perfect for projects like freestanding lace (FSL) or on delicate fabrics like organza where you need support during stitching but want nothing left afterward. It's also commonly used as a topper on high-pile fabrics like terry cloth or fleece to keep your stitches from sinking into the material.
Specialty Stabilizers: Sticky-Back and Heat-Away
- Sticky-Back (Pressure-Sensitive): This is a tear-away or cut-away stabilizer with a paper-backed adhesive surface. You hoop the stabilizer, score the paper, and then stick on items that are difficult to hoop, like caps, velvet, or tiny baby onesies.
- Heat-Away: This stabilizer is for fabrics that cannot tolerate water, such as certain silks or velvets. After stitching, it disintegrates and flakes away when touched with a hot, dry iron.
How to Choose: A 3-Step Formula for Perfect Results
Tired of guesswork? Choosing a stabilizer doesn't have to be a game of chance. By following this simple three-step formula, you can confidently select the perfect foundation for any project, eliminating puckering and poor stitch-outs. This repeatable process considers the three most critical variables: your fabric, your design, and the stabilizer's weight.
Step 1: Analyze Fabric → Step 2: Consider Design Density → Step 3: Match Stabilizer Weight = Perfect Results
Step 1: Analyze Your Fabric's Stretch and Weight
The foundation of your project is the fabric itself. A simple rule to remember is: the more stretch your fabric has, the more support it needs. Your fabric type is the first and most important clue in determining the best stabilizer for embroidery.
- Knit Fabrics: Items like t-shirts, sweatshirts, and fleece have significant stretch. They require a stable, permanent foundation. Always choose a cut-away stabilizer to prevent the design from distorting after washing and wearing.
- Woven Fabrics: Sturdy materials like denim, canvas, and linen have very little stretch. A tear-away stabilizer is usually sufficient to provide support during stitching and can be easily removed afterward.
- Delicate & Sheer Fabrics: For materials like organza, silk, or tulle where a backing would be visible, a wash-away stabilizer is the ideal choice. It provides support and then dissolves completely in water.
Step 2: Consider Your Design's Stitch Density
Next, look at your embroidery design. The number of stitches packed into a small area, known as stitch density, dictates how much stability is required. The rule here is: the more stitches in the design, the more stability you need.
A light, open design with running stitches or simple lettering requires less support than a dense, full-fill design like a patch or a solid company logo. For complex designs with high stitch counts, performing a test stitch-out is crucial to ensure your fabric and stabilizer combination can handle the density without puckering.
Step 3: Match Stabilizer Weight to Your Project
Finally, match the stabilizer's weight to your fabric and design. Stabilizer weight is measured in ounces (oz) per square yard-a higher number means a thicker, more stable product. Layering lighter-weight stabilizers can also achieve the support of a heavyweight one.
- Lightweight (1.0 - 1.8 oz): Best for light stitch-count designs on stable woven fabrics like quilting cotton.
- Medium-weight (2.0 - 2.8 oz): The most common and versatile choice. This is the workhorse for most everyday projects on fabrics like denim, fleece, and stable knits.
- Heavyweight (3.0+ oz): Reserved for very dense, large designs or unstable, stretchy fabrics that need maximum support to prevent any distortion.
Practical Guide: Stabilizer Pairings for Common Projects
Theory is great, but practical application is where your embroidery skills truly shine. This section is your go-to cheat sheet for common projects. Choosing the best stabilizer for embroidery often comes down to matching it perfectly with your fabric and design density. We recommend bookmarking this page for quick reference before you start stitching!
For Clothing: T-Shirts, Polos, and Sweatshirts
Stretchy knit fabrics require a stabilizer that provides permanent support to prevent designs from warping or puckering after washing. A medium-weight cut-away (around 2.0-2.5 oz) is the industry standard. It remains with the garment, ensuring your embroidery looks crisp for its entire lifespan.
Pro Tip: Always use a ballpoint needle when embroidering on knits. Its rounded tip pushes the fibers aside instead of cutting them, preventing holes and runs in the fabric. Perfect your technique with our fun cartoon character embroidery designs.
For Accessories: Towels, Caps, and Bags
Accessories often involve unique textures and shapes, each requiring a specific stabilizer combination for professional results. Here are the most common pairings:
- Towels (Terry Cloth): The plush loops of terry cloth can swallow your stitches. Use a heavy water-soluble topper to keep stitches on top of the pile, combined with a medium tear-away stabilizer on the back for support during stitching.
- Structured Caps: The rigid, curved surface of a cap needs a robust backing. Use a heavy-weight tear-away specifically designed for caps, which can withstand the high stitch count and tension.
- Bags (Canvas/Duck Cloth): For sturdy fabrics like canvas, a medium-weight tear-away stabilizer is usually sufficient. It provides support during the embroidery process and then removes cleanly.
For Home Decor: Denim, Quilting Cotton, and Linens
Stable woven fabrics like denim, cotton, and linen don't have much stretch, making them easier to work with. For most designs, a medium-weight tear-away (1.8-2.2 oz) provides excellent stability and removes easily afterward. If you're working with a particularly dense or stitch-heavy design on denim, consider using a light-weight cut-away to give the design lasting support without adding too much bulk. This simple switch can be the key to finding the best stabilizer for embroidery on heavy-duty fabrics.
Troubleshooting: Is Your Stabilizer Causing These Common Issues?
Even the most beautiful design can be ruined by the wrong foundation. If your embroidery projects aren't turning out as expected, your stabilizer is the first place to look. Think of this section as a diagnostic tool to pinpoint the problem and find the right solution, helping you achieve professional, pucker-free results every time.
Problem: Fabric Puckering Around the Design
Puckering, or that wrinkled, gathered look around your stitches, is one of the most common embroidery frustrations. It typically happens when the fabric shifts or pulls during stitching because it isn't held stable enough for the design's density.
- The Cause: Insufficient stabilization. This is especially common on stretchy knit fabrics like T-shirts or with dense, high-stitch-count designs.
- The Solution: If you're using a tear-away on a knit, switch to a cut-away stabilizer. It provides a permanent, stable foundation that moves with the fabric after washing. For any fabric type, you can also try using a heavier weight stabilizer or adding a second layer for extra support. Finally, always ensure your fabric and stabilizer are hooped "tight as a drum" to prevent any shifting.
Problem: Stitches are Sinking into the Fabric
Have you ever embroidered on a towel or fleece blanket, only to have your beautiful stitches disappear into the fabric's fluff? This happens when the thread doesn't have a solid surface to sit on, causing it to sink into the material's pile.
- The Cause: The fabric has a high pile or a deep texture (e.g., towels, minky, fleece, corduroy).
- The Solution: Use a topper. A topper is a thin, film-like stabilizer, usually wash-away or heat-away, that you place on top of your fabric before stitching. It creates a smooth, flat surface, allowing the stitches to form perfectly on top of the pile instead of getting lost within it. Once the design is finished, the topper is removed with water or heat, leaving crisp, clear stitches behind.
Problem: The Stabilizer is Tearing During Stitching
If you notice your stabilizer shredding or falling apart before the design is even finished, you're using the wrong type for the job. This compromises the entire project, often leading to misaligned stitches and puckering.
- The Cause: Using a standard tear-away stabilizer with a dense, high-stitch-count design. The sheer number of needle penetrations essentially perforates the stabilizer, causing it to tear prematurely.
- The Solution: For dense designs, a cut-away stabilizer is essential. It's constructed from non-woven fibers that can withstand thousands of needle strikes without tearing. For wearables where you want a softer feel against the skin, consider a 'no-show' mesh cut-away. Learning how to match your stabilizer to your design's density is crucial for finding the best stabilizer for embroidery and ensuring your projects are successful.
For more expert tips and project inspiration, be sure to explore the resources at embroiderynsewing.com.
Your Foundation for Flawless Embroidery
You've now uncovered the most critical, yet often overlooked, element of machine embroidery. Remember that stabilizer isn't just an accessory; it's the essential foundation for every successful project. Ultimately, finding the best stabilizer for embroidery isn't about a single magic product, but about understanding the simple formula: match the stabilizer type and weight to your fabric and design density. Mastering this will eliminate puckering, poor registration, and thread breaks for good.
Now that you're equipped with the knowledge to create a perfect canvas, it's time to choose a design worthy of your skills. With thousands of professionally digitized embroidery designs, you're sure to find your next inspiration. All our patterns are rigorously tested for flawless stitch-outs and are available as instant downloads for all major machine formats.
Ready to stitch? Browse our high-quality designs perfect for any project.
Go forward with confidence, knowing you have the right components for a beautiful result. Happy stitching!
Frequently Asked Questions
What is the best all-purpose embroidery stabilizer for a beginner?
For beginners, a medium-weight cut-away stabilizer is an excellent choice. It offers fantastic, versatile support for a wide range of common projects like t-shirts, sweatshirts, and denim. This type prevents the fabric from puckering or distorting during stitching, which are common beginner frustrations. While no single product is perfect for everything, a quality medium-weight cut-away is the most forgiving and will help you achieve great results as you learn and build your confidence.
Can you use two layers of stabilizer? When is it necessary?
Yes, you can and should use two layers of stabilizer in certain situations. This is necessary when working with high stitch-count designs or on very unstable, stretchy fabrics like thin knits. Finding the best stabilizer for embroidery can sometimes mean layering two lighter pieces. This provides superior support to prevent the design from sinking into the fabric and significantly reduces puckering. For example, a dense logo on a lightweight jersey would benefit from two layers.
What can I use if I run out of embroidery stabilizer?
While a commercial stabilizer is always the recommended choice, some crafters use temporary household items in an emergency. For simple designs on stable fabric, coffee filters or heavy-duty paper towels have been used as a last resort. However, these substitutes lack the proper structure and can tear easily, potentially damaging your project or machine. It is always best to pause your work and purchase the correct stabilizer to guarantee a high-quality, lasting result.
How do you hoop fabric and stabilizer together correctly?
First, place a piece of stabilizer larger than your hoop on a flat surface. Lay your fabric smoothly on top of it, ensuring there are no wrinkles. Press the inner hoop down into the outer hoop, sandwiching the layers firmly. The goal is to have the fabric and stabilizer taut like a drum, but not stretched or distorted. Gently pull the excess material around the outside of the hoop to remove any final slack before tightening.
Does the color of the stabilizer (black vs. white) matter?
Yes, the color of your stabilizer definitely matters for a professional finish. The general rule is to match the stabilizer to your fabric. Use a white or off-white stabilizer for light-colored fabrics and a black stabilizer for dark fabrics like black, navy, or charcoal gray. This simple step prevents the stabilizer from showing through the material, especially on thinner fabrics, ensuring your project looks clean and polished from both the front and the back.
How do I know what weight my stabilizer is if it's not on the package?
You can determine the approximate weight with a simple "feel test." A lightweight stabilizer feels similar to tissue paper-it's very pliable and often translucent. A medium-weight stabilizer has more body, comparable to a standard sheet of printer paper. A heavyweight stabilizer is much stiffer and more opaque, feeling closer to cardstock. Comparing an unknown piece to a labeled one you own is the easiest way to identify its weight and proper use.