

- Selecting stable fabrics to prevent puckering and fabric waste.
- Identifying the right digital designs to ensure a smooth stitching process.
- Understanding how file formats like PES and DST work with your machine.
- Mastering basic hooping techniques to avoid thread nesting and alignment errors. The secret to your success isn't the machine you own; it's matching stable "blank" fabrics with professionally digitized, low-complexity designs. I must apologize for the technical barriers that often make this hobby feel inaccessible, specifically the confusion over file formats and software requirements. You probably fear wasting expensive materials or dealing with a "thread nest" that ruins your project. I understand those pains, and I'm here to provide a clear path forward.
This guide will help you discover the best machine embroidery projects for beginners using high-quality digital embroidery designs. Whether you're using a Brother SE700 or a PE535, you'll learn how to choose the right projects and master basic hooping. We'll explore how to pick the best designs, from sports embroidery to anime embroidery designs, so you can finish your first project with total confidence.
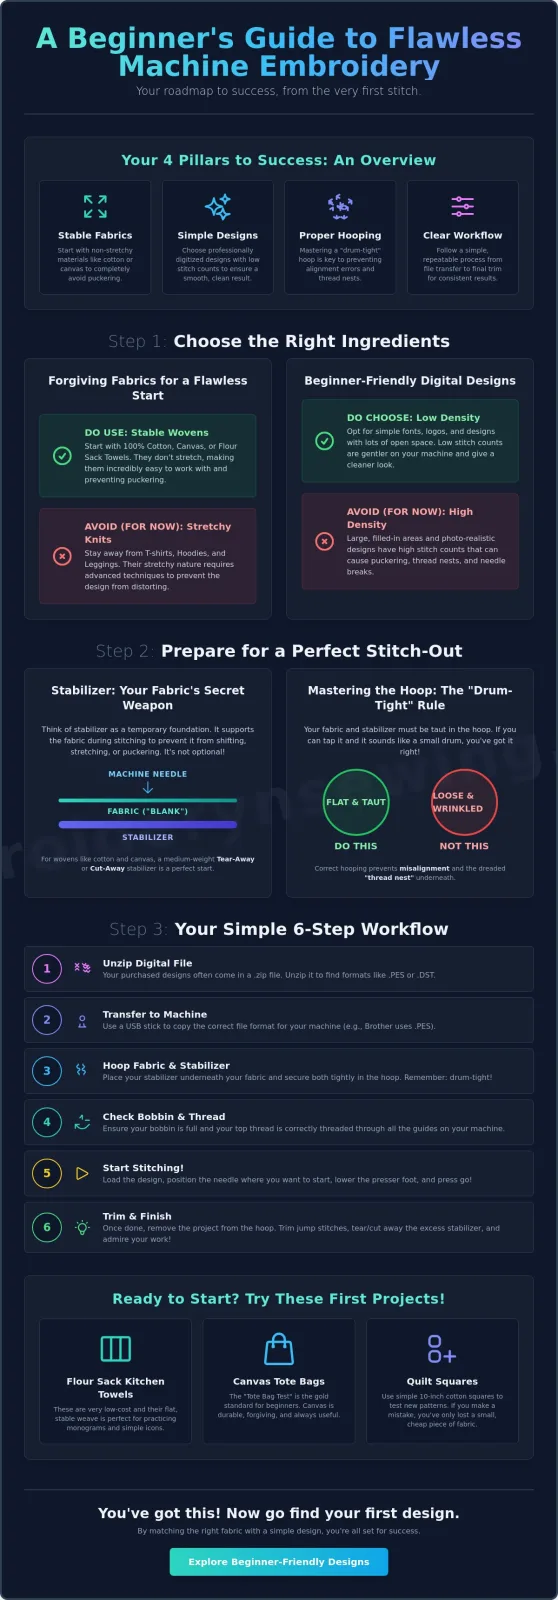
- Focus on stable blanks like 100% cotton or canvas to prevent the common issue of fabric puckering during your first projects.
- Choose digital designs with low stitch density to protect your machine and ensure a smooth, professional-looking embroidery process.
- I must apologize for the technical complexity of stabilizer types, so I've simplified the choices to help you avoid frustrating thread nesting.
- Master a clear workflow for machine embroidery projects for beginners that covers everything from unzipping digital files to the final trim.
Table of Contents
- Executive Summary: Your Roadmap to Beginner Embroidery
- Identifying the Most Forgiving "Blanks" for New Embroiderers
- Picking Beginner-Friendly Digital Designs Like Fonts and Logos
- Preparing Your Workspace with the Right Stabilizers and Threads
- Following a Simple Workflow from File Transfer to Final Trimming
Executive Summary: Your Roadmap to Beginner Embroidery
I must apologize for the initial technical barriers that often discourage new creators. The learning curve for machine embroidery projects for beginners can feel quite steep, especially when you're dealing with file formats and hooping tension for the first time. I've designed this roadmap to strip away the confusion and focus on the specific variables that lead to a successful stitch-out every single time.
The key to a professional result isn't just having a high-end machine; it's the relationship between your fabric choice and the quality of your digital designs. This summary highlights the four pillars of beginner success:
- Forgiving Blanks: Starting with non-stretchy materials like canvas or 100% cotton to minimize fabric shifting.
- Simple Digital Designs: Using professionally digitized fonts and logos that won't overwhelm your machine with high stitch counts.
- Proper Stabilization: Matching your project with the right tear-away or cut-away backing to prevent puckering.
- A Standard Workflow: Following a consistent routine for file transfer and hooping to ensure alignment.
If you're looking for a foundation on how these machines function, this Machine Embroidery Overview offers a helpful technical background. My focus here is to ensure you don't waste expensive fabric while you learn the ropes. By understanding the interaction between the needle and the stabilizer, you can avoid the common pitfalls of thread nesting and broken needles.
How to Use This Guide
I've expanded each of the bullet points above into its own detailed section. This structure allows you to move logically from selecting your materials to the final trimming process. I suggest you bookmark this guide and keep it open on your tablet or phone for your first five machine embroidery projects for beginners. It acts as a checklist to ensure you haven't missed a critical step like checking your bobbin or unzipping your design files correctly. By following this framework, you'll build the muscle memory needed to move onto more complex fabrics and intricate digital designs later on.
Identifying the Most Forgiving "Blanks" for New Embroiderers
I must apologize for the technical barrier that makes knit fabrics so difficult for newcomers. When you're searching for machine embroidery projects for beginners, the fabric you choose is actually more important than the machine you use. I recommend starting in the "Goldilocks" zone: 100% cotton. This woven fabric is stable and doesn't shift or stretch under the rapid movement of the embroidery needle. It provides a predictable surface that allows you to focus on your machine settings rather than fighting the material.
Canvas is another excellent teacher, leading to what I call the "Tote Bag Test." Because canvas is heavy and stiff, it gives you immediate feedback on your hooping tension. If your fabric is too loose, the stiffness of the canvas will make the gaps obvious. It's much easier to master the art of a "drum-tight" hoop on a sturdy bag than on a delicate or slippery fabric. I've found that starting with these rigid materials builds the confidence you need for more complex tasks later.
Please try to avoid the "Stretch Trap" during your first few weeks. T-shirts, hoodies, and leggings are made of knit fabrics that pull and distort as the needle penetrates the surface. Without advanced knowledge of adhesive sprays and specialty mesh stabilizers, you'll likely face puckering. I'd hate for you to waste a perfectly good garment while you're still learning the basics of file placement. If you want to start with something fun, you can browse our collection of embroidery designs to find a simple shape that works well on a flat, woven surface.
Top 3 Beginner Project Ideas
- Flour Sack Kitchen Towels: These are very low cost and high utility. Their flat, thin weave makes them incredibly stable for practicing monograms or small icons.
- Canvas Tote Bags: These are the gold standard for practicing machine embroidery sewing. They are durable, forgiving, and always useful.
- Quilt Squares: Use simple 10-inch cotton squares to test new embroidery patterns. If you make a mistake, you've only lost a small scrap of fabric rather than a finished item.

Picking Beginner-Friendly Digital Designs Like Fonts and Logos
I must apologize for the technical barrier that often comes with choosing digital files. Many newcomers assume that any beautiful image can be easily stitched, but the reality is that stitch density dictates your success. When you're looking for machine embroidery projects for beginners, you should prioritize designs with a lower stitch count. If a design is too dense, the needle strikes the fabric so many times in a small area that it causes puckering or even tears the stabilizer. Density dictates your success.
I recommend starting with simple monograms. Using embroidery fonts for machine embroidery allows you to personalize items without the risk of complex overlapping layers. It's helpful to understand the difference between a satin stitch and a fill stitch. A satin stitch uses long, smooth threads that wrap around an area; this is perfect for thin borders or text. A fill stitch is a series of tiny, repeating stitches used to cover large shapes. For your first few projects, look for designs that use satin stitches for outlines. They're much more forgiving on the machine than heavy fills.
If you want to practice color changes, sports embroidery and college embroidery designs are fantastic choices. These often feature bold, distinct sections of color. This makes it easy to see where one thread ends and the next begins. It helps you get used to the rhythm of your machine's prompts without getting lost in intricate details. I've found that simple logos provide the best balance of challenge and reward for new hobbyists.
Recommended Design Categories
- Sports and College Logos: These designs, such as NFL embroidery or college embroidery designs, have clear boundaries. They provide a structured way to learn how your machine handles different thread colors.
- Single-Color Silhouettes: I suggest these for your very first run. They eliminate the stress of frequent thread changes so you can focus entirely on the stitching process.
- Basic Fonts: These are essential for learning [how to embroider] names on towels or bags. I've found that simple block letters are much easier to align than intricate script fonts.
Preparing Your Workspace with the Right Stabilizers and Threads
I must apologize for the overwhelming variety of stabilizers you'll encounter at the craft store. This technical barrier is one of the most common reasons beginners feel stuck before they even start. To keep your machine embroidery projects for beginners moving forward, I've simplified these materials into what I call the "Big Three." Understanding these will save you from wasting fabric and thread on failed attempts.
- Tear-away: This is the most beginner-friendly option. It works perfectly with the stable cotton and canvas fabrics I recommended earlier. Once the machine finishes stitching, you simply tear the excess away from the edges of the design.
- Cut-away: You'll need this for anything with a stretch, like t-shirts or hoodies. It provides permanent support and must be trimmed with scissors around the design after stitching is complete.
- Wash-away: This soluble film is used for specialized projects or as a "topping" on fluffy towels to keep stitches from sinking into the fabric pile.
I suggest starting with a medium-weight tear-away stabilizer. It's versatile enough for most basic digital designs and very easy to handle. For your thread, 40wt polyester is the industry standard for a reason. It's strong, has a beautiful shine, and resists the high-speed friction of the needle better than cotton or rayon. Once you have these basics ready, you can explore our full collection of machine embroidery designs to find a project that fits your new setup.
Hooping Without the Headache
Hooping is the foundation of a good stitch-out. I always follow the "Drum Tight" rule. After you've tightened the screw on your hoop, tap the fabric with your finger. It should produce a clear, resonant sound like a drum. If the fabric feels mushy or sags, your design will likely pucker or shift during the stitching process.
I frequently see beginners make the mistake of not securing the "Stabilizer Sandwich" correctly. The correct order is always the outer hoop on the bottom, followed by the stabilizer, and then your fabric on top. If these layers aren't locked together tightly, thread will bunch up under the throat plate. This creates a "birds nest" that can be difficult to clear and might even damage your machine's timing if it's severe enough.
Following a Simple Workflow from File Transfer to Final Trimming
I must apologize for the technical barrier that unzipping files often presents to new users. It's a necessary step that can feel like a hurdle when you're excited to start your first project. Most digital embroidery designs are delivered in a compressed .ZIP folder to keep the file size manageable. You'll need to right-click and select "Extract All" on your computer before you can access the actual stitch data. If you try to load the zipped folder directly onto your USB drive, your machine simply won't recognize the contents.
Once your files are extracted, you need to identify the specific format your machine requires. Brother machines typically use PES, while Janome uses JEF and many commercial machines prefer DST. Copy only that specific file to your USB drive. I've found that keeping your drive organized with only one or two designs at a time prevents the machine's software from lagging. This straightforward approach ensures a smooth transfer every time you start new machine embroidery projects for beginners.
After loading the design into your machine's memory, you must perform a "trace." This function moves the hoop to show the outer boundaries of where the needle will travel. It's a critical safety check to make sure your needle won't strike the inner edge of the hoop. While the machine stitches, I recommend staying nearby to monitor the tension. You'll likely see jump threads, which are the stray strands of thread that the machine leaves behind when it moves from one section to another. Trimming these carefully gives your work a professional finish.
Your First Stitch-Out Checklist
- Check your bobbin: There's nothing more frustrating than running out of bobbin thread halfway through a complex logo. Always start with a full bobbin to ensure consistent tension throughout the design.
- Inspect your needle: A dull needle causes skipped stitches and fabric pulls. I recommend using a fresh 75/11 embroidery needle for most light to medium woven fabrics.
- Manage jump threads: Jump threads are the connecting lines of thread between separate parts of a design that you should carefully snip with curved embroidery scissors once the section is complete.
By following this routine, you'll find that your success rate increases with every project you tackle. Whether you're stitching out car embroidery designs or NFL embroidery, a consistent workflow is your best tool for success. Don't be afraid to take it slow. Mastering the digital side of this hobby is just as important as the stitching itself.
Take the Next Step Toward Your Embroidery Goals
I must apologize for the technical complexities that often surround this hobby, but I hope this guide has cleared the path for you. You now have the tools to select stable fabrics like canvas and 100% cotton to ensure your machine embroidery projects for beginners turn out perfectly every time. By focusing on simple digital designs and mastering the "drum-tight" hooping technique, you can avoid the frustration of thread nesting and fabric waste. It's important to remember that the quality of your digital file is just as critical as the machine you use for a clean stitch-out.
If you're ready to put these skills into practice, I invite you to browse our collection of beginner-friendly digital embroidery designs! Our designs are available for instant download after purchase and come in high-quality PES, DST, and JEF formats. I prioritize professional-grade digitizing in every file to ensure you experience fewer thread breaks and smoother results on your machine. I'm excited to see what you create as you master your embroidery machine with confidence.
Frequently Asked Questions
What is the easiest thing to embroider for a beginner?
The easiest items to embroider are flat, stable materials like canvas tote bags or 100% cotton kitchen towels. I must apologize for the technical constraint that makes stretchy fabrics like t-shirts difficult for novices. These woven "blanks" stay in place without shifting during the stitch-out. This stability makes them the most reliable choice for machine embroidery projects for beginners who want a successful first result.
What supplies do I need to start machine embroidery?
You'll need an embroidery machine, specialized 40wt polyester thread, and the correct stabilizer for your specific fabric. I regret that I don't sell physical supplies like hoops or needles, so you'll need to source those from a local sewing retailer. My role is limited to providing the high-quality digital designs that serve as the primary blueprint for your machine's needle movements.
Can I use any digital design on my machine?
You cannot use any digital file; you must match the file format to your machine's specific brand requirements. I apologize for the technical barrier created by proprietary formats like PES for Brother or JEF for Janome. It's essential to consult your machine's manual to confirm which format it reads before you purchase and download any digital embroidery designs for your next project.
How do I get digital designs onto my embroidery machine?
Most creators transfer designs by downloading a zipped folder, extracting the files on a computer, and saving the correct format to a USB drive. I understand that the unzipping process can be a frustrating technical barrier for those starting machine embroidery projects for beginners. Once the extracted file is on your drive, you can plug it directly into your machine's port to load the pattern.
Why is my embroidery puckering and how can I fix it?
Puckering is typically caused by insufficient stabilization or loose fabric tension within the hoop. I must apologize for the learning curve involved in achieving the perfect "drum-tight" hooping. To fix this, ensure you're using a fresh piece of medium-weight stabilizer. You should also check that your fabric doesn't sag or shift when you lock the hoop's adjustment screw in place before stitching.


