

- Stop permanent hoop burn by "floating" your fleece instead of clamping it in the hoop. - Use water-soluble toppers to prevent stitches from sinking into the $8.99-per-yard fabric nap. - Pair heavy 2.5oz cut-away stabilizer with 2026 machines like the Brother PR1060W for maximum stability. - Master the "embroidery sandwich" to handle high stitch counts without puckering or shifting.
Last Tuesday, a maker spent $8.99 on a yard of anti-pill fleece only to watch a 12,000-stitch design vanish into the fabric's nap like it never existed. It's a common heartbreak when machine embroidery on fleece blankets goes wrong. You've likely felt that same frustration when "hoop burn" leaves permanent marks or the weight of a heavy blanket pulls the hoop right out of your machine.
I promise you can achieve crisp, professional results by mastering the "float-and-top" technique. This method ensures your stitches stay visible and your fabric remains pristine. We'll explore how to use $3.95 cut-away stabilizers and water-soluble toppers to create a perfect foundation on 2026's top models, like the Baby Lock Meridian 2 or the Brother Celeste CX1e. It's time to stop fighting the fuzz and start creating blankets that look as good as they feel.
- Switch to heavy 2.5oz cut-away stabilizer to provide the permanent structural support required for stretchy polyester fabrics.
- Master the professional floating technique for machine embroidery on fleece blankets to eliminate permanent hoop burn and manage heavy fabric weight.
- Select low-density designs like bean stitches or redwork to ensure your finished project remains soft and cuddly rather than stiff and "bulletproof."
- Apply a water-soluble topper to every project to keep fine details and lettering perfectly crisp on high-pile Sherpa or polar fleece.
- Incorporate a basting box into your workflow as a final insurance policy to prevent the blanket from shifting during high-speed stitching.
Table of Contents
- Mastering Machine Embroidery on Fleece Blankets: An Executive Summary
- The Perfect Setup: Selecting Stabilizers, Toppers, and Threads
- Hooping vs. Floating: How to Handle Bulky Fleece Blankets
- Selecting the Right Digital Designs for Napped Fabrics
- The Step-by-Step Fleece Embroidery Process & Pro Troubleshooting
Mastering Machine Embroidery on Fleece Blankets: An Executive Summary
- Floating: Hoop your stabilizer only; never the blanket. This prevents permanent "hoop burn" on the fibers.
- The Topper: Always use a water-soluble topper (WSS). It keeps stitches on top of the $8.99-per-yard fluff so they don't disappear.
- Stabilizer: Use heavy 2.5oz cut-away. It stops polyester fleece from stretching or sagging during high-speed stitching.
- Needle & Thread: Use a 75/11 or 80/12 Ballpoint needle with 40wt polyester thread for maximum durability.
- Design: Choose "light" or "sketch" designs. High-density fills turn soft blankets into stiff, uncomfortable boards.
If you've ever tried machine embroidery on fleece blankets, you know the struggle. You finish a beautiful design only to realize half of it has vanished into the fuzzy fabric. Or worse, you unhoop the project and find a permanent, rectangular dent in the fleece that won't wash out. This summary gives you the professional "cheat sheet" to avoid these disasters without wading through unnecessary fluff. We're focusing on the settings that work for 2026's high-speed machines like the Brother PR1060W.
Why Fleece Requires a Unique Approach
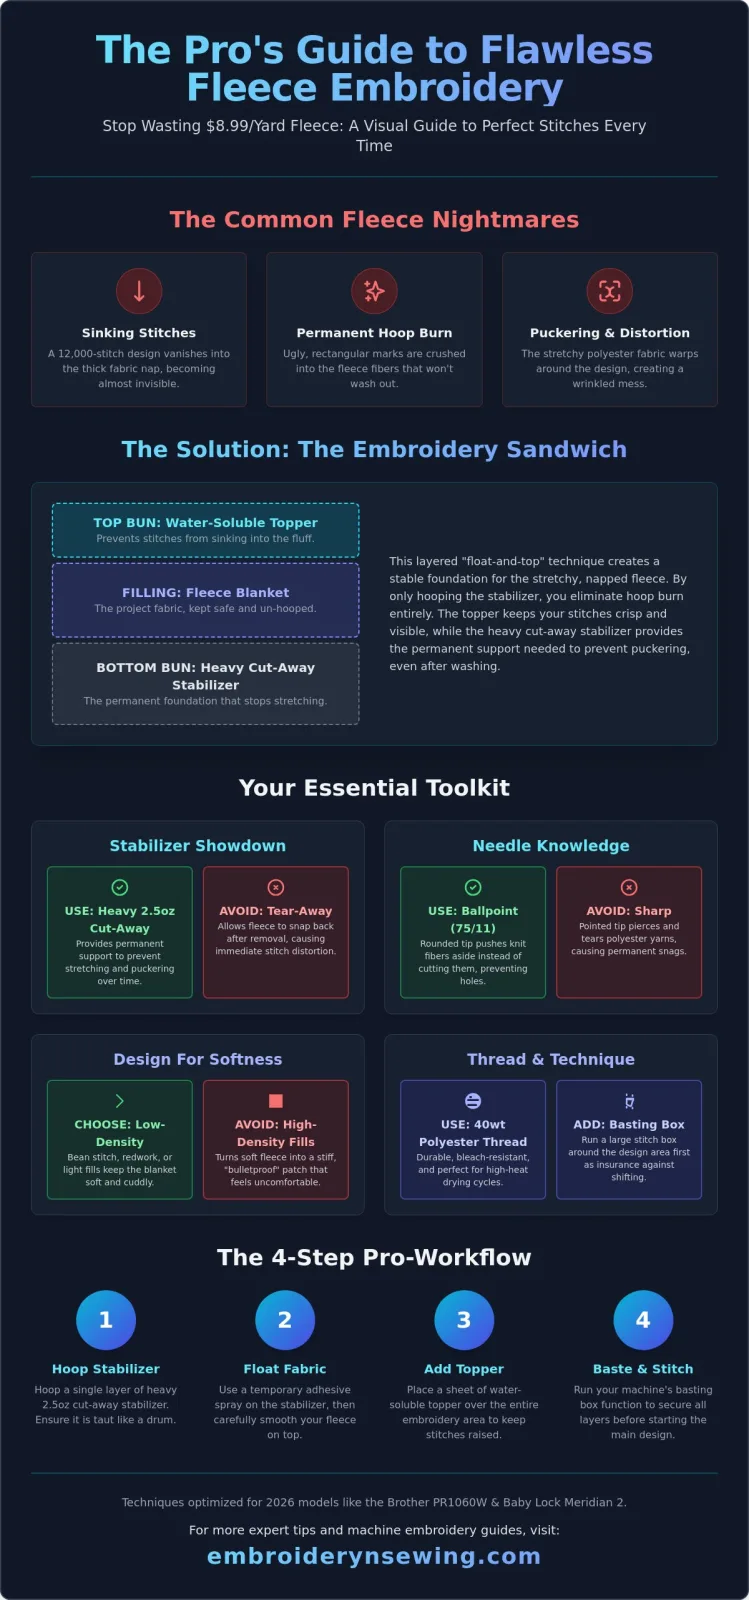
Fleece isn't like a standard cotton tee. It features a "nap," which is the fuzzy, raised surface that makes it so cozy. Without a topper, your stitches will sink into this pile and become invisible. Because most modern fleece is 100% polyester, it has a significant amount of mechanical stretch. If you don't stabilize it correctly, the design will pucker as soon as it comes off the machine. Think of your setup as a "sandwich." Your water-soluble topper is the top bun, the fleece is the meat, and the heavy cut-away stabilizer is the bottom bun. This Machine embroidery overview explains how different stitch types interact with various fabric structures; for fleece, the goal is always buoyancy.
Essential Tools for Your Fleece Project
Getting started requires a specific kit. You'll need a roll of water-soluble topping and a heavy 2.5oz cut-away stabilizer. Don't reach for tear-away; it won't hold up to the stretch of a heavy blanket over time. A temporary adhesive spray is also vital for the floating method we'll discuss later. You should also brush up on machine embroidery sewing basics to ensure your machine tension is dialed in perfectly. Using 40wt polyester thread is a smart move here. Polyester is bleach-resistant and can handle the high-heat drying cycles these blankets often endure. Stick with a ballpoint needle, either size 75/11 or 80/12. It pushes the fabric fibers aside instead of cutting them, which prevents holes in your material.
The Perfect Setup: Selecting Stabilizers, Toppers, and Threads
Success with machine embroidery on fleece blankets depends entirely on your foundation. While we touched on the "sandwich" concept earlier, the specific weight of your components determines if your design puckers after the first laundry cycle. I recommend 40wt polyester thread over rayon because it stands up to the high-heat drying and bleach often used on heavy throws. Polyester's tensile strength also handles the friction of dense fleece better than delicate rayon. Pair this with a 75/11 ballpoint needle. Unlike sharp needles that pierce and tear knit fibers, ballpoint tips slide between the yarns, preserving the fabric's integrity.
DIAGRAM: Needle Tip Comparison for Fleece
Ballpoint Tip (Ideal): Rounded end pushes knit fibers aside without cutting. Prevents "runs" in the fleece.
Sharp Tip (Avoid): Pointed end slices through polyester yarns, creating permanent holes and snags.
The Stabilizer Debate: Cut-Away vs. Tear-Away
Many beginners reach for tear-away stabilizer because it's easy to remove. That's a mistake on stretchy fabrics. When the machine finishes and you tear the stabilizer away, the fleece snaps back to its original shape, but the stitches stay put, causing immediate distortion. Cut-away stabilizer remains behind the design forever, acting as a permanent anchor. For bulky projects, check out this expert guide to stabilizers for fleece which highlights why cut-away is the industry gold standard. If you're working with a massive, heavy throw, try using two layers of light 1.5oz cut-away instead of one heavy sheet to distribute the weight more evenly.
DIAGRAM: The Professional Stabilizer Stack
Layer 1: Water-Soluble Topper (prevents stitch sinking)
Layer 2: Fleece Blanket (the "meat" of the sandwich)
Layer 3: 2.5oz Cut-Away Stabilizer (the foundation)
Toppers: Preventing Your Design from Sinking
Without a topper, your design will look like it's drowning in the nap. A water-soluble topper (WSS) creates a temporary "floor" that holds the embroidery stitches above the fuzz while the machine works. This is non-negotiable for Sherpa or high-pile polar fleece. You can secure it by pinning the corners or using a tiny spritz of temporary adhesive spray. Once the embroidery is done, don't just rip it off. Tear away the large chunks, then use a damp cloth to dissolve the remaining bits. If you're just starting out, learning how to stabilize different fabrics will save you hours of trial and error and prevent costly fabric waste.
Hooping vs. Floating: How to Handle Bulky Fleece Blankets
Most beginners make the mistake of trying to jam a thick, $8.99-per-yard fleece blanket into an embroidery hoop. This leads to "hoop burn," which is a permanent compression of the fabric's fibers. On high-pile fabrics like Sherpa, these marks are often permanent because the heat and pressure from the hoop crush the polyester fibers. Floating is the professional solution. When you "float" a project, you hoop only the stabilizer and then secure the blanket on top. This protects the fabric and allows you to manage the massive weight of a 60x80 throw without straining your machine's motor.
DIAGRAM: The Floating Technique Layout
[ Machine Head ]
↑
[ Water-Soluble Topper ] ← Top Layer
[ Fleece Blanket ] ← Floating (Not Hooped)
[ Hooped Cut-Away Stabilizer ] ← Bottom Layer (Hooped Tight)
Note: Only the stabilizer is gripped by the hoop frames. The blanket and topper are secured via adhesive or basting.
Step-by-Step Floating Technique
Start by marking your center point on the blanket using tailor's chalk. Hoop a single layer of heavy 2.5oz cut-away stabilizer until it's drum-tight. Take the hoop out of the machine and apply a light mist of temporary adhesive spray. Align your chalk marks with the hoop's center notches and press the fleece down firmly. For the best results, use your machine's "basting box" feature. This creates a large rectangle of long stitches around the design area, locking all three layers together before the high-speed machine embroidery on fleece blankets begins.
Managing Blanket Bulk During Stitch-out
Don't let the rest of the blanket bunch up around the needle. Use large quilting clips or hair scrunchies to roll up the excess fabric and keep it away from the moving hoop. This prevents the fabric from sliding under the needle and getting sewn into the design. If you don't have a dedicated extension table, you must support the blanket's weight manually or with the "Chair Method" to prevent the hoop from being pulled out of the machine arm.
DIAGRAM: The "Chair Method" for Weight Support
[ Embroidery Machine ] ← Level Surface
[ Embroidery Arm/Hoop ] ← Stitching Area
[ Folding Chair or Table ] ← Same Height as Machine
[ Excess Blanket Bulk ] ← Resting on Chair
Critical: The chair prevents the 3-pound weight of the blanket from pulling down on the hoop, which causes registration errors.
Always perform a safety check before starting. Move the hoop to its furthest positions to ensure the rolled-up bulk won't hit the machine's neck or snag on the moving parts. This is especially important on newer 2026 models like the Baby Lock Meridian 2, where the high speed of 1,050 stitches per minute can turn a small snag into a major birdnest in seconds. Managing the physical weight is just as important as the stitch settings for successful machine embroidery on fleece blankets.
## Selecting the Right Digital Designs for Napped Fabrics
- Prioritize Low Density: Heavy fill designs create a stiff, "bulletproof" patch on soft blankets.
- Use Appliqué: This technique blocks the nap effectively while using fewer stitches than a full fill.
- Check Underlay: A solid grid underlay is essential for high-pile Sherpa to prevent stitch sinking.
- Choose Bold Fonts: Thin scripts vanish in the fuzz; stick to blocky letters at least 4mm wide.
Picking the wrong file for machine embroidery on fleece blankets is like trying to build a house on quicksand. If the design is too dense, you'll end up with a stiff, scratchy patch that ruins the cozy feel of a $10.99-per-yard Sherpa throw. I've seen makers choose complex, high-stitch-count florals only to realize the blanket no longer folds properly. Instead, look for Redwork or Bean stitches. These designs use multiple passes over a single line to create bold visibility without the bulk of a full satin fill. It's the smartest way to keep your project soft while ensuring the design actually stands out.
DIAGRAM: Stitch Interaction with Fleece Nap
Scenario A: No Topper/Poor Underlay
[ Thread ] → [ Buried in Nap ] → [ Fabric Surface ]
Result: Design is invisible and "swallowed" by fibers.
Scenario B: Correct Topper + Grid Underlay
[ Thread ] → [ Sitting on Topper ] → [ Supported by Underlay Grid ] → [ Flattened Nap ]
Result: Crisp, visible embroidery that stays on the surface.
Best Design Types for Fleece
Appliqué is a secret weapon for napped fabrics. By using a piece of contrasting fabric to cover the fleece, you create a smooth, flat surface that completely blocks the nap from poking through. It's much more efficient than using 20,000 stitches to achieve the same coverage. When choosing text, skip the delicate, thin scripts. Bold, blocky fonts with a width of at least 4mm are far more successful. You can find a curated collection of embroidery designs that have been digitized specifically with heavy fabrics in mind to ensure your project stays soft.
Underlay: The Invisible Hero
Underlay is the foundation of your embroidery. It's the series of stitches the machine runs before the final top layer to secure the fabric to the stabilizer. For fleece, you want a "grid" or "double zigzag" underlay. If your design doesn't have enough, you can add a knockdown stitch. This is a low-density fill, usually in a color matching the blanket, that mashes down the fuzz. Think of it like paving a road before you drive on it. Without this "floor," your top stitches will fall into the gaps between the fibers. You can evaluate embroidery patterns in your software to see if they have enough structural support before you ever hoop up. If you want to take your projects to the next level, browse our library of professional digitized files to see the difference a correct underlay makes.
The Step-by-Step Fleece Embroidery Process & Pro Troubleshooting
Before you hit the start button on your machine embroidery on fleece blankets, you need to decide on the pre-wash. In 2026, most anti-pill fleece is 100% polyester, which means it won't shrink. You can skip the laundry room and head straight to your machine. However, if you're working with a rare cotton-rich fleece blend, pre-washing is mandatory. If you don't, the fabric will shrink around your polyester stitches during the first laundry cycle, creating permanent puckers that no iron can fix.
Once your "sandwich" is on the machine, use the basting box feature. This is your final insurance policy. It places a temporary perimeter of long stitches around your design area, anchoring the water-soluble topper and fleece to the stabilizer. This prevents the fabric from shifting as the needle moves at high speeds. Don't let your machine run at its maximum 1,050 stitches per minute. Dial it back to 600 spm. This reduces friction heat and prevents thread breaks, which are common when working through thick, fuzzy layers.
Execution Checklist
- Trace the design: Always perform a "trace" or "perimeter check" to ensure your needle won't hit the edges of your hoop or any clips you've used to manage the blanket weight.
- Monitor the start: Stay with your machine for the first 500 stitches. This is the critical window where most tension issues or "birdnests" will appear.
- Clean your bobbin case: Fleece is a lint bomb. After every large blanket, use a small brush to remove fibers from the bobbin area. Excessive lint buildup can throw off your tension and cause expensive mechanical timing issues.
Troubleshooting Common Fleece Issues
Birdnesting is the most frequent headache. If you see a massive clump of thread forming under the hoop, your top thread likely jumped out of the tension discs. Rethread the entire machine with the presser foot up. If the issue persists, check your bobbin tension. Fleece requires a slightly looser top tension than flat cotton to account for the thickness of the material. If you notice the nap peeking through your design, it's a sign your topper has shifted or your underlay density is too low. Stop the machine and lay down a second piece of water-soluble topper over the area before continuing. For the final finish, trim your cut-away stabilizer to within 1/4 inch of the design. Use a warm, damp cloth to dissolve any remaining topper, and your professional-grade blanket is ready.
Start Your Next Fleece Project with Confidence
You now have the technical blueprint for successful machine embroidery on fleece blankets. By ditching traditional hooping for the floating technique, you've eliminated the risk of permanent hoop burn on your $8.99-per-yard fabric. Remember that the combination of a 2.5oz cut-away stabilizer and a water-soluble topper is non-negotiable. This setup keeps your stitches crisp and visible on high-pile Sherpa or polar fleece. These small adjustments in your setup make the difference between a project that looks homemade and one that looks like a high-end retail product.
Now that you've mastered the process, it's time to find the perfect patterns. Our library features professional-grade PES, DST, and JEF files that are specifically tested on high-pile fabrics to ensure they won't sink. You can browse our high-quality digital embroidery designs for your next blanket project and get started immediately with instant digital downloads. Your machine is ready, your fabric is prepped, and you have the expertise to handle any bulk. Go ahead and start stitching your most impressive blankets yet.
Frequently Asked Questions
Do I need to pre-wash a fleece blanket before embroidering?
Pre-washing is usually unnecessary for 100% polyester fleece because it is chemically stable and won't shrink. If your blanket is a cotton or bamboo blend, you must wash it first to avoid puckering later. Check the manufacturer's tag for fabric content before you start. Most high-quality blankets from 2026 retailers are synthetic, so they are ready for the machine right off the bolt.
Can I use tear-away stabilizer on a fleece blanket?
You should avoid tear-away stabilizer because it doesn't provide the permanent support that stretchy knit fabrics require. Once you tear the stabilizer away, the fleece will shift and distort your design. For machine embroidery on fleece blankets, a 2.5oz cut-away is the only way to ensure the embroidery stays flat and crisp through years of use and dozens of laundry cycles.
How do I remove hoop burn if I accidentally hooped the fleece?
You can often remove mild hoop burn by lightly steaming the area or misting it with water and brushing the nap with a soft toothbrush. If the fibers are melted or severely crushed by a high-pressure hoop, the damage might be permanent. This is why floating is the preferred method. For 2026's luxury high-pile throws, preventing the mark is much easier than trying to fix it after the fact.
What is the best needle size for machine embroidery on fleece?
A 75/11 or 80/12 ballpoint needle is the best choice for this project. Sharp needles can cut the knit fibers of the fleece, which leads to small holes or "runs" in the fabric over time. The rounded tip of a ballpoint needle slides between the polyester yarns instead of piercing them. This keeps the structural integrity of your blanket intact even with high-stitch-count designs.
Why is my embroidery design sinking into the blanket?
Your design is sinking because the stitches are falling between the fuzzy fibers of the fabric's nap. This happens when you skip the water-soluble topper or use one that is too thin. The topper acts as a temporary bridge that holds the thread on top of the fluff. Without it, even the best machine embroidery on fleece blankets will look sparse and unprofessional as the fabric swallows the thread.
How do I get the water-soluble topper out of the tiny corners of my design?
A damp Q-tip or a soft, wet cloth is the most effective way to remove stubborn topper from tight corners. You don't need to soak the entire blanket. Simply dab the small areas until the film dissolves. If you have a lot of leftover bits, a quick 10-minute rinse cycle in your washing machine will clear everything out without leaving any sticky residue behind on your stitches.
Can I embroider on both sides of a double-sided fleece blanket?
You can embroider both sides, but remember that the bobbin thread will be visible on the reverse. To make it look professional, use a matching 40wt polyester thread in your bobbin so the back looks almost identical to the front. This is a popular trend for 2026 baby blankets where both sides are frequently seen. Just ensure your stabilizer is trimmed neatly to keep the back looking clean.
Is it better to use a large hoop or multiple small hoops for a big design?
It is better to use a single large hoop like the 9.5x14 inch field on a Brother Celeste CX1e. Multi-hooping a thick blanket is incredibly difficult because the weight makes it hard to align the sections perfectly. If you must use multiple hoops, ensure you are using a support table. This prevents the heavy fabric from pulling on the machine's arm and causing registration errors between the different hooping sections.


