Is there anything more frustrating than pulling your project from the hoop, only to find a puckered, wrinkled mess? You’ve spent time and money on a beautiful design and quality thread, yet the stitches have sunk into the fabric or the material has warped beyond recognition. This common embroidery heartbreak can make you afraid to even touch your more expensive fabrics. But what if we told you the solution is simpler than you think? The secret to flawless results begins long before the first stitch, with the critical skill of choosing fabric for machine embroidery.
Delicate Fabric (Silk, Organza): Use a Wash-Away Stabilizer and a Microtex Needle. For inspiration on high-end silk projects, you can explore Pañuelos de 100% Seda Natural inspirados en las bellas de Chile options.
This is your ultimate guide to ending that frustration for good. We'll demystify the crucial relationship between fabric type, stabilizer, and design density so you can achieve professional results every time. You will learn how to confidently select the perfect material for any project, from delicate knits to sturdy canvas, ensuring your embroidery lies flat, crisp, and beautiful. Get ready to say goodbye to wasted materials and hello to the confidence of creating stunning projects you can be proud of.
- Achieve flawless results by understanding the critical relationship between your fabric, stabilizer, and embroidery design. - Identifying your fabric as a woven (stable) or a knit (stretchy) is the first step to preventing puckering and misalignment. - The right stabilizer is your fabric's best friend; pairing them correctly is the secret to crisp, professional-looking stitches. - Simplify the process of choosing fabric for machine embroidery by learning which materials work best for popular projects, from sturdy denim jackets to delicate t-shirts.
Table of Contents
- The 'Holy Trinity' of Machine Embroidery: Fabric, Stabilizer, and Design
- Woven vs. Knit Fabrics: The Two Families You Must Understand
- A Practical Guide to Common Embroidery Fabrics & Projects
- The Stabilizer-Fabric Partnership: Choosing Your Perfect Match
- Your Pre-Stitch Checklist: 5 Steps to Guaranteed Success
The 'Holy Trinity' of Machine Embroidery: Fabric, Stabilizer, and Design
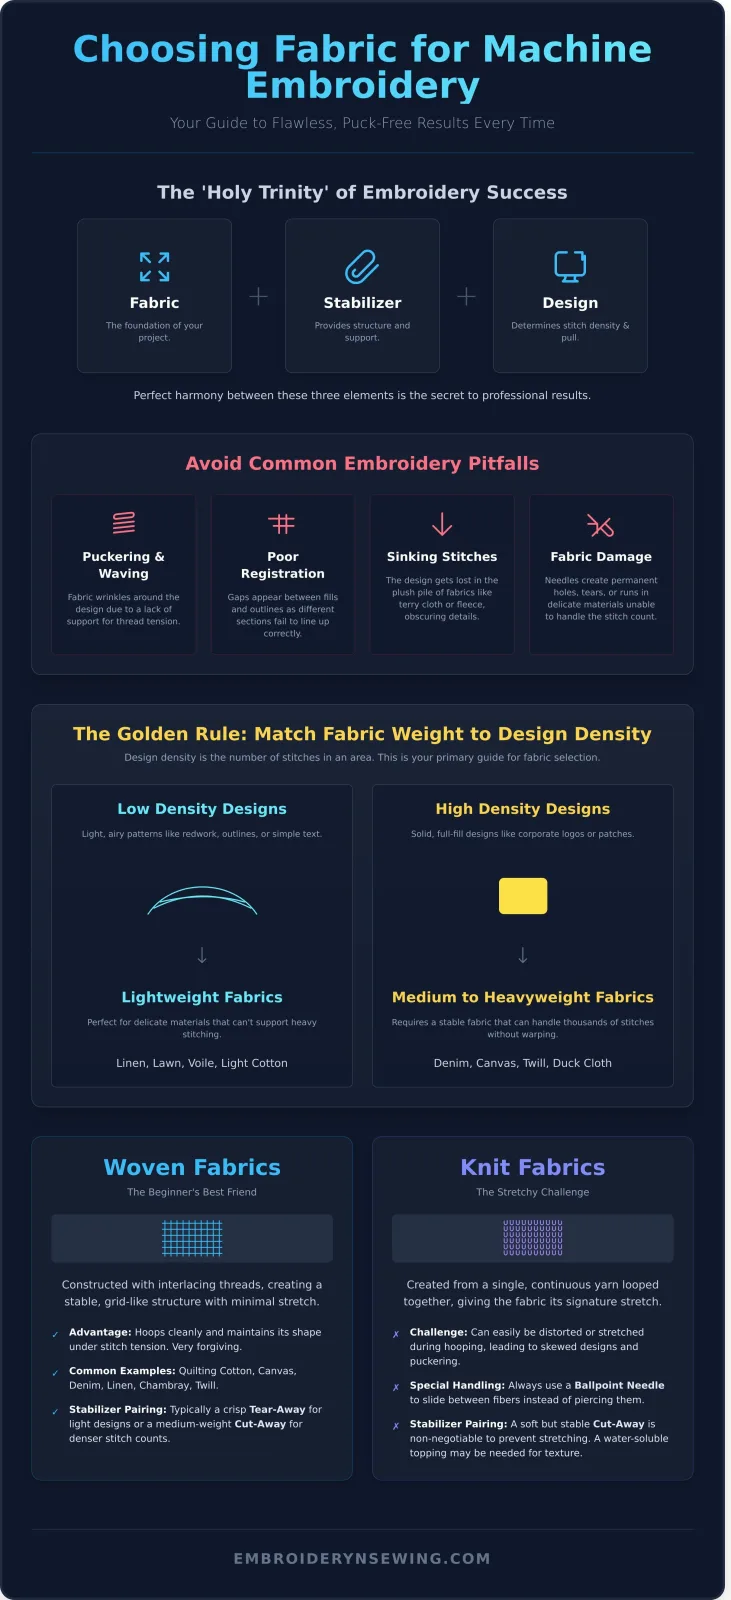
Before you even thread your needle, understanding one core concept will save you from countless frustrations: successful embroidery depends on the perfect harmony between your fabric, your stabilizer, and your design. Think of them as a three-legged stool-if one is out of balance, the entire project will wobble. At its core, machine embroidery is the process of adding thousands of stitches to a base material. Your fabric choice is the foundation that must support it all.
The primary goal when preparing your project is to use stabilizer to temporarily make any fabric-from stretchy knit to slippery silk-behave like a perfectly stable, non-stretch piece of cotton canvas. A dense, stitch-heavy design on a lightweight fabric will always fail, causing puckering and distortion, no matter what stabilizer you use. The fabric simply cannot support the tension and pull of the thread.
When your fabric and design are not a good match, the signs of trouble are immediate and obvious. Here are the most common issues that stem from an improper pairing:
- Puckering and Waving: The number one frustration for embroiderers. The fabric gathers and wrinkles around the design because it lacks the structure to support the thread tension.
- Poor Registration: You'll see unsightly gaps between fill stitches and their outlines, or different colored sections of the design will not line up correctly.
- Sinking Stitches: The design gets lost in the plush pile of fabrics like terry cloth towels or fleece, obscuring its crisp details.
- Fabric Damage: The needle can create permanent holes, tears, or runs in delicate materials that are too fragile for the design's stitch count.
The Golden Rule: Match Fabric Weight to Design Density
The most crucial aspect of choosing fabric for machine embroidery is understanding design density. Density is simply the number of stitches packed into a given area. A light, airy design like a simple redwork pattern has a very low density and is perfect for delicate fabrics like linen or lawn. In contrast, a solid, full-fill corporate logo has extremely high density and demands a stable, medium-to-heavyweight fabric like denim, canvas, or sturdy twill.
Always consider your design first. Analyze its density before you select your material. This single step will guide your fabric and stabilizer choices, setting you on the path to a flawless, professional-looking result every time.
Woven vs. Knit Fabrics: The Two Families You Must Understand
When it comes to choosing fabric for machine embroidery, every material falls into one of two main families: woven or knit. The way a fabric is constructed is the single most important factor determining how you'll handle it, from hooping to stabilizing. Understanding this fundamental difference is your first step toward achieving flawless, professional-looking results.
Think of wovens as a stable grid. They are made from two sets of threads (warp and weft) interlacing at right angles, much like a basket. This creates a strong, rigid structure with very little give. In contrast, knits are created from a single yarn looped continuously around itself, similar to a hand-knitted sweater. This interlocking loop structure is what gives knit fabrics their signature stretch.
Woven Fabrics: The Beginner's Best Friend
Wovens are characterized by their stability and lack of stretch, making them the ideal starting point for new embroiderers. Because they hold their shape so well, they are far less likely to shift or pucker in the hoop. This forgiving nature means you can focus more on your design and less on wrangling your material.
- Common Examples: Quilting cotton, canvas, denim, linen, chambray, and twill.
- Key Advantage: They hoop cleanly and maintain their structure under the weight of thread.
- Stabilizer Pairing: Typically paired with a crisp tear-away for light designs or a medium-weight cut-away for denser stitch counts.
Knit Fabrics: The Stretchy Challenge
Knit fabrics are beloved for their comfort and drape, but their inherent stretch presents a unique challenge. If not handled correctly, knits can easily be distorted during hooping, leading to skewed designs and frustrating puckering. Success with knits requires a specific set of tools, including a ballpoint needle that slides between the fabric loops instead of piercing them. The right stabilizer is non-negotiable; as this comprehensive guide to machine embroidery from the University of Kentucky explains, a solid foundation is critical. For virtually all knits, a soft but stable cut-away stabilizer is essential to control the stretch during and after stitching.
- Common Examples: T-shirt jersey, polo pique, sweatshirt fleece, and French terry.
- Key Challenge: Preventing distortion and puckering caused by stretch.
- Essential Tools: Ballpoint needle and a high-quality cut-away stabilizer.
Quick Reference Chart: Woven vs. Knit
| Characteristic | Woven Fabrics | Knit Fabrics |
|---|---|---|
| Construction | Interlaced threads (grid-like) | Interlocking loops of yarn |
| Stretch | Little to no stretch | Stretches in one or two directions |
| Examples | Denim, linen, quilting cotton, canvas | T-shirt jersey, fleece, French terry |
| Best For | Beginners, patches, crisp designs, towels | Apparel, baby items, performance wear |
| Typical Stabilizer | Tear-away or cut-away | Almost always cut-away |
A Practical Guide to Common Embroidery Fabrics & Projects
Now that we've covered the basics, let's put theory into practice. This guide simplifies the process of choosing fabric for machine embroidery by grouping materials by common projects. Find your project type below to see our go-to recommendations for fabric, needles, and stabilizers to achieve professional results every time.
For Patches, Tea Towels, and Quilts: Crisp Cottons & Canvas
Stable, non-stretch woven fabrics like cotton are perfect for beginners. They hoop easily and hold stitches well, making them ideal for projects that require clean lines and dense fills, such as custom patches or decorative kitchen towels. Their inherent stability provides a forgiving foundation for your designs.
- Recommended Fabrics: Quilting cotton, duck canvas, twill.
- Needle: Sharp 75/11 or 80/12.
- Stabilizer: Medium-weight tear-away. For patches, use a permanent cut-away for maximum durability.
For T-Shirts and Baby Onesies: Lightweight Knits
Working with stretchy knits can seem intimidating, but the right setup makes all the difference. The key is to support the fabric's natural stretch without distorting it. A ballpoint needle is crucial here, as it pushes the knit fibers aside instead of cutting them, preventing holes and runs in the material.
- Recommended Fabrics: Jersey, interlock knit.
- Needle: Ballpoint or Stretch 75/11.
- Stabilizer: A soft, lightweight cut-away or no-show mesh is essential to prevent puckering.
- Pro Tip: Do not stretch the fabric as you hoop it. Let it lie naturally to avoid a wavy, distorted design after you remove it from the hoop.
For Jackets and Bags: Denim and Other Heavyweights
Durable, heavy-duty fabrics can handle dense, complex designs with ease. Their sturdy structure provides a fantastic canvas for bold embroidery on items like jean jackets, tote bags, and backpacks. A larger, stronger needle is required to penetrate these thick materials without breaking.
- Recommended Fabrics: Denim, heavy canvas, corduroy.
- Needle: A strong Denim or Topstitch needle in size 90/14 or 100/16.
- Stabilizer: A medium-weight tear-away is often sufficient, as the fabric itself provides significant stability.
For Towels, Fleece, and Blankets: Napped & Plush Fabrics
Fabrics with a pile or 'nap' like terry cloth and fleece present a unique challenge: stitches can sink and disappear into the fluff. The solution is a two-part stabilization method. The water-soluble topper is non-negotiable; it creates a smooth surface for stitches to form on top of the pile. Once you're done, it dissolves away with water, leaving your embroidery crisp and prominent.
- Recommended Fabrics: Terry cloth, minky, fleece, velvet.
- Needle: Sharp 80/12.
- Stabilizer: Use a medium-weight tear-away on the back and a water-soluble topper on the front.
The Stabilizer-Fabric Partnership: Choosing Your Perfect Match
Think of fabric and stabilizer as a dynamic duo. While your fabric is the star of the show, the stabilizer is the essential support system working behind the scenes. In machine embroidery, using a stabilizer is non-negotiable. Its primary job is to provide structure and prevent the fabric from stretching, puckering, or shifting during the intense, high-speed stitching process. The secret to a professional finish lies in understanding that the right stabilizer depends entirely on your fabric's properties. This partnership is a critical part of choosing fabric for machine embroidery, and getting it right is as important as the thread colors you select.
Cut-Away Stabilizer: The Permanent Choice for Knits
When you're embroidering on anything with stretch-like a t-shirt, sweatshirt, or polo-cut-away stabilizer is your best friend. Because knits can stretch and distort, they need permanent support to keep the embroidery design looking crisp, even after dozens of washes. After stitching, you simply trim the excess stabilizer away from the design with a small, sharp pair of scissors, leaving a permanent backing that continues to support the stitches for the life of the garment.
Tear-Away Stabilizer: The Temporary Choice for Wovens
For stable, non-stretchy woven fabrics, tear-away stabilizer is the go-to option. Materials like denim, canvas, quilting cotton, and towels don't need long-term support. Tear-away provides the necessary stability only during the embroidery process. Once your design is complete, you can gently tear the excess stabilizer away from the edges of your stitching. It’s a clean and quick solution for projects where a permanent backing isn't needed or desired.
Wash-Away (Water-Soluble) Stabilizer: For Topping & Freestanding Lace
This magical stabilizer dissolves completely in water and serves two distinct purposes:
- As a Topper: When embroidering on fabrics with a pile or nap (think terry cloth towels, fleece, or corduroy), place a layer of wash-away stabilizer on top of the fabric. This prevents the stitches from sinking into the fibers, ensuring your design sits proudly on the surface.
- As a Base: For creating delicate freestanding lace (FSL) or intricate patches, wash-away is used as the primary "fabric." Once the design is stitched, a quick soak in water dissolves the stabilizer completely, leaving only the beautiful thread structure behind.
Mastering this pairing takes a little practice, but it's the key to unlocking flawless results. By matching the stabilizer to your fabric's needs, you ensure every stitch is perfectly placed and your final project is something you can be proud of.
Your Pre-Stitch Checklist: 5 Steps to Guaranteed Success
You’ve learned the theory behind selecting materials, but this is where the magic happens. This pre-stitch ritual is the secret that separates frustrating mishaps from flawless results. By turning these five steps into a habit, you eliminate guesswork and ensure every project is a success. Mastering the art of choosing fabric for machine embroidery is all about having a reliable process.
Step 1: Pre-Wash and Press Your Fabric
This is the most skipped, yet most critical, first step. Pre-washing your fabric does exactly what it sounds like-it preshrinks the material before you stitch. This single action prevents your beautiful embroidery from puckering and warping after its first trip through the laundry. Afterward, press it with an iron to create a perfectly smooth and flat surface for hooping.
Step 2: Pair Your Fabric, Stabilizer, and Needle
Now, build your project’s foundation. The right combination of fabric, stabilizer, and needle is non-negotiable for clean, professional-looking stitches. Refer back to the detailed guides in this article, or use this quick cheat sheet for common pairings:
- Knit Fabric (T-shirts): Use a Cut-Away Stabilizer and a Ballpoint Needle.
- Woven Fabric (Cotton, Denim): Use a Tear-Away Stabilizer and a Sharp Needle.
- Delicate Fabric (Silk, Organza): Use a Wash-Away Stabilizer and a Microtex Needle.
- Plush Fabric (Towels, Fleece): Use a Water-Soluble Topper plus a Cut-Away Stabilizer and a Sharp Needle.
Step 3: Hoop With Care
Your hooping technique directly impacts the final quality. The goal is to make the fabric taut, like the surface of a drum, but not stretched. Stretching the fabric in the hoop will cause it to distort and pucker as soon as you release it. Ensure there are no wrinkles and that both the fabric and stabilizer are secured smoothly together.
Step 4: Always, Always Do a Test Stitch-Out
Professionals never skip this step, and neither should you. Before committing to your final garment or project, stitch a small portion of your design on a scrap of the exact same fabric and stabilizer combination. This allows you to check thread tension, density, and overall appearance, catching any potential issues before they ruin your hard work. Ready to test? Find a beautiful design to start with.
Step 5: Double-Check Machine Settings
Finally, do a quick check at your machine. Confirm you have loaded the correct design file. Check that your thread tension is appropriate for the materials you are using and consider slowing down the machine speed for particularly dense or intricate designs. This final glance ensures the machine is perfectly set up for the specific demands of your project.
Your Stitching Success Starts with the Right Fabric
You've now navigated the essentials, from the foundational 'holy trinity' of fabric, stabilizer, and design to the crucial differences between woven and knit materials. The key takeaway is that your fabric and stabilizer must work in perfect harmony to support your chosen design and prevent puckering or distortion. This knowledge transforms the often-daunting task of choosing fabric for machine embroidery from a guessing game into a confident, creative process. You're no longer just stitching; you're engineering a beautiful result from the ground up.
Now that you're a fabric expert, the most exciting step awaits. Find the perfect design to bring your next project to life! Explore a vast library of thousands of high-quality digital designs, all ready for instant download. With formats available for all major embroidery machine brands, you can start stitching your masterpiece right away.
Embrace your new expertise, trust the process, and get ready to create something you'll be proud to show off. Happy stitching!
Frequently Asked Questions
Can I embroider on stretchy fabric like a t-shirt?
Yes, you absolutely can embroider on stretchy fabrics like t-shirt jersey. The key is using the right stabilizer to prevent the fabric from shifting and the design from distorting. For knits, a cut-away stabilizer is best because it remains with the garment after stitching, providing permanent support through washing and wearing. Also, be sure to use a ballpoint needle, which slides between the fabric fibers instead of piercing them, preventing holes and runs.
What is the easiest fabric for a machine embroidery beginner?
For beginners, the easiest fabrics are stable, medium-weight woven materials that don't stretch. Think quilting cotton, broadcloth, canvas, or linen. These fabrics are firm and hold their shape well in the hoop, which dramatically reduces the risk of puckering and shifting. Starting with a forgiving fabric like cotton allows you to focus on learning your machine and techniques without fighting the material, ensuring a more successful and less frustrating first experience.
Do I always need to use a stabilizer for machine embroidery?
Yes, using a stabilizer is a critical step for virtually all machine embroidery projects. A stabilizer acts as a foundation, supporting the fabric and preventing it from moving, stretching, or puckering under the density of thousands of stitches. Without it, your design will likely be distorted and your fabric may be damaged. The type of stabilizer-cut-away, tear-away, or wash-away-depends on your fabric type and the design's stitch count.
How do I stop my fabric from puckering when I embroider?
Puckering is typically caused by incorrect stabilization or hooping. First, ensure your stabilizer is appropriate for your fabric's weight and the design's density; a dense design on a light fabric needs a sturdy stabilizer. Second, make sure your fabric and stabilizer are hooped correctly-they should be smooth and "taut like a drum," but not stretched. Over-stretching the fabric in the hoop will cause it to pucker once it's released and relaxes.
What's the best fabric for making freestanding embroidered patches?
The best materials for freestanding patches are sturdy, non-woven fabrics that won't fray when cut. Craft felt is a popular and excellent choice because it’s stable and comes in many colors. Another great option is marine vinyl or other non-fraying synthetics. For a lace-like patch with no fabric background, you would use a heavy-duty water-soluble stabilizer, which is rinsed away after stitching to leave only the thread design behind.
Can you use felt for machine embroidery projects?
Felt is a fantastic choice for machine embroidery, especially for beginners. As a non-woven matted fabric, it has excellent stability, doesn't stretch, and won't fray at the edges. This makes it perfect for projects like appliqués, ornaments, and patches. A simple tear-away stabilizer is often all you need for support. The dense texture of felt also provides a great surface that makes your embroidery thread colors appear vibrant and rich.
Do I need a special needle for different types of fabric?
Yes, matching your needle to your fabric is essential for flawless results and is a key part of choosing fabric for machine embroidery. While a universal needle works for many wovens, you should use a ballpoint needle for knits and stretchy fabrics to prevent snags. For dense materials like denim or leather, a sharp, strong needle is required to penetrate the fabric cleanly. Always start each new project with a fresh needle to avoid skipped stitches and fabric damage.