

Have you ever pulled a freshly embroidered t-shirt from your machine, only to find a wavy, puckered mess surrounding your beautiful design? That sinking feeling is a common frustration, turning the excitement of a new project into the fear of ruining another favorite garment. It’s enough to make anyone hesitant to tackle knits, fleece, or that perfect sweatshirt. But what if you could stitch with complete confidence, knowing your results would be flawlessly smooth every single time?
The truth is, the secret to professional-looking results lies in understanding the unique challenges of embroidering on stretchy fabric. In this complete guide, we are going to demystify the entire process. You’ll learn exactly which stabilizer to choose to eliminate distortion, the right type of needle to prevent fabric damage, and how to select designs that work with your material, not against it. Get ready to say goodbye to wasted projects and hello to stunning, wearable art you can be proud of. [
Key Takeaways](https://embroiderynsewing.com/articles)
- Choosing the right stabilizer is the single most important step to prevent puckering and distortion on knit fabrics. - The secret to successfully embroidering on stretchy fabric is to temporarily eliminate the fabric's stretch during the stitching process. - Your choice of needle and hooping technique can make or break your project; learn the correct methods for a smooth, professional finish.
- Avoid stiff, "bulletproof" results by discovering which types of embroidery designs work best on flexible materials and which to avoid.
Table of Contents
- Why Stretchy Fabric Puckers (And How to Stop It)
- The Golden Rule: Choosing the Right Stabilizer for Knits
- Prepping Your Fabric, Machine, and Hoop for Success
- How to Select the Perfect Embroidery Design for Stretchy Fabric
- Finishing Your Project Like a Pro
Why Stretchy Fabric Puckers (And How to Stop It)
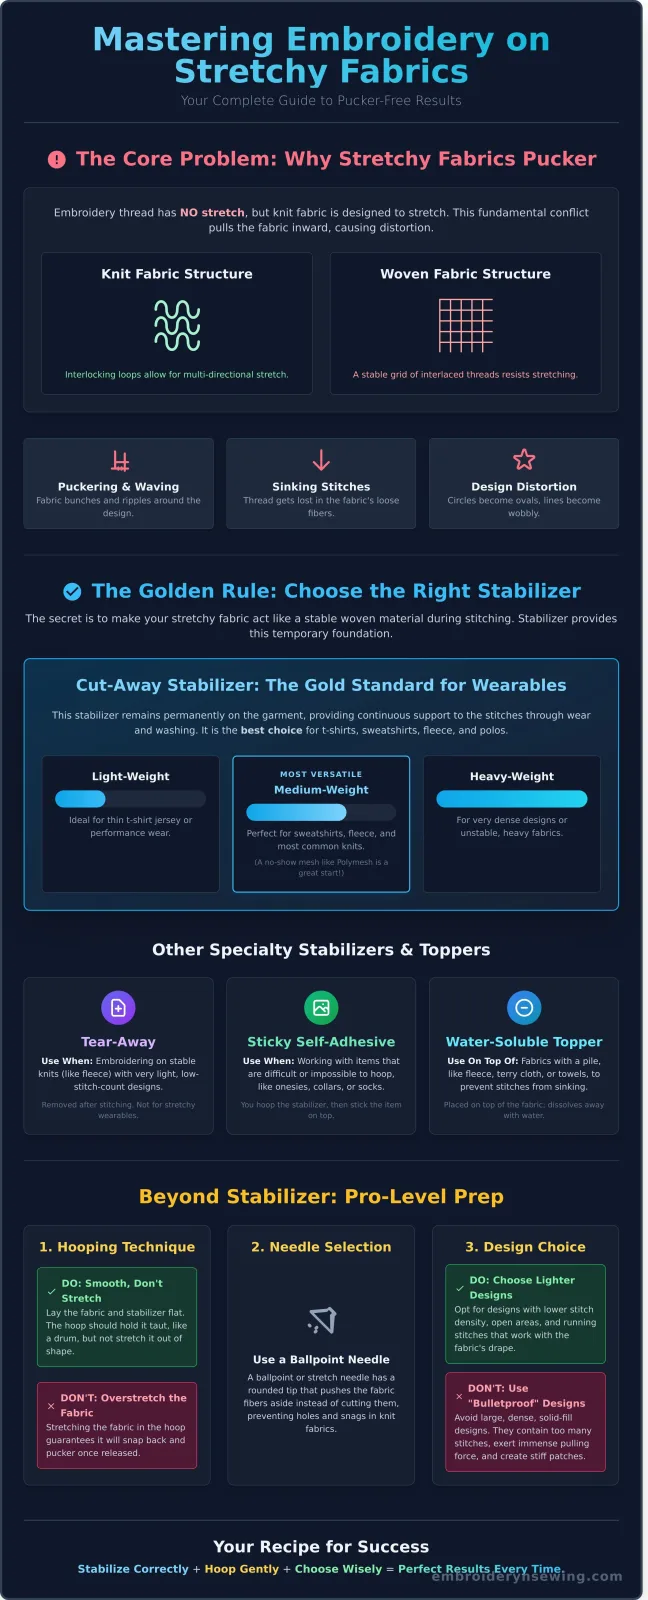
You’ve seen it happen: the perfect t-shirt or cozy sweatshirt, now ruined by a wrinkled, bunched-up embroidery design. This frustrating result, known as puckering, is the number one challenge when embroidering on stretchy fabric. The core problem is a fundamental conflict: your embroidery thread has no stretch, but the knit fabric it’s sewn onto is designed to move and flex.
Every knit fabric has a ‘memory’-its natural ability to lie flat and return to its original shape after being stretched. Embroidery stitches permanently lock the fabric in place, distorting that memory. The result is a design that looks great in the hoop but immediately puckers once the tension is released. You might also encounter:
- Waving: The fabric around the edges of your design looks wavy and distorted.
- Sinking Stitches: Your thread gets partially lost or buried within the fabric’s loose fibers.
- Design Distortion: Circles become ovals and straight lines look wobbly.
The goal is simple: you must make your stretchy fabric act like a stable, non-stretchy woven material throughout the entire embroidery process. Understanding why it puckers is the first step to achieving that.
Knit vs. Woven Fabrics: The Fundamental Difference
The source of stretch lies in how a fabric is constructed. Knit fabrics, like jersey, fleece, and rib knit, are made from a single thread looped continuously together, much like a hand-knitted sweater. This structure of interlocking loops allows the fabric to stretch easily in multiple directions. In contrast, woven fabrics like denim or quilting cotton have a stable grid structure, with threads interlaced at right angles, which severely limits their ability to stretch.
The Role of the Embroidery Machine
Your embroidery machine applies significant force to the fabric. The process of modern machine embroidery involves thousands of push-and-pull motions as the needle penetrates the fabric and the bobbin thread pulls the top thread tight. In a dense design, these stitches collectively exert a strong inward pulling force. A stable woven fabric can resist this force, but a stretchy knit will be easily pulled and distorted, causing it to bunch up.
Furthermore, the embroidery hoop itself can be a source of trouble. If you stretch the knit fabric while hooping it, you are pre-loading it with tension. Once you finish stitching and release it from the hoop, the fabric will try to snap back to its relaxed state, causing the immovable embroidered area to pucker dramatically.
The Golden Rule: Choosing the Right Stabilizer for Knits
If there's one non-negotiable secret to success, it's this: you must use the correct stabilizer. When you are embroidering on stretchy fabric, the stabilizer's job is to provide a stable foundation, preventing the material from shifting, stretching, or puckering under the needle. Think of it as a temporary (or sometimes permanent) support system that ensures your design looks as crisp and professional as you imagined.
Cut-Away Stabilizer: Your Best Friend for Wearables
For nearly all knit garments like t-shirts, sweatshirts, and polos, a cut-away stabilizer is the gold standard. Unlike other types, it remains with the fabric permanently, offering continuous support to the stitches. This prevents the design from distorting, stretching, or pulling away from the garment after repeated wear and washing.
Cut-away stabilizers come in different weights:
- Light-weight: Ideal for thin t-shirt jersey or performance wear.
- Medium-weight: A versatile choice for sweatshirts, fleece, and most common knits.
- Heavy-weight: Reserved for very dense designs or extremely unstable fabrics.
If you're just starting, a medium-weight no-show mesh (like Polymesh) is a fantastic, soft, and reliable option.
When to Use Tear-Away and Other Specialty Stabilizers
While cut-away is king, other stabilizers have their place. Tear-away is best suited for stable woven fabrics but can be used on stable knits (like fleece) with very light, low-stitch-count designs. For tricky items you can’t hoop, like a baby onesie or a sock cuff, a sticky self-adhesive stabilizer is a lifesaver. You hoop the stabilizer itself and then press the fabric onto the sticky surface.
Don't forget the topper! A water-soluble topper (WSS) is a thin, plastic-like film placed on top of fabrics with a pile, like fleece or terry cloth. It prevents your stitches from sinking into the fabric, keeping them sharp and visible.
How to Apply Stabilizer Correctly
Proper application is just as important as choosing the right type. For a pucker-free finish, first, cut a piece of stabilizer that is at least one inch larger than your hoop on all sides. Next, use a light mist of temporary spray adhesive to gently bond the stabilizer to the wrong side of your fabric. Finally, smooth it out carefully, ensuring there are absolutely no wrinkles or bubbles between the layers before hooping. This simple prep work is a game-changer for professional results.
Prepping Your Fabric, Machine, and Hoop for Success
When it comes to embroidering on stretchy fabric, success is almost entirely determined before your machine makes its first stitch. Proper preparation is 90% of the battle. Getting this stage right prevents the puckering, distortion, and damaged garments that frustrate so many embroiderers. By focusing on three key areas-your needle, hooping technique, and thread-you can set yourself up for a flawless result every time.
Needles Matter: Why You Need a Ballpoint Needle
Using a standard sharp needle on a knit fabric is the fastest way to ruin your project. Sharp needles are designed to pierce woven materials, but on knits, they act like tiny blades, cutting the delicate looped fibers. This can cause small holes or even runs in the fabric that may not appear until after the garment is washed. A ballpoint needle, also called a jersey needle, is essential. Its rounded tip is designed to slide between the knit fibers instead of piercing them. For most t-shirts, jerseys, and interlock knits, a size 75/11 ballpoint needle is perfect. For heavier materials like sweatshirt fleece, move up to an 80/12.
Mastering the Hoop: The 'Floating' Technique
Stretching knit fabric while hooping is a recipe for disaster. Once you unhoop the project, the fabric will relax back to its original state, causing the thread to bunch up and the design to pucker severely. To avoid this and the dreaded 'hoop burn' (marks left by the hoop), you must 'float' the fabric instead of hooping it directly.
- Step 1: Hoop your stabilizer by itself. Ensure it is smooth, taut, and wrinkle-free, like the top of a drum.
- Step 2: Lightly spray the hooped stabilizer with a temporary fabric adhesive.
- Step 3: Carefully lay your fabric on top of the sticky stabilizer, gently smoothing it from the center outwards. Do not pull or stretch it in any direction.
- Step 4 (Optional): For extra security, use your machine’s basting stitch function to run a large stitch around the design area, holding the fabric firmly to the stabilizer.
Choosing Your Thread
The good news is that you likely don't need special thread for embroidering on stretchy fabric. A standard 40 wt. polyester or rayon embroidery thread is the industry standard and works beautifully on knits. Where you need to be mindful is thread weight. Avoid using heavy or thick threads, as their weight can pull on the delicate fabric and cause distortion. For your bobbin, a standard 60 wt. bobbin thread is ideal. Many professionals prefer pre-wound bobbins because they offer incredibly smooth and consistent tension, which is critical for a pucker-free finish.
How to Select the Perfect Embroidery Design for Stretchy Fabric
You've prepped your fabric and chosen the right stabilizer, but your project's success now hinges on one critical choice: the embroidery design itself. Not all digital files are created equal, especially when working with knits. The primary culprit behind puckering, distortion, and a stiff, uncomfortable patch is a design that’s simply too heavy for the material.
Understanding a few key characteristics of a design file will empower you to choose wisely and achieve beautiful, professional results every time.
Look for Lighter Stitch Density
Stitch density refers to the number of stitches packed into a specific area. For knits, less is more. A design with a lower, or lighter, stitch density will place less stress on the fabric, allowing it to drape naturally without pulling. Avoid designs with large, solid areas of heavy satin stitching, as these are notorious for causing stiffness and puckering. To avoid the guesswork, look for files specifically digitized for knits. Explore our collection of machine-tested designs that are optimized for performance on T-shirts, sweatshirts, and more.
The Importance of Underlay Stitching
Think of underlay as a foundational framework of stitches laid down before the main design. This light stitching serves a crucial purpose: it gently tacks the stretchy fabric to the stabilizer, creating a stable base. This prevents the fabric from shifting or stretching during the embroidery process. When examining a design, look for those that include an edge-walk, grid, or lattice underlay, as this is a non-negotiable part of successfully embroidering on stretchy fabric.
Good vs. Bad Designs for Knits: A Comparison
To make it simple, here are some examples of designs that work well versus those you should typically avoid for stretchy materials:
- Good Choices: Designs with open spaces work best. Think of redwork, light-fill patterns, appliqué designs, lettering with thinner fonts, and smaller, isolated motifs.
- Designs to Avoid: Steer clear of photo-realistic portraits, dense corporate logos, and any pattern with full, heavy stitch coverage that will feel like a solid patch on the finished garment.
Pro Tip: Always perform a test stitch-out! Before committing to your final garment, embroider the design on a scrap piece of the exact same fabric with the same stabilizer. This five-minute test can save you from a disappointing result.
Finishing Your Project Like a Pro
The embroidery machine has stopped, but your work isn't quite done. The final steps you take are what transform a good project into a great one, ensuring your design looks crisp and professional for years to come. This finishing stage is especially critical when embroidering on stretchy fabric, as it helps the material return to its natural shape and preserves the integrity of your stitches.
Removing Stabilizer Correctly
Proper stabilizer removal prevents puckering and distortion. For cut-away stabilizer, which is essential for knits, use a pair of small, sharp embroidery scissors. Carefully trim the excess stabilizer from the back of your design, leaving a small margin of about 1/4 inch around the stitches. This border continues to support the embroidery and prevents it from stretching out of shape. If you used a water-soluble topper, gently dab it with a damp sponge or cloth until it dissolves and disappears completely.
Pressing and Aftercare
Heat can be an enemy to delicate embroidery thread. Never place a hot iron directly onto the front of your embroidery, as it can melt or flatten the threads. Instead, turn the garment inside-out and place a press cloth over the design. Use a medium heat setting and press gently. For extra protection and to maintain the texture of your stitches, place a fluffy towel on your ironing board and press the design into it. This cushions the stitches, keeping them looking full and defined.
To ensure your beautiful work lasts, proper care is key. Follow these simple guidelines to keep your embroidered garments looking their best:
- Wash Inside-Out: This protects the embroidery from abrasion from other clothes and the machine itself.
- Use a Gentle Cycle: Wash with cold water on a delicate or gentle cycle to minimize stress on the fabric and threads.
- Dry with Care: Tumble dry on a low heat setting or, for best results, hang the garment to air dry.
For particularly delicate or important embroidered items, you might also consider a professional touch. Services like Hustle Laundry specialize in caring for custom garments, ensuring your hard work is preserved.
By mastering these finishing techniques, every project you create will have a polished, durable, and professional look. The extra care you take after embroidering on stretchy fabric ensures your creation can be worn and washed with confidence. For more expert guides and premium supplies, explore the resources at embroiderynsewing.com.
Your Pucker-Free Embroidery Journey Starts Now
You now have the secrets to conquer even the trickiest knits. Remember, the foundation of beautiful results lies in choosing the right stabilizer to provide support and properly preparing your fabric and hoop to prevent shifting. These steps are crucial for successful embroidering on stretchy fabric. When you combine solid prep work with a design that’s built for knits, you eliminate puckering and achieve professional-quality stitches every time.
Ready to put your new skills to the test? The right design makes all the difference. Find the perfect, lightweight design for your next project! We offer thousands of professionally digitized designs, all tested for quality stitching and available for instant download in all major machine formats. You’ll find the ideal match for your t-shirts, sweatshirts, and baby onesies.
Go ahead, turn on your machine with confidence and create something amazing!
Frequently Asked Questions
Absolutely, but careful preparation is key. The best approach for embroidering on stretchy fabric like thin t-shirt material is to use a lightweight no-show mesh cut-away stabilizer. This provides essential support without adding stiffness. Always use a ballpoint needle (size 75/11 is a great choice) which separates the fabric fibers instead of piercing them, preventing holes. Ensure the fabric is hooped smoothly but not stretched taut to avoid distortion during stitching.
What is the best way to embroider on a baby onesie without a large hoop?
For small or awkward items like a baby onesie, hoopless embroidery is your best friend. This technique involves hooping only a piece of sticky-backed tear-away stabilizer. After hooping, you score and remove the paper topping to expose the adhesive. Then, simply press the onesie smoothly onto the sticky surface. This method prevents stretching the small garment and allows for precise placement, even in tight areas near snaps and seams.
How do I stop my embroidery machine from making holes in knit fabric?
The primary cause of holes in knit fabric is using the wrong needle. You must use a ballpoint or stretch needle. These needles have a rounded tip designed to slide between the fabric threads rather than cutting through them like a sharp needle would. Also, verify you are using the correct stabilizer-a cut-away is usually best for knits-and avoid hooping the fabric too tightly, as this can permanently damage the fibers and lead to runs.
What is a 'knockdown stitch' and should I use it on fleece?
A knockdown stitch is a preliminary layer of low-density stitching that flattens the pile of textured fabrics like fleece, minky, or terry cloth. It acts as a base, creating a smooth surface so your main embroidery design doesn't sink into the fabric. Yes, you should absolutely use a knockdown stitch on fleece. It ensures your design details remain crisp and visible instead of getting lost in the fluffy texture of the material.
My design still puckered slightly. Can I fix it after it's been stitched?
You can sometimes minimize minor puckering after the fact. Once you have trimmed away the excess stabilizer, use a steam iron or a handheld steamer on the back of the embroidered area. Gently press and smooth the fabric around the design while it is warm. This can help relax the fabric and threads. However, this trick works best on small puckers; significant puckering caused by incorrect stabilization is typically permanent.
Do I need special embroidery designs for performance wear or spandex?
Yes, choosing the right design is critical for fabrics with high stretch, like performance wear or spandex. Look for designs digitized specifically for knits. These designs are less dense, with fewer stitches, which prevents the heavy, stiff "bulletproof" effect. They often incorporate a special underlay that stabilizes the design area without compromising the fabric's stretch. Using a standard dense design will likely result in puckering and distortion of the garment.


