Last Tuesday, a dedicated creator discovered that a single loose thread had snagged on a rough cardboard edge, unraveling an entire car embroidery design before the customer even opened the box. I regret that such small shipping mishaps can compromise your hard work, but these technical barriers are manageable with the right strategy. You put immense effort into every stitch, and you deserve a shipping process that respects that craftsmanship. This guide will teach you exactly how to package embroidered products to ensure they arrive in pristine condition, regardless of moisture or rough handling. I'll help you build a professional, repeatable workflow that protects your items and delights your customers. Before we dive into the details, here's an executive summary of the professional standards we'll cover:
- Implementing moisture-barrier layers to prevent dampness and mildew during transit. - Selecting specific anti-snag tissue paper to shield delicate thread textures from cardboard friction. - Accounting for the 7.8% USPS Ground Advantage rate hike that took effect in January 2026. - Navigating the suspension of the $800 de minimis rule for international commercial shipments.
- Compliance with the EU Digital Product Passport requirements for all international apparel shipments.
Key Takeaways
- Master the pre-packaging inspection process by trimming jump threads and using the 'inside-out' folding method to shield delicate satin stitches from friction.
- Discover how to package embroidered products using the most effective moisture barriers and protective layers, including a technical comparison of corrugated boxes versus vellum wraps.
- Elevate your brand's unboxing experience by integrating custom stamps and essential care instruction cards that ensure the longevity of your embroidery designs.
- Streamline your shipping workflow with precise weight calculations and a clear understanding of the 2026 USPS rate adjustments and international customs mandates.
- Implement a repeatable five-step workflow—Protect, Fold, Wrap, Brand, and Ship—to minimize returns and maximize customer satisfaction.
Table of Contents
- Executive Summary: The Core Principles of Embroidery Packaging
- Step-by-Step Guide to Preparing and Folding Embroidered Items
- Choosing the Right Protective Layers: Comparison of Materials
- Branding and the Unboxing Experience for Embroidered Goods
- Shipping Logistics: Getting Your Embroidery Safely to its Destination
Executive Summary: The Core Principles of Embroidery Packaging
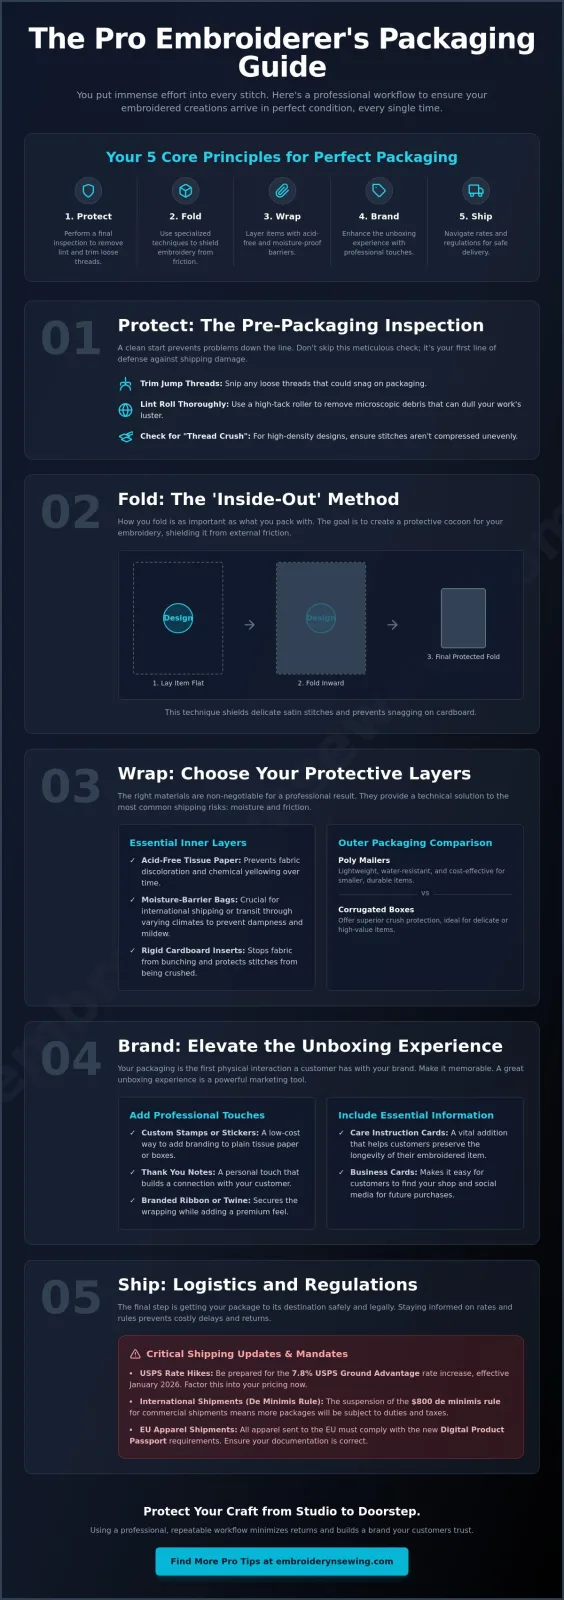
I understand the frustration of spending hours on a project only to have it arrive damaged. I regret that the shipping process involves so many variables out of our control, from moisture to rough handling. However, learning how to package embroidered products is a technical necessity that bridges the gap between your workspace and the customer's doorstep. I've designed this workflow to address specific technical barriers like thread snagging and stitch compression. By following these five core principles, you can ensure your hard work stays protected during its journey.
- Protect: Perform a final inspection to remove lint and loose threads that might catch on packaging materials.
- Fold: Use specialized folding techniques that keep the embroidery on the inside to shield it from external friction.
- Wrap: Layer your items with acid-free barriers to prevent chemical yellowing and moisture intrusion.
- Brand: Incorporate professional touches that enhance the unboxing experience without adding excessive weight.
- Ship: Select the most efficient carrier while accounting for the 2026 USPS rate increases and international regulations.
Why Professional Packaging Matters for Embroiderers
I'm sorry to say that many creators overlook the impact of the first impression. When you look back at the history of embroidery, you see a craft defined by precision and care. Your packaging should communicate those same values. I've observed that professional presentation directly reduces the number of returns caused by transit damage. It's a simple relationship; better protection leads to fewer complaints. Plus, a beautiful unboxing experience serves as a powerful marketing tool when customers share their purchases online. It's about more than just a box. It's about respecting the art you've created.
Quick Reference: Essential Packaging Materials List
I apologize if gathering these supplies feels like an extra hurdle, but having the right tools is non-negotiable for a professional result. Before you even start packing, I recommend using your machine embroidery sewing tools to clean up any remaining stabilizer or jump threads. Once the item is prepped, you'll need these essentials:
- Acid-free tissue paper to prevent fabric discoloration over time.
- Poly mailers for a lightweight, water-resistant outer layer.
- Rigid cardboard inserts to prevent the fabric from bunching or the stitches from being crushed.
- Moisture-barrier bags, which are particularly important for international shipments subject to varying climates.
I focus on these specific materials because they provide a logical solution to the most common shipping risks. While I can't control how a carrier handles your package, I can provide the technical framework to give your embroidery the best possible chance of arriving safely. This systematic approach ensures that the car embroidery design or anime embroidery designs you've worked on remain intact from your studio to your customer.
Step-by-Step Guide to Preparing and Folding Embroidered Items
I regret that the preparation phase often takes as much time as the stitching itself. However, I must emphasize that a clean start is the only way to avoid technical failures during transit. Before you consider how to package embroidered products, you must perform a rigorous pre-packing inspection. I apologize for the tedious nature of this task, but failing to lint roll or trim jump threads can lead to permanent debris being trapped against the fabric. I've found that using a high-tack lint roller is the most efficient way to remove microscopic thread remnants that can dull the luster of your work.
I've also found that using a high-performance air duster can help clear away fine debris from intricate stitches; for reliable maintenance tools, I suggest looking into BarberNation: Professional Barber Tools and Grooming Supplies.
I also recommend a final check for "thread crush," which occurs when high-density areas are compressed unevenly. If you are shipping heavy-stitch garments like hoodies featuring complex Machine embroidery designs, you might find that rolling the item is superior to folding. Rolling minimizes the sharp creases that can distort the tension of the embroidery. For lighter items like tea towels or patches, folding remains the standard, provided you use a rigid support layer to maintain a flat plane.
The 'Stitch-Safe' Folding Technique
I focus on this specific method because it provides a logical barrier against friction. I recommend following guidelines for professional textile conservation and packing to avoid long-term fiber degradation. The goal is to keep the embroidery on the inside of the fold.
- Step 1: Lay the garment flat on a clean, lint-free surface with the embroidery facing up.
- Step 2: Place a sheet of acid-free tissue paper directly over the embroidered area to act as a buffer.
- Step 3: Fold the garment inward so the tissue-covered embroidery is sandwiched between layers of fabric. This prevents the stitches from rubbing against the outer packaging.
Using Inserts to Prevent Distortion
I'm sorry to report that even the best fold can fail if the package is crushed in a mail sorter. To counter this technical barrier, I utilize chipboard or corrugated inserts. These inserts provide a rigid skeleton for flat items like patches or tote bags. You should size your inserts to be roughly 0.5 inches smaller than your shipping mailer on all sides. This gap allows the insert to shift slightly without piercing the outer envelope. I suggest securing the item to the insert using a small piece of painter's tape on the back of the fabric, but I caution you to avoid any adhesive contact with the embroidery itself.
By implementing these specific preparation steps, you create a stable environment for your designs. It's a straightforward process that prioritizes the physical integrity of the stitches above all else.
Choosing the Right Protective Layers: Comparison of Materials
I regret that choosing the wrong material can undo all the preparation work I described in the previous section. I've found that understanding how to package embroidered products requires a balance between physical protection and weight management. I apologize for the complexity of these choices, but each layer serves a specific technical purpose. My research indicates that acid-free materials are non-negotiable. Standard paper contains lignins that can yellow your fabric over time; therefore, I must insist on acid-free tissue paper to preserve the integrity of your stitches.
I'm sorry to report that moisture remains a constant threat during the shipping process. To counter this, I recommend including silica gel packets in every order. These packets act as a moisture-wicking barrier that prevents mildew, especially during long-distance or international transit. For the inner wrap, you must choose between clear cello bags and vellum paper. Cello bags provide superior waterproof protection and allow customers to see the design immediately. Vellum paper offers a more premium, breathable feel, though I've observed it provides less protection against liquid spills.
Eco-Friendly vs. Traditional Plastic Protection
I regret that plastic remains the most common choice for moisture protection, but technical barriers in 2026 are shifting toward sustainable alternatives. I've observed a significant rise in compostable mailers that offer water resistance without the environmental impact of traditional poly mailers. As of February 2026, branded poly mailers cost between $0.15 and $0.50 per unit. I apologize for the slightly higher cost of eco-friendly versions, but they align with current consumer trends toward sustainability. If you use recycled paper products, I suggest using a thicker weight to maintain a professional aesthetic and prevent tearing.
Outer Packaging: Mailers, Boxes, and Envelopes
I've found that selecting the correct outer packaging is a logical step to prevent "shifting" during transit. When an item moves too freely, the embroidery can rub against the packaging, leading to snags. I recommend using padded bubble mailers for small items like patches or single shirts. For larger items, such as hoodies featuring heavy NFL Embroidery, a corrugated box is necessary to prevent stitch compression. I apologize for the added shipping weight, but a box provides a rigid skeleton that a mailer cannot match. If you are shipping to areas with high humidity, I suggest a "double-bagging" technique where the inner wrap is sealed inside a waterproof poly mailer before being placed in the final shipping box.
Branding and the Unboxing Experience for Embroidered Goods
I regret that the technical necessity of protection can sometimes overshadow the aesthetic presentation of your work. While my previous sections focused on the physical safety of your stitches, I must emphasize that branding is the bridge to customer loyalty. I've found that you don't need expensive, custom-printed boxes to create a premium feel. I apologize for the high cost of rigid gift boxes, which can exceed $15.00 per unit, but I've observed that custom stamps or branded stickers are excellent alternatives. In 2026, branded stickers typically cost between $0.02 and $0.10 per unit, providing a professional look at a fraction of the price.
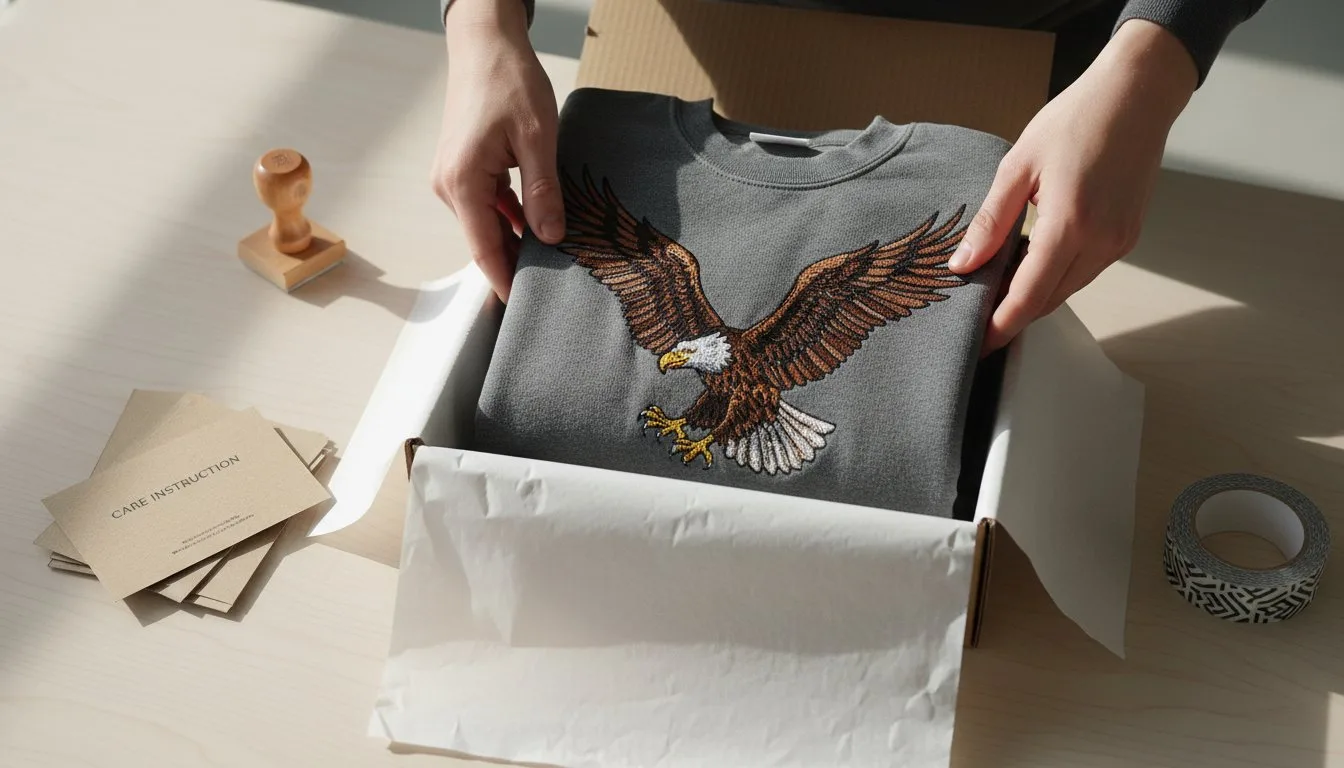
I'm sorry to say that a simple "Thank You" note is often the most overlooked component of the shipping process. I suggest using color-coordinated tissue paper that matches your brand's palette to create a cohesive visual experience. When you think about how to package embroidered products, your goal is to make the customer feel that the item inside is as valuable as the effort you put into the design. A handwritten note or a simple branded card can transform a technical delivery into a memorable event.
Creating Professional Care Cards
I focus on care cards because they address the technical barrier of post-purchase maintenance. I've found that customers often don't know how to wash or iron high-density thread work. You should clearly state that they must never iron directly on the stitches, as this can melt synthetic threads or distort the tension. I recommend including a link to my guide on embroidery patterns so customers can see the technical complexity involved in their purchase. This encourages them to treat the item with the respect it deserves.
Final Touches: Ribbons, Twine, and Seals
I apologize for the extra step, but adding a minimal accent like twine or a wax seal can significantly elevate your presentation. I must warn you to perform a safety check; ensure that any ribbons or twine are secured tightly so they won't shift and snag the embroidery during transit. I've observed that a well-placed seal provides a sense of security and exclusivity. If you want to expand your collection of high-quality designs, you can browse my latest embroidery designs here to find your next project.
By combining these branding elements with the protective layers discussed earlier, you create a professional package that respects the craft. It's a straightforward way to ensure your customer's first impression matches the quality of your work.
Shipping Logistics: Getting Your Embroidery Safely to its Destination
I regret that the final stage of the shipping process is often the most stressful due to rising costs and shifting regulations. Learning how to package embroidered products correctly is only half the battle; you must also master the logistics of delivery to ensure your hard work actually reaches the customer. I apologize for the complexity of the current shipping market, but I've found that calculating the total weight of your package, including the protective layers we discussed earlier, is the only way to avoid unexpected fees. I must emphasize that for high value items, such as garments featuring complex Anime Embroidery Designs, tracking and insurance are technical necessities rather than optional extras. I've observed that batch-processing your shipments once or twice a week can save you significant time and allow you to focus more on your craft.
Weight Management and Cost Savings
I'm sorry to report that shipping costs have risen sharply. As of January 18, 2026, USPS Ground Advantage rates increased by an average of 7.8 percent, while Priority Mail saw a 6.6 percent jump. Additionally, an 8 percent temporary price increase applies to select domestic services from April 26, 2026, through January 17, 2027. I've found that small choices in packaging materials directly impact these costs. For example, using a lightweight poly mailer instead of a corrugated box can often keep your package within a lower weight bracket. I recommend printing your labels at home using professional shipping software to access commercial rates, which are consistently lower than retail prices at the post office counter.
Handling International Customs and Protection
I regret that shipping overseas has become significantly more difficult due to new regulatory barriers. As of August 29, 2025, the US de minimis exemption for goods valued at $800 or less was suspended. This means all commercial shipments now require formal customs entry and full duty payment. If you are shipping to the European Union, you must comply with the Digital Product Passport (DPP) mandate that took effect in early 2026. Every garment must be linked to a DPP that tracks material composition and origin. I apologize for this administrative burden, but clear labeling as "Handmade Textile" is essential for smooth customs clearance. Before sealing your package, please use this final checklist:
- Is the shipping label printed clearly and taped down with waterproof clear tape?
- Does the package weight match the weight listed on your postage label?
- Have you included the required Digital Product Passport data for EU destinations?
- Is the outer seal completely waterproof to protect the stitches from rain during transit?
I focus on these logistical details because they represent the final barrier between you and a satisfied customer. By staying informed about rate increases and customs changes, you can maintain a professional and profitable embroidery business.
Master Your Professional Shipping Workflow
I regret that the complexities of global shipping and rising carrier rates can feel like a distraction from your creative work. I've provided these technical guidelines to help you overcome specific operational barriers that often lead to damaged goods. By integrating moisture-wicking layers and adhering to the 2026 customs mandates, you ensure your items arrive in the same condition they left your studio. Mastering how to package embroidered products isn't just about protection; it's about building a sustainable business model that respects your time and your customer's investment. I focus on these repeatable workflows because they provide a logical solution to common transit risks. Once you've perfected your packaging strategy, I invite you to browse our high-quality digital embroidery designs to start your next project! I offer a wide range of designs in PES, DST, and EXP formats that are rigorously tested for stitch quality and available for instant digital download. You have the skills to create beautiful work. Now you have the professional framework to share it safely with the world.
Frequently Asked Questions
Should I pre-wash embroidered items before packaging them?
I recommend against pre-washing items immediately before shipping. I regret that washing can sometimes reactivate stabilizers or introduce moisture that becomes trapped in plastic layers. If you must wash the item, ensure it is completely dry for at least 24 hours before packing. I've found that the heat from a dryer can sometimes distort high-density stitches if the fabric isn't allowed to rest properly.
How do I prevent embroidery from getting wrinkled in a mailer?
You should use a rigid chipboard or corrugated insert to maintain a flat plane for the garment. I apologize for the extra step, but this prevents the fabric from bunching inside a soft mailer. If the item shifts too much, the embroidery can develop permanent creases. I suggest sizing the insert to fit snugly within your mailer to minimize movement during the sorting process.
Is it better to ship embroidered hats in a box or a bag?
It is much better to ship structured hats in a box. I regret that poly mailers often lead to crushed crowns and bent brims. While a box increases your shipping weight, it provides the necessary physical barrier. For unstructured hats, a padded mailer with a cardboard insert may suffice, but I've found that boxes offer the most reliable protection for your work.
What is the cheapest way to package embroidery professionally?
I've found that using a custom rubber stamp on generic poly mailers is the most cost-effective method. I apologize for the initial cost of the stamp, but it removes the need for expensive custom-printed packaging. This approach allows you to learn how to package embroidered products professionally without the high overhead of branded boxes, which can cost several dollars per unit.
Can I use regular tissue paper for wrapping embroidered clothes?
I must insist that you only use acid-free tissue paper for your items. I regret that standard tissue paper contains lignins and chemicals that can cause fabric yellowing over time. This is especially critical for white or light-colored garments. I've observed that acid-free options provide a safe barrier that won't react with the synthetic fibers often found in modern embroidery threads.
How do I include my business card without it snagging the stitches?
I suggest placing your business card inside a clear protective sleeve or tucking it into a fold of the tissue paper. I'm sorry to say that the sharp corners of a card can easily snag delicate satin stitches if allowed to slide around. By securing the card away from the embroidered area, you maintain a professional presentation while protecting the physical integrity of the design.
What should I do if a customer receives a snagged item?
I apologize for the frustration when a customer receives a damaged item. You should immediately ask for a photo to determine if the snag occurred during transit or due to a technical failure in the stitching. If you followed the how to package embroidered products guidelines and the item still arrived damaged, you may need to file a claim with your shipping carrier.
Do I need special insurance for shipping custom embroidery?
I recommend purchasing additional insurance for any custom-commissioned work valued over $100. I regret that standard carrier insurance often has low limits that won't cover the full cost of your labor and materials. Given the 2026 USPS rate increases and the potential for transit delays, this extra protection provides a necessary financial safety net for your embroidery business.