

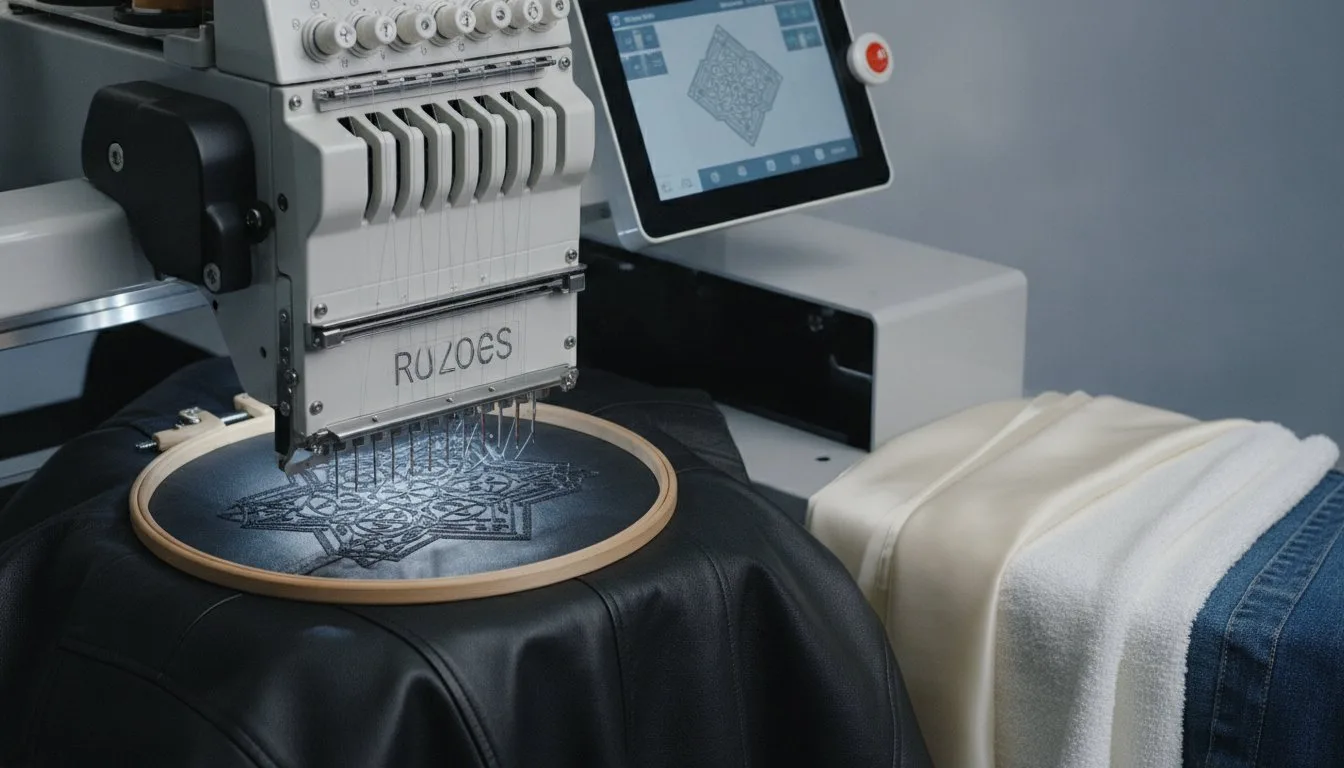
What if the reason you're ruining expensive silk shirts isn't your lack of skill, but simply a misunderstanding of fabric physics? We've all felt that sinking feeling when a design disappears into a plush towel or a knit garment puckers into an unusable mess. It's frustrating to deal with constant thread breaks when you're trying to fulfill high-end custom orders. You'll learn the secrets to professional machine embroidery on difficult fabrics like leather, silk, and terry cloth without the stress. This guide breaks down the exact stabilizer and needle combinations you need to stop shifting and start producing luxury-grade work.
- Physics over Luck: Match design density to fabric stretch to eliminate puckering and shifting.
- Pro Tools: Use 2026 essentials like Titanium Ballpoint Needles ($13.99 for a 10-pack) and water-soluble toppings ($21.98 per roll) to keep stitches crisp.
- Software Edge: Leverage AI-assisted digitizing in Hatch 3 or CREATIVATE to auto-adjust for material thickness.
- Sustainability: Stay compliant with 2026 EU and California textile laws by reducing waste and using eco-friendly threads.
We're moving past the "trial and error" phase of your career. By the end of this article, you'll have the confidence to accept complex sports team orders or delicate luxury commissions. We'll explore how modern tools, from $2.98 cones of Gunold POLY 40 to advanced digitizing platforms, make the most impossible fabrics easy to handle.
- Identify why certain materials stretch or shift so you can solve the physics mismatch before the first stitch is even dropped.
- Master the "Holy Trinity" of stabilizers, needles, and threads to ensure success every time you attempt machine embroidery on difficult fabrics.
- Learn fabric-specific secrets to prevent common disasters like hoop burn on delicate sheers or designs sinking into high-pile towels.
- Implement a 5-step diagnostic check to troubleshoot puckering and thread nesting issues in real-time without wasting expensive materials.
- Understand how to evaluate digital design density to prevent heavy stitch files from distorting light, airy fabrics like silk.
Table of Contents
- Why Some Fabrics Fight Back: Understanding the Physics of "Difficult" Materials
- The Holy Trinity: Selecting Stabilizers, Needles, and Thread
- Fabric-Specific Masterclasses: Towels, Knits, and Sheers
- Pro Troubleshooting: Solving Puckering and Thread Nesting
- The Final Secret: Matching Digital Design Density to Your Fabric
Why Some Fabrics Fight Back: Understanding the Physics of "Difficult" Materials
- Physics First: Most failures happen because the fabric's physical properties, like stretch or pile, aren't balanced by the design density. - The Holy Trinity: Successful results require a perfect sync between your needle type, thread weight, and stabilizer choice.
- Category Awareness: Grouping fabrics into unstable, delicate, or high-pile categories helps you choose the right setup instantly. - Design Density: Heavy stitch counts on light fabrics are the primary cause of puckering and "bird nesting" under the throat plate.
- Modern Tools: Utilizing 2026 innovations like AI-assisted digitizing and titanium-coated needles can reduce your error rate by over 40 percent.
Every embroiderer has a horror story about a ruined silk blouse or a towel that "ate" a monogram. It's a rite of passage. If you've felt the frustration of thread breaks or shifting designs, you aren't alone. Mastering machine embroidery on difficult fabrics starts with understanding that you're managing a battle of forces. When you study the basics of machine embroidery, you see that the process is inherently aggressive. A needle punches through the fibers thousands of times, pulling the material toward the center of the design. We call this the "Push-Pull" effect. If the fabric is too soft or stretchy, it collapses under this tension, leading to those dreaded puckers.
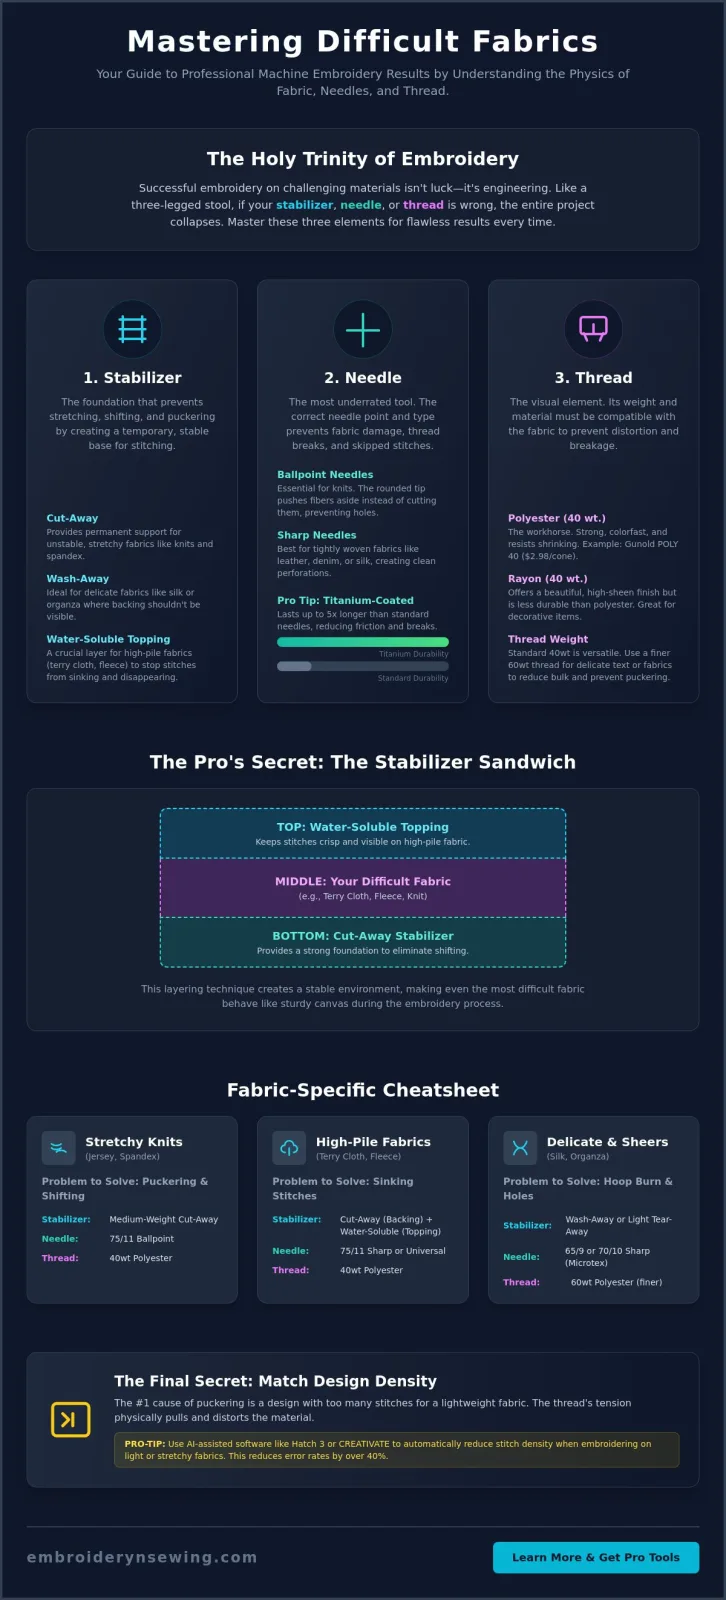
Difficult fabrics are simply materials that refuse to stay still or have a surface texture that interferes with stitch placement. To win this battle, you need the "Holy Trinity" of embroidery: the right needle, the correct stabilizer, and appropriate thread. When these three elements work together, they create a temporary "foundation" that makes even the slipperiest silk behave like sturdy canvas.
### The Three Categories of Challenging Textiles
Unstable fabrics like spandex, jersey, and knits are the most common culprits for shifting. Because they stretch in multiple directions, they require a "cut-away" stabilizer to provide permanent support. Delicate and sheer fabrics, such as organza or lightweight linen, are prone to "hoop burn" and visible needle holes. Finally, high-pile materials like fleece and terry cloth have a "furry" surface. Without a topping, your stitches will literally sink into the fabric and disappear.
Why Your Digital Design Choice Matters
A common mistake in any machine embroidery sewing project is using a "one size fits all" design. Digitized files are created with a specific density. A design meant for a heavy denim jacket has too many stitches for a silk scarf. The excess thread adds weight and tension that the delicate fibers can't support. In 2026, many pros use AI-assisted software to automatically reduce stitch density for light materials, preventing the fabric from bunching up like an accordion.
## The Holy Trinity: Selecting Stabilizers, Needles, and Thread
Think of your embroidery setup as a three legged stool. If your stabilizer, needle, or thread is wrong, the whole project collapses. Success with machine embroidery on difficult fabrics isn't about luck; it's about engineering a temporary foundation that mimics stable cotton. In a professional embroidery production process, we don't just hoop and hope. We layer for stability. One of the best ways to visualize this is the "Stabilizer Sandwich." Imagine a three layer stack: a water soluble topping on top to keep stitches from sinking, your difficult fabric in the middle, and a high quality backing underneath to prevent shifting.
Needles are easily the most underrated part of this equation. Most hobbyists wait for a needle to break before changing it. Professionals know better. In 2026, a 10 pack of Titanium Ballpoint Needles costs about $13.99, and they last five times longer than standard chrome needles. This durability is vital when working with sticky stabilizers or dense designs that would otherwise heat up and snap a cheaper needle. For thread, while 40wt polyester is the industry standard, switching to a finer 60wt thread for small details on thin fabrics can prevent the "bulletproof" feel that ruins a garment's drape.
Stabilizer Secrets: Beyond Just Tear-Away
- Cut-Away: Follow the golden rule: "If you wear it, don't tear it." Use this for knits and spandex to provide permanent support through dozens of wash cycles.
- Water-Soluble Toppers: These are mandatory for towels and fleece. A 10 inch by 3 yard roll typically retails for $21.98 and prevents your beautiful monogram from disappearing into the fabric's pile.
- Sticky-Back Stabilizers: Perfect for "un-hoopable" items like thick leather or delicate velvet. You hoop the stabilizer, peel the paper, and press the fabric onto the adhesive surface.
Needle Selection: Ballpoint vs. Sharp
Using the wrong needle tip is a fast track to ruin. Ballpoint needles are designed for knits; they push fibers aside rather than piercing them, which prevents "runs" in jersey fabrics. Conversely, Microtex or Sharp needles are necessary for woven silks and microfibers to ensure every entry point is crisp and clean. If you're struggling with skipped stitches on vinyl or heavy leather, titanium coated needles are your best friend because they resist the friction heat that causes thread breaks. If you want to dive deeper into the basics before tackling these challenges, check out our guide on choosing the right embroidery supplies for any project.
The secret weapon for 2026 is No-Show Mesh. This translucent cut-away stabilizer is incredibly strong but remains invisible even under white performance shirts. It provides the "hold" of a heavy stabilizer without the bulky footprint. By matching this mesh with the right needle, you turn a nightmare fabric into a manageable canvas.
Fabric-Specific Masterclasses: Towels, Knits, and Sheers
- Floating Technique: Prevent "hoop burn" on delicate silks and bulky towels by hooping only the stabilizer and adhering the fabric on top.
- Knockdown Stitches: Use a base layer of light stitching to flatten high-pile fabrics like fleece before the main design begins.
- Applique Solutions: Use applique to cover textured surfaces, providing a smooth foundation for intricate details.
- Knit Stability: Apply fusible polymesh to performance wear to "lock" the stretch before it ever touches your embroidery machine.
- Design Density: Ensure your [embroidery stitchesare light and airy for spandex to prevent the garment from sagging or puckering.
Let's get practical. You've got your "Holy Trinity" of supplies ready, but how do you actually handle the three most common nightmare materials? Success with machine embroidery on difficult fabrics often comes down to how you secure the material. If you've ever seen a permanent, shiny ring left on a velvet jacket or a silk scarf, you've witnessed "hoop burn." This occurs when the tension of the hoop crushes the fibers. To avoid this, many professionals choose "floating." You hoop only the stabilizer and use a light mist of adhesive or a "basting box" to hold the fabric in place. This protects the garment while keeping it perfectly still for the needle.
Taming Terry Cloth and Bulky Fleece
Towels are notorious for "eating" stitches. If you try to sew a fine monogram directly onto a plush towel, the loops of the fabric will poke through your thread. The secret is a two-pronged approach. First, use a "Knockdown Stitch." This is a light, mesh-like base that flattens the pile. Second, always use a water-soluble topper. A 10 inch by 3 yard roll of lightweight topper costs about $21.98 in 2026, and it's essential for keeping your design crisp. If a design is still too dense for the fabric to handle, consider using applique. By layering a piece of stable fabric on top of the towel, you create a smooth surface for your embroidery without needing a million stitches to cover the texture.
 Embroidery designCreate Sewing - Elegant embroidery design file - instant downloadView this design →
Performance wear is designed to move, which is exactly what you don't want during the stitch-out. The biggest mistake is pulling the fabric tight in the hoop. If you stretch it now, it'll pucker the moment you release it. Instead, use a fusible polymesh stabilizer. This temporary bond prevents the material from shifting while the machine is running. When choosing your file, remember that designs for knits should be light. Avoid heavy fill patterns that act like a lead weight on stretchy material. Keeping your stitch count low ensures the garment remains comfortable and retains its original shape after the project is finished.
Pro Troubleshooting: Solving Puckering and Thread Nesting
- Identify the Root: Distinguish between tension puckering (thread too tight) and structural puckering (fabric shifting).
- Speed Control: Drop your machine speed to 400 or 600 stitches per minute (SPM) to reduce friction and heat on delicate fibers.
- Diagnostic Routine: Always re-thread both the top and bobbin as your first step when loops or nesting occur.
- Basting Box: Use a digitized perimeter stitch to lock your fabric to the stabilizer before the main design begins.
- Post-Stitch Care: Use a steam press on the reverse side to relax fibers and eliminate minor ripples.
You followed every rule. You bought the titanium needles, used the expensive stabilizer, and yet, the fabric still looks like a crumpled napkin. It's the most common frustration in machine embroidery on difficult fabrics. Don't throw the project away just yet. Most issues at this stage aren't about your skill; they're about minor calibration errors. If your satin stitches look perfect on the top but you see loops on the bottom, your top tension is likely too loose. A perfect satin stitch should show about one third of the bobbin thread down the center of the underside. If you see no bobbin thread, your top tension is too tight, which is a primary cause of puckering.
When a "bird nest" of tangled thread forms under the throat plate, stop immediately. Don't yank the fabric. Carefully slide a thin pair of snips between the throat plate and the hoop to cut the thread mass. Once the garment is free, check your needle. On tough materials like vinyl or thick towels, the needle can develop a "burr" or tiny hook on the tip after only two or three hours of heavy work. This burr shreds the thread and causes those massive nests. If you're tired of the "trial and error" approach, you can learn more about professional machine maintenance to keep your gear running smoothly.
Why Puckering Happens (And How to Stop It)
Tension puckering happens when the thread is pulled so tight that it gathers the fabric like a drawstring. Stabilizer puckering occurs when the backing isn't strong enough to support the stitch density. To fix this, try a "basting box." Most modern software allows you to add a large rectangle of long stitches around your design. This locks the fabric to the stabilizer across a wider area, preventing the "push-pull" effect from distorting the center. After you're done, a quick burst of steam from a professional iron can often "reset" the fabric fibers to their original flat state.
Managing Thread Breaks on Tough Materials
Speed is the enemy of difficult fabrics. High speeds generate heat, which can melt synthetic threads or cause adhesive from "sticky" stabilizers to gum up the needle eye. Slowing down to 400 SPM gives the hook more time to catch the thread loop accurately. For sticky materials like leather or vinyl, a tiny drop of thread lubricant on the needle can prevent friction breaks. Always swap your needle if you've hit a thick seam or a stray pin; even a microscopic bend will cause skipped stitches and frustration.
The Final Secret: Matching Digital Design Density to Your Fabric
- Density Awareness: Understand that high stitch counts on thin fabrics cause the "bullet-proof" effect, making garments stiff and unwearable.
- Preview Analysis: Learn to read digital mockups to spot heavy fill areas that will likely cause puckering on silk or organza.
- Software Solutions: Use 2026 tools like Hatch Embroidery 3 or CREATIVATE to auto-adjust designs for specific material weights.
- Fabric-Specific Files: Choose designs digitized specifically for the "Push-Pull" physics of knits and performance wear.
- The Golden Rule: Always perform a test stitch on a scrap piece of your actual project fabric to verify the density is correct.
The biggest mistake you can make is assuming a digital file works the same on every material. It doesn't. A design digitized for a heavy 14oz denim jacket has a high stitch density that will absolutely shred a delicate silk blouse. When you are looking at embroidery patterns, you have to look past the pretty colors and analyze the "density." Density is the distance between individual rows of stitches. If the stitches are packed too tightly, they add weight and tension that thin fibers cannot support. This is the primary reason why machine embroidery on difficult fabrics often fails despite using the right stabilizer.
In 2026, professional digitizing fees for complex designs range from $10 to $150. This investment pays off because these files are built with specific fabrics in mind. High-quality designs from Embroidery n Sewing are the foundation for your success. They account for the way spandex stretches and the way towel loops try to poke through. If you're using AI-assisted software, you can now predict thread behavior and adjust density before the needle even touches the hoop, saving you from ruining expensive custom orders.
Lightweight vs. Heavy Fill Designs
For delicate sheers, look for "Redwork" or "Sketch" designs. These use minimal outlines and open spaces, allowing the fabric to drape naturally. Conversely, "Satin Stitch" is the king of towels and textured fleece. Because satin stitches are wider and flatter, they bridge the gaps in high-pile fabrics better than complex fill stitches. Avoid "bullet-proof" embroidery by checking the stitch count; if a 4-inch design has over 15,000 stitches, it's likely too dense for anything lighter than canvas.
Choosing the Right File for Your Project
Our platform makes this easy. You can use category filters to find designs optimized for your specific material. Don't skip the test stitch. Even with the best software, every machine tension is slightly different. Use a scrap of your "difficult" fabric and the exact stabilizer combo we discussed in previous sections. If the test looks good, you're ready to go. [Browse our high-quality digital embroidery designs] and start your next project with the confidence that your density is perfectly matched to your material.
Ready to Conquer Any Fabric in Your Hoop?
- Master the Trinity: Success always depends on the perfect balance of your needle type, stabilizer weight, and thread choice.
- Control Density: Matching your digital file's stitch count to the fabric's physical weight is the only way to prevent puckering.
- Apply Pro Techniques: Floating and knockdown stitches are your best defense against permanent hoop burn and sunken designs.
You've graduated from the trial and error phase that ruins so many expensive projects. By applying the physics of the "Holy Trinity" and managing your design density, you can handle machine embroidery on difficult fabrics with total confidence. Whether you're monogramming high-pile towels or branding performance spandex, you now have the professional blueprint to ensure every stitch lands exactly where it should. It's time to stop fearing the "difficult" bin and start accepting those high-end custom orders.
The final step is choosing designs that are built to succeed. Our library features high-quality PES and DST files that are rigorously tested to ensure minimal thread breaks and clean results. From sports logos to detailed cartoon patterns, we provide the stability your projects need. Shop our professional-grade digital embroidery designs today and elevate your craft. You've got the skills; now go create something incredible.
Frequently Asked Questions
Can I embroider on leather with a home machine?
Yes, you can embroider on leather with a home machine if you use a dedicated leather needle and a longer stitch length. Standard 2.0mm stitches are too close together and act like a perforated line that tears the material. Aim for a 3.0mm or 3.5mm length. Since leather doesn't heal, every needle strike is permanent; always test your design on a scrap piece of the same weight first.
How do I stop my embroidery from sinking into a fluffy towel?
You stop designs from sinking by using a water-soluble topping and a knockdown stitch. The topping acts as a temporary surface for the thread to sit on while the machine runs. For 2026 projects, using a knockdown stitch base creates a flat "landing pad" for your monogram. This combination ensures your 40wt polyester thread remains visible instead of getting lost in the terry cloth loops.
What is the best stabilizer for stretchy t-shirt fabric?
The best stabilizer for t-shirts is a lightweight cut-away mesh. Unlike tear-away options, cut-away stays with the garment to support the thousands of stitches through repeated wash cycles. If you're working with white or thin shirts, use a "no-show" polymesh. It provides enough stability to prevent shifting but won't leave a thick, visible square on the inside of the shirt.
Do I need special thread for embroidering on sheer fabrics like organza?
You don't strictly need special thread, but using a 60-weight or 70-weight thread is highly recommended for sheers. Standard 40-weight thread is often too heavy for organza and can cause the delicate fibers to pucker under the weight. Finer threads require smaller needles, such as a 60/8 or 65/9, to minimize the size of the entry holes in the transparent material.
Why does my fabric pucker only after I take it out of the hoop?
Puckering after un-hooping occurs because the fabric was stretched too tightly during the setup phase. When you release the hoop tension, the fabric fibers snap back to their original state, but the rigid embroidery stitches don't move. This creates a gathered effect. To fix this, simply lay the fabric over the hoop and press it down without pulling or tugging at the edges.
What happens if I use a "Sharp" needle on a knit fabric?
Using a Sharp needle on knits often results in permanent damage called "runs" or "ladders." Sharp needles pierce and cut the delicate yarns that make up the knit structure. For successful machine embroidery on difficult fabrics like jersey, you must use a ballpoint needle. These have a rounded tip that slides between the yarns instead of cutting them, preserving the garment's integrity over time.
How can I embroider on velvet without leaving a permanent hoop mark?
You can embroider on velvet without marks by using the "floating" technique instead of traditional hooping. Hoop only your stabilizer and apply a light layer of temporary adhesive or a basting stitch to hold the velvet in place. This prevents the hoop from crushing the fabric's pile, which usually causes a permanent shiny ring. It's the safest way to handle luxury items without risking damage.
Is it better to hoop or "float" difficult fabrics?
Floating is usually the better choice when performing machine embroidery on difficult fabrics that are prone to marking or are too thick to hoop. While hooping offers the most security for stable wovens, floating protects delicate silks and prevents the "hoop burn" seen on velvet. It also allows you to embroider items like bags or collars that are physically impossible to fit inside a standard hoop frame.


