- Fabric-First Selection: Matching stitch files to garment weave to stop puckering on stretchy knits. - Format Compatibility: Choosing .DST, .PES, or .EXP files for error-free machine runs. - Stabilizer Selection: Picking backings that keep logos crisp through 50 or more washes. - 2026 Trends: Achieving the heirloom look that 140% more parents now crave for school uniforms.
Why does a premium school polo often end up looking like a wrinkled mess after just one trip through the laundry? It's frustrating when you've invested in school uniform logo embroidery files only to see the fabric pucker or the design develop gaps after a few washes. You want those crests to look sharp for the entire year, especially with the 140% increase in demand for heirloom-quality clothing heading into the Fall 2026 season. When you consider that digitizing fees usually run between $40 and $100 per logo, you really want to get that file right the first time. We're going to fix those common embroidery headaches together. You'll learn how to select the right digital designs and stabilization techniques to ensure your logos stay crisp through weekly bleaching. This guide provides a clear path to achieving professional results, from file compatibility to stitch density.
- Match your machine's language by choosing the correct .PES, .DST, or .JEF format for a seamless, error-free stitch out every time.
- Protect the integrity of your design by following the 10% resizing rule to avoid thin coverage and unsightly gaps after washing.
- Discover how to pair specific school uniform logo embroidery files with pique or oxford fabrics to eliminate puckering on stretchy polo knits.
- Solve common issues like birdnesting and thread loops by identifying if the fault lies in the digital file or your hooping setup. - Create professional-grade crests that remain crisp and durable even after fifty cycles through a heavy-duty laundry wash.
Table of Contents
- Executive Summary: Getting Started with School Uniform Logos
- Selecting the Right File Format and Size for Uniforms
- Matching Logo Files to Common Uniform Fabrics
- Troubleshooting Common School Logo Issues
- Get Professional Results with Embroidery n Sewing Designs
Executive Summary: Getting Started with School Uniform Logos
Getting your school gear right starts long before you hoop the fabric. It begins at your computer screen. Think of your digital file as the blueprint for your project. If the blueprint is shaky, the house won't stand. When you're working with school uniforms, the stakes are high because these clothes go through a lot of wear and tear. Here is the foundation you need for success:
- Foundation: High-quality digital files are the absolute bedrock of a durable school logo.
- Compatibility: Selecting the correct file format, such as PES for Brother or DST for Tajima, ensures your machine runs without errors.
- Consistency: Standard logo placement is critical for a professional look that matches across the entire student body.
- Materials: Your fabric choice dictates the specific stabilizer and needle type required to prevent puckering.
- Efficiency: Embroidery n Sewing offers professional-grade designs ready for immediate download to save you time.
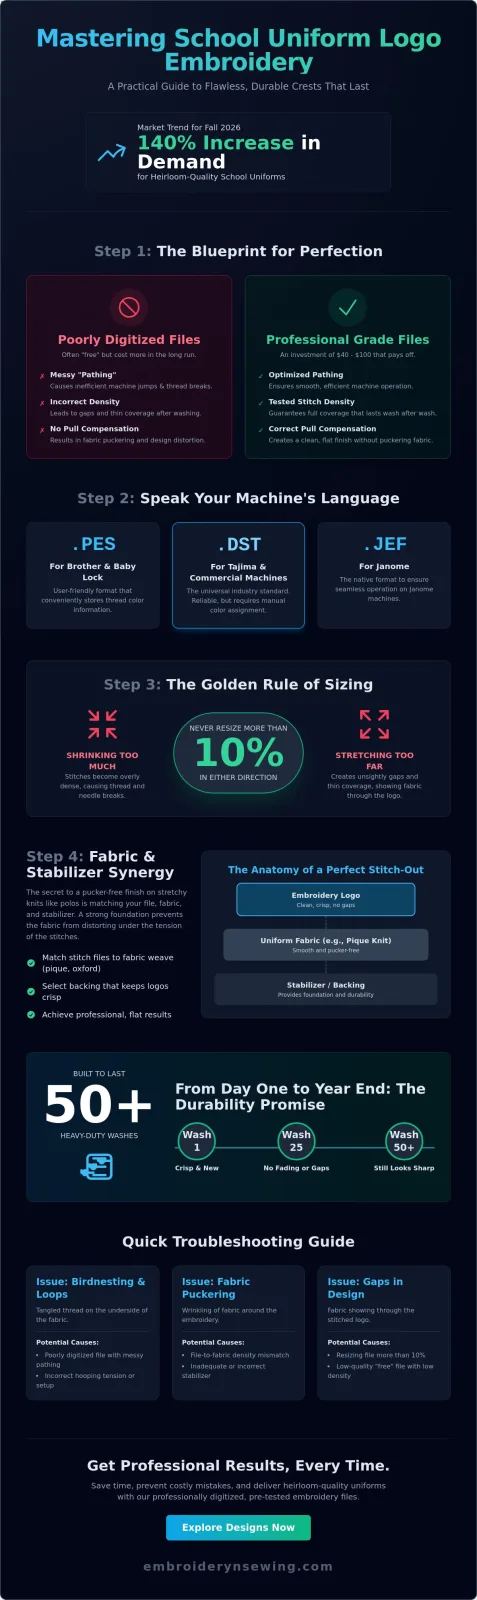
Poorly digitized school uniform logo embroidery files are the main reason for thread breaks and machine downtime. If the "pathing" in a file is messy, the machine jumps around inefficiently. This creates birdnesting on the underside of the shirt and can even damage your needle bar. With the 140% growth in demand for heirloom-quality school clothing seen heading into 2026, parents expect designs that don't just look good on day one, but stay crisp after fifty washes. While "free" files might seem like a bargain, they often lack proper density. This leads to designs that look thin or develop gaps after a few cycles in the laundry. Investing in a solid file prevents you from ruining expensive garments.
The Role of Professional Embroidery Designs
You have two main paths: stock designs or custom logos. For many school projects, high-quality digital embroidery designs that feature classic mascots or crest shapes are the most efficient choice. These files are pre-tested for various fabric types, which takes the guesswork out of your hands. Understanding the computerized machine embroidery process helps you realize why a professional touch is necessary. A pro-grade file manages the pull compensation correctly, meaning the logo won't shrink or distort the fabric as the stitches pull together. At Embroidery n Sewing, our designs are optimized for high-traffic use, ensuring your school uniform logo embroidery files produce a clean, flat finish every time you hit the start button.
Selecting the Right File Format and Size for Uniforms
Picking the right file format is like choosing the correct key for a lock. If the teeth don't match, you aren't getting in. Your embroidery machine is exactly the same way. It needs to "read" the school uniform logo embroidery files you feed it, or you'll end up with error messages instead of beautiful crests. Let's look at how to get this technical part right before you even touch a piece of fabric.
PES vs. DST: Which Should You Download?
If you're working from home, you're likely using a Brother or Baby Lock machine. For these, PES is your go-to format. It's user-friendly and keeps your thread colors mapped out. On the other hand, DST is the universal language for commercial machines like Tajima or Barudan. While DST is incredibly reliable, it doesn't store color data. You'll have to manually tell your machine which needle has the blue thread and which has the gold. If you're using a Janome, you'll want JEF. You can find a deeper breakdown of these embroidery file types to make sure you're downloading the right one for your specific setup.
Standard Sizing for School Logos
You might be tempted to just drag the corner of a design in your software to make it fit a smaller shirt. Don't do it. There's a "Golden Rule" in this industry: never resize a digital file more than 10% in either direction. If you shrink a 4-inch logo down to 2 inches, the stitches become too dense, which can break your needles. If you stretch it too far, you'll get gaps that show the shirt color through the logo. When creating a strong logo for a school, focus on these standard dimensions to keep things professional:
- Left Chest (Adult): 3.0 to 3.5 inches wide.
- Left Chest (Youth): 2.5 to 2.75 inches wide.
- Caps and Hats: No taller than 2.25 inches to avoid hitting the brim.
- Bags and Totes: 4.0 to 5.0 inches for high visibility.
Stitch density also matters. A file optimized for a thick Oxford shirt will have more "pull compensation" than one made for a thin t-shirt. Always check if your school uniform logo embroidery files are specifically digitized for the left chest standard, as this ensures the weight of the stitches won't make the fabric sag. If you want to skip the technical headache, you can find ready-to-stitch machine embroidery designs that are already scaled and tested for these common uniform sizes.
[Insert diagram showing standard logo dimensions for different age groups]
Matching Logo Files to Common Uniform Fabrics
Even the best school uniform logo embroidery files will fail if you don't respect the fabric. Every material behaves differently under the needle. A pique polo stretches, while an Oxford shirt stays rigid. These physical traits change how your digital design translates into real thread. If you use the same settings for a stretchy knit as you do for a stiff woven shirt, you're going to see puckering before the first bell rings.
Pique polos are the most common school garment, but their "bumpy" texture is a nightmare for fine detail. Stitches tend to fall into the tiny pits of the weave, making the edges of a crest look jagged. Oxford shirts present a different challenge. They're thin and woven. If your file has a high stitch count, you risk the "cookie-cutter effect," where the needle punctures the fabric so many times it actually cuts a hole in the shirt. For cardigans and sweaters, the "sinkage" is real; the high-pile yarn swallows up small text, making it unreadable. If you are personalizing high-quality handmade knits like those at himalayanwool.se, ensuring your underlay is sufficient is key to preventing the logo from disappearing. Finally, nylon jackets are slippery and prone to permanent needle holes, so you have to get it right on the first try.
The Secret to Perfect Polo Embroidery
You must use "cut-away" stabilizer for school polos. Don't even think about using "tear-away." Because pique knits are so stretchy, they'll shift during the 3,000 to 7,000 stitches required for a standard crest. Cut-away stays behind to support the design for the life of the garment, preventing that "wavy" look after washing. You should also use a water-soluble topping, which is a thin film that sits on top while you stitch. It keeps the thread elevated above the fabric's bumps until the design is finished. Check our for a deeper look at hooping these tricky knits without leaving "hoop burn" marks.
Embroidering on Heavy School Outerwear
Varsity jackets and hoodies are thick, so you'll need to loosen your top tension slightly to account for the bulk. If it's too tight, you'll see the bobbin thread pulling through to the front. For nylon windbreakers, use a sharp 75/11 needle. A ballpoint needle, which is great for knits, will actually "bruise" the nylon and leave visible marks. When working with school uniform logo embroidery files on heavy gear, always do a test run on a scrap piece of similar weight to ensure your density is high enough to cover the thicker fibers.
Fabric Compatibility Reference Table
- Pique Polo: 75/11 Ballpoint Needle | Cut-away Stabilizer | Water-soluble Topping
- Oxford Shirt: 70/10 Sharp Needle | Light Tear-away Stabilizer | No Topping
- Hoodie: 80/12 Ballpoint Needle | Heavy Cut-away Stabilizer | Optional Topping
- Nylon Jacket: 75/11 Sharp Needle | Sticky Tear-away Stabilizer | No Topping
Troubleshooting Common School Logo Issues
Even with top-tier school uniform logo embroidery files, you might occasionally face a project that looks more like a science experiment gone wrong. Don't panic. Most issues come down to a few specific culprits: tension, hooping, or thread choice. If your machine is birdnesting, which is that ugly tangle of thread underneath the fabric, check your top thread path first. It's almost always a threading error rather than a file glitch. If your alignment is off, a crooked crest will make a $40 polo look like a cheap knockoff. Use a centering tool or a simple ruler to mark the vertical line from the shoulder seam to ensure the logo sits perfectly level.
Preventing the Dreaded Pucker
Puckering is the most common complaint in the uniform world. Is it the file or the hooping? If the file has too many stitches for the fabric weight, it will pull. However, if your fabric isn't properly secured, the needle's movement will drag the material inward. Your fabric needs to be "drum tight" before you start. This means when you tap the fabric inside the hoop, it should sound like a drum and have zero wrinkles. You can master these basics by following our guide on how to embroider. A professional file also uses "underlay" stitches. These are the first few layers of thread that act like a foundation, pinning the fabric to the stabilizer so the top stitches don't shift.
Color Matching and Thread Selection
School uniforms are high-traffic garments. They face hot water and harsh detergents weekly. This is why 40wt polyester thread is the industry standard. Rayon thread is shiny and soft, but it's made from organic cellulose. It will break down or bleach out after about 15 to 20 laundry cycles. Polyester is synthetic and can easily survive 50 or more heavy-duty washes without losing its luster. When you're matching colors, don't just eyeball it. Most schools have specific Pantone or PMS color codes. Use these codes to buy the exact thread match so the "Navy Blue" on the shirt matches the "Navy Blue" on the logo perfectly. If you're tired of troubleshooting and just want files that work every time, browse our machine embroidery designs for pre-tested, high-density options that are ready to stitch.
[Insert a diagram showing the difference between a puckered logo and a flat, stabilized logo]
Get Professional Results with Embroidery n Sewing Designs
You've done the hard work of learning about stabilizers, needle sizes, and fabric textures. Now it's time to put that knowledge into action with the right digital tools. At Embroidery n Sewing, we focus on providing high-quality school uniform logo embroidery files that eliminate the guesswork. You don't have to worry about messy pathing or thin density because every design in our shop has been tested for a smooth stitch-out. Whether you're preparing a single polo for your child or a hundred jerseys for a local team, these files are ready to perform from the first stitch to the last.
One of the biggest hurdles in school embroidery is the wait time. When the school year approaches in August, you need to move fast. Our system provides instant downloads, meaning you can go from purchase to stitching in under five minutes. Every purchase includes a variety of formats like PES, DST, and JEF, so you never have to worry about machine compatibility or file conversion errors. We've built our library to serve both home hobbyists and small business owners who need professional reliability without the high cost of custom digitizing services.
Browse Our Mascot and School Collections
Our curated collection features everything from classic academic crests to high-energy sports mascots. If you're looking for something beyond a standard logo, we offer a wide range of athletic fonts and collegiate-style lettering that works perfectly on varsity jackets. For those looking to expand their creativity, check out our guide on [embroidery patterns] for more inspiration on how to customize school gear. Check out our latest school-ready designs today and see how easy it is to get that professional finish.
Why Choose Embroidery n Sewing?
We understand that a logo is only as good as its digitizing. Poorly made files waste your thread, break your needles, and ruin expensive garments. Our designs are optimized to use the most efficient pathing possible, which reduces jump stitches and saves you time on every garment. We also pride ourselves on being relatable. If you have a question about which file works best for a specific pique knit, we're here to help. With the 140% increase in demand for classic heirloom styles heading into the 2026 season, having a reliable source for your digital designs is more important than ever. Shop our digital embroidery designs now and start your next school project with confidence.
What You Get With Every Download:
- Multiple machine formats (PES, DST, EXP, JEF, VP3, XXX).
- Production sheets with stitch counts and color sequences.
- Optimized density for durable, long-lasting school wear.
- Instant access through your customer account 24/7.
Ready to Stitch Professional School Gear?
You're now equipped with the technical secrets to turn a basic polo into a professional school uniform. Success in this craft starts with picking the correct file format and respecting that strict 10% resizing limit to protect your stitch density. By matching your stabilizer to the specific fabric, such as using cut-away for those tricky stretchy knits, you'll completely avoid the puckering that ruins so many projects. High-quality school uniform logo embroidery files shouldn't be a source of stress or wasted material. When you choose designs that feature professional high-density digitizing and are pre-tested for machine compatibility, you save yourself hours of frustrating troubleshooting. You can get moving on your next project immediately with our instant digital downloads that work with your machine right out of the box. It's time to stop worrying about thread breaks or thin coverage and start creating crests that look sharp through every school assembly. You've got the knowledge and the tools to succeed, so go ahead and Browse Professional School Logo Designs to find your perfect match. Happy stitching!
Frequently Asked Questions
What is the best file format for a Brother embroidery machine?
PES is the absolute best format for any Brother or Baby Lock machine. It's the proprietary language these machines use to understand stitch placement and thread colors. While commercial machines often use DST, those files don't store color data, meaning you'd have to manually assign every thread change. If you're downloading school uniform logo embroidery files for a home machine, always look for the PES option to keep your project simple.
Can I resize a school logo file to fit a smaller shirt?
You shouldn't resize a digital file more than 10% in either direction. If you try to shrink a large adult-sized crest down to fit a toddler's polo, the stitches become too dense and can actually break your needle. When the density is too high, the fabric also becomes stiff and uncomfortable. It's always better to use a file that was specifically digitized for the dimensions you need.
What stabilizer should I use for school polo shirts?
You must use a medium-weight cut-away stabilizer for school polos. Since polo shirts are stretchy knits, they need permanent support to prevent the logo from "waving" or sagging over time. Cut-away stays attached to the back of the design for the life of the garment. This ensures the logo stays crisp and professional through 50 or more heavy-duty laundry cycles.
How do I center a school logo on a button-down shirt?
Standard placement for a left-chest logo is usually 7 to 9 inches down from the shoulder seam. You want the vertical center of the logo to align with the space between the buttons and the side seam. Most pros use a placement ruler to mark this spot consistently. This ensures every student in the class has a logo that sits at exactly the same height.
Why does my embroidery machine keep breaking the thread on school logos?
Thread breaks usually happen because of a dull needle or a tiny burr on the needle's eye. If your school uniform logo embroidery files are high-quality, the issue is almost always mechanical. You should change your needle every 8 hours of active stitching, or roughly every 50,000 stitches. A fresh needle prevents snags and keeps the thread moving smoothly through the fabric layers.
Do I need special needles for embroidering on school sweaters?
Yes, you should use an 80/12 ballpoint needle for sweaters and cardigans. Sharp needles can actually cut the delicate yarn fibers in a knit, which leads to small holes appearing around the logo after a few washes. A ballpoint needle has a rounded tip that slides between the fibers rather than piercing them. This keeps the integrity of the sweater intact while providing a clean stitch-out.
Is polyester or rayon thread better for school uniforms?
Polyester thread is the winner for school uniforms because it's bleach-resistant and incredibly durable. School clothes face high-heat drying and harsh detergents every week. Rayon is made from organic cellulose and will lose its color or even break down after about 20 washes. Polyester is a synthetic fiber that keeps its shine and strength for the entire school year.
Can I use a school logo file on a hat?
You can use a shirt logo on a hat only if it's less than 2.25 inches tall. Most chest logos are 3 to 3.5 inches wide, which is too large to sit flat on the curved surface of a cap. If you try to force a large design onto a hat, you'll end up with massive puckering. If your file is small enough, it will work, but you'll need a specialized hat hoop to keep the fabric from shifting.